|
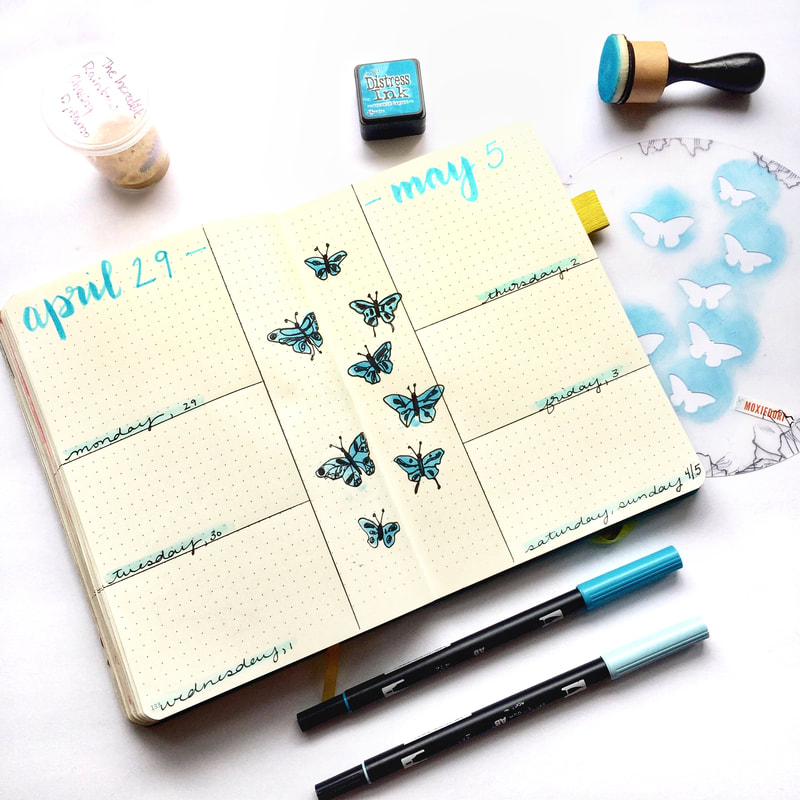
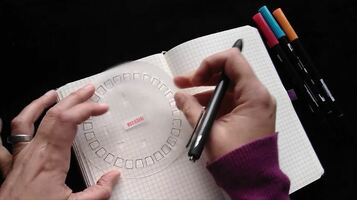
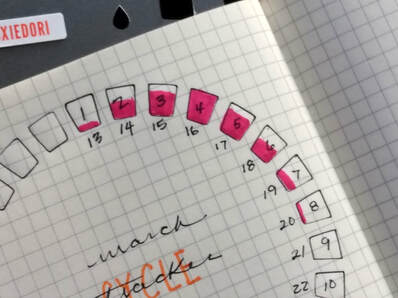
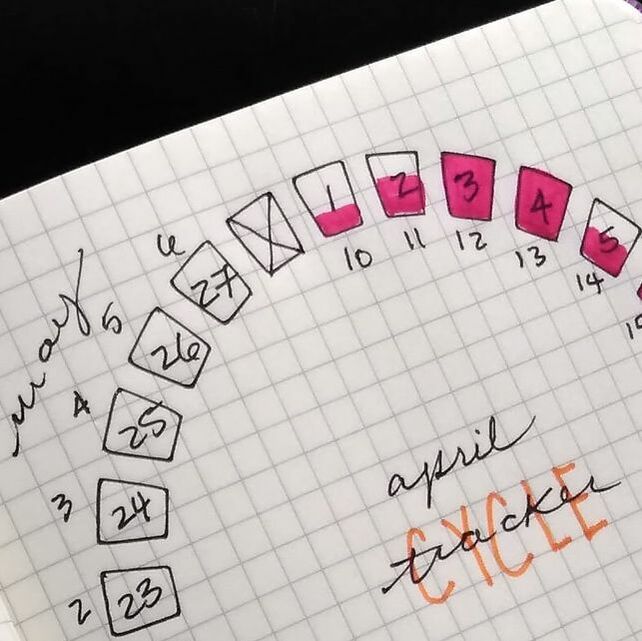
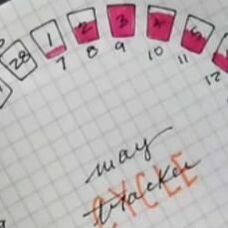
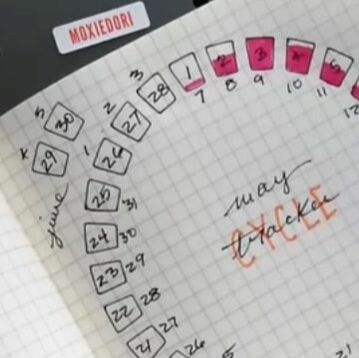
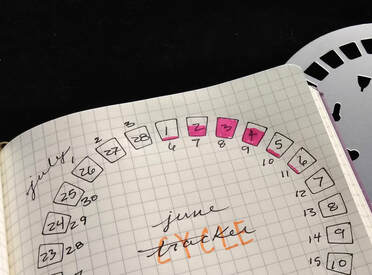
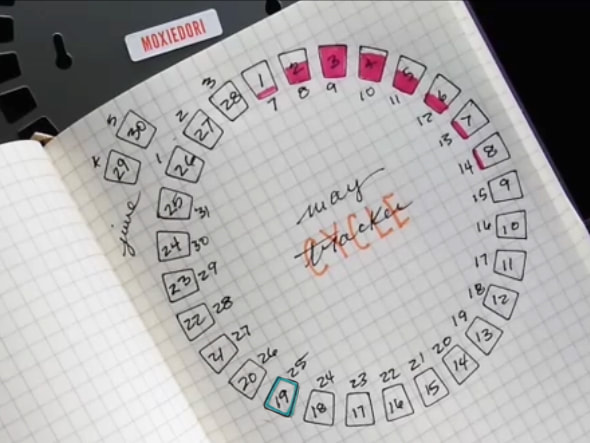
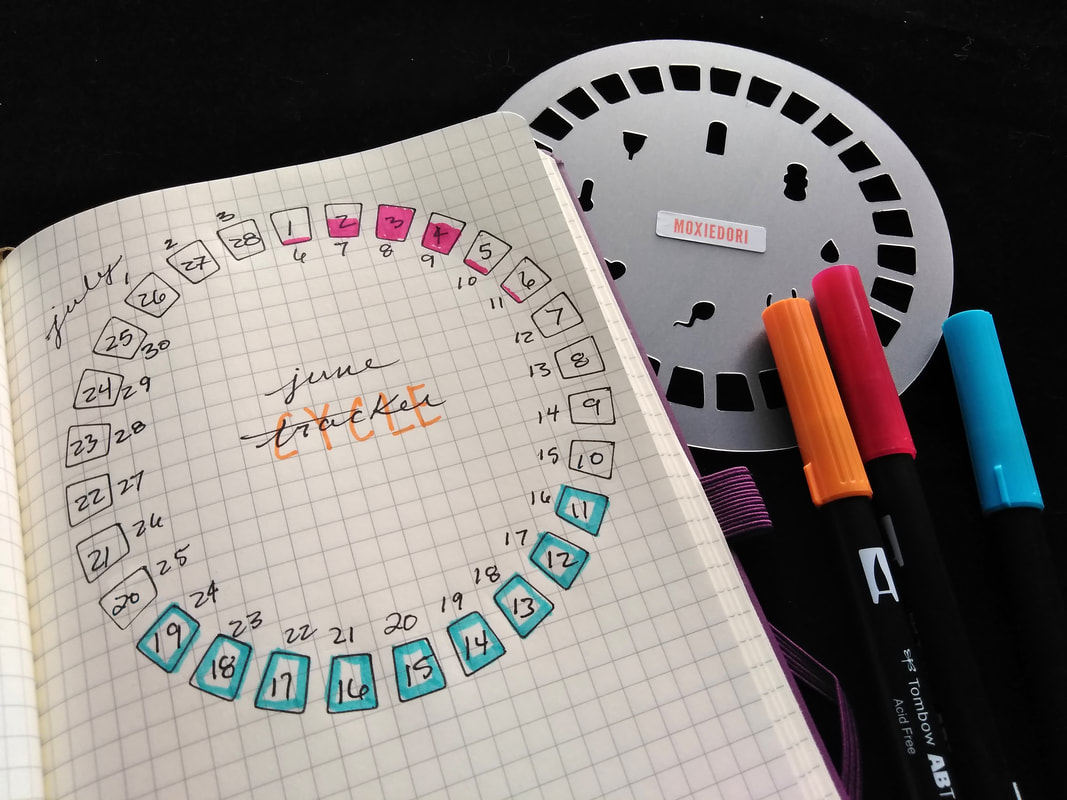
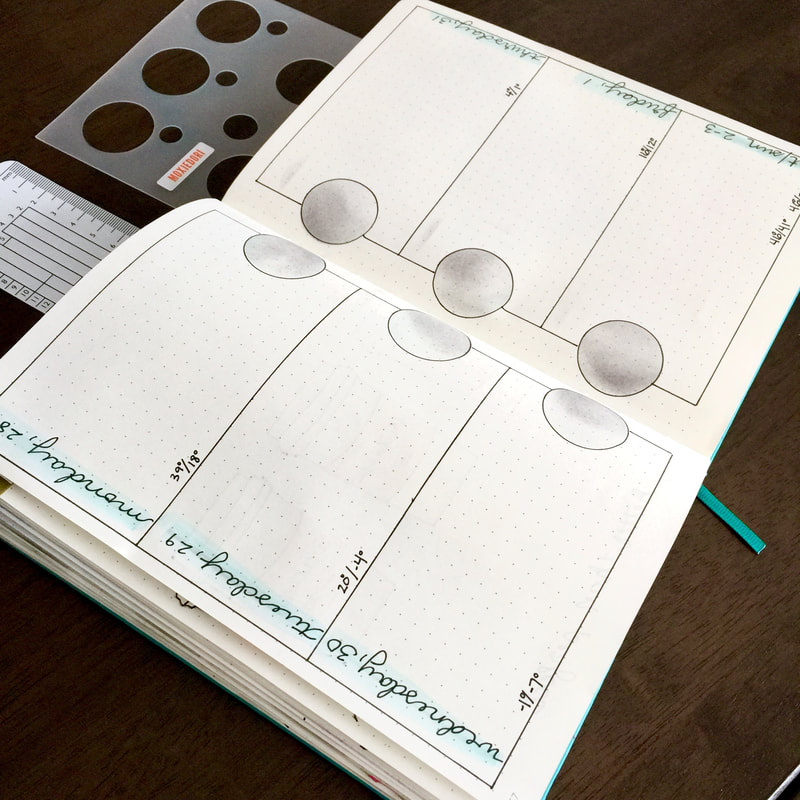
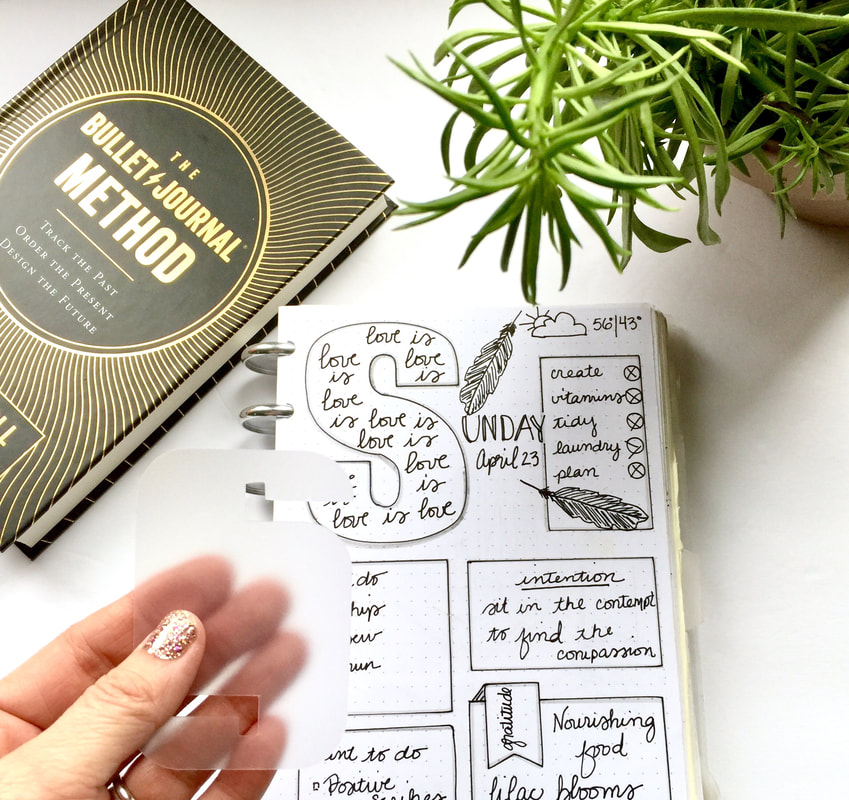
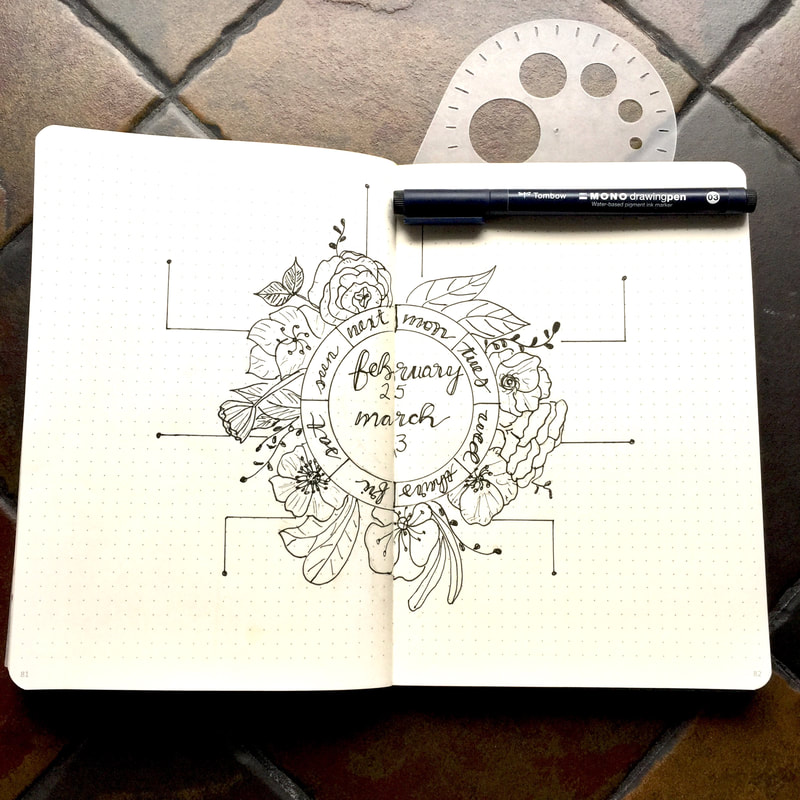
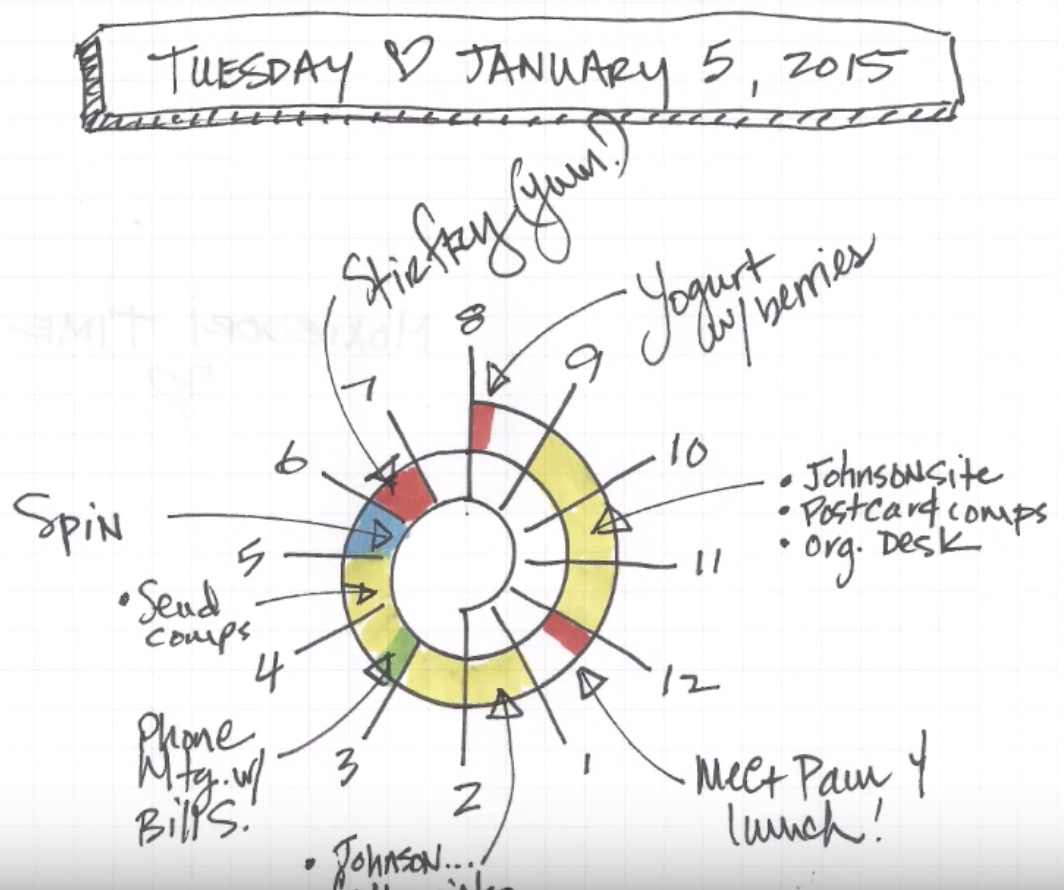
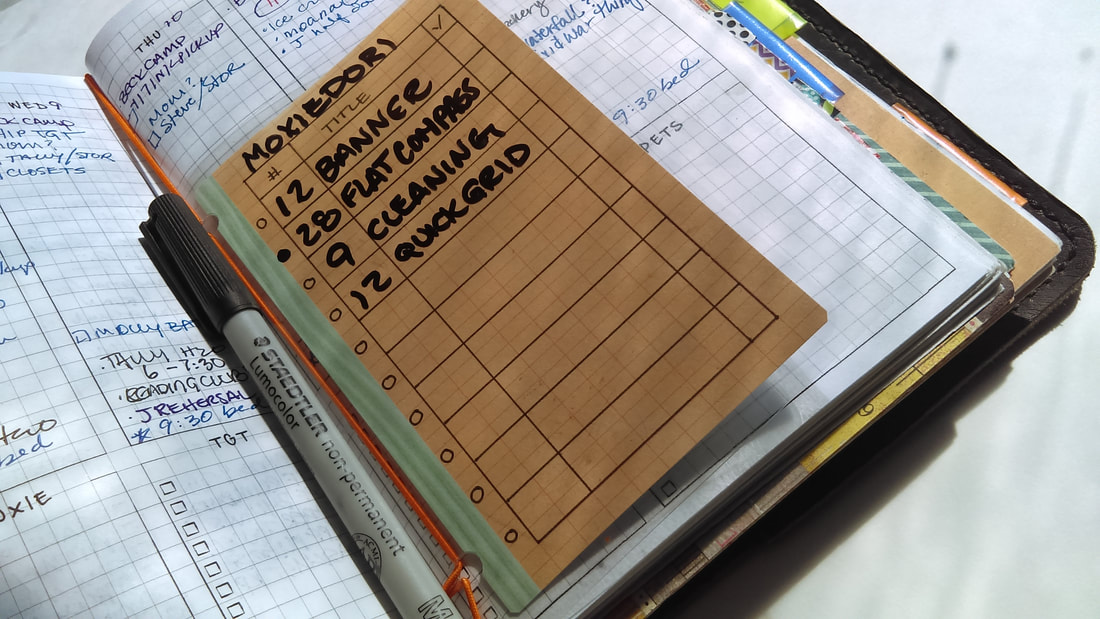
Using a bullet journal can be helpful in so many ways and yet it is a habit that is sometimes hard to stick with. Looking for tricks to stay on the path of the bujo? Here are 15 tips that will help you cement and sustain your bullet journal habit.  1. Keep your journal in sight & travel lightKeep your bujo on your kitchen table, in your purse, at your desk, or next to the coffee pot - wherever you will see it and remember to use it. Taking your bullet journal with you wherever you go will also help ensure you use it. Travel only with the bare essentials and leave your fancier bujo accessories at home for more in depth journaling sessions. Make placing your journal in your bag, purse, or hand part of your departure routine and keep it close throughout the day. 2. Build planning into your dayThe act of sitting down with your bujo and organizing your affairs is focusing and it forces you to think through the steps of how to accomplish your daily goals. Include "Plan" on your daily task list, at the start or end of your daily schedule, allowing time to prepare for or reflect upon the current day or get ready for the next. You could also work in a small habit tracker on your weekly layout and include "plan" as one of the habits. Tracking your planning will help you notice patterns as well as keep yourself accountable. 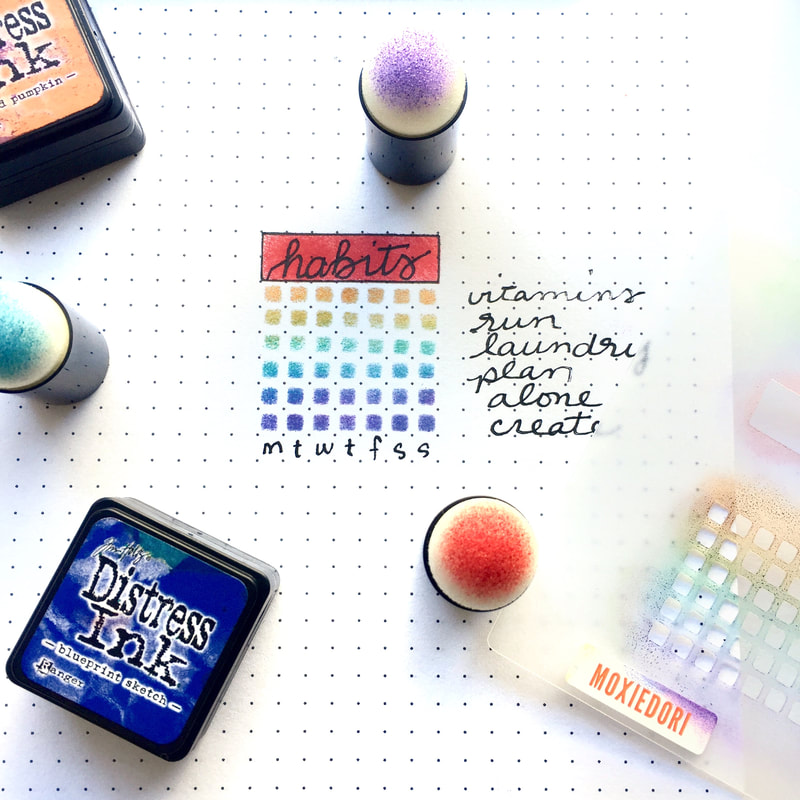 3. Store your pen with your journalHow many times have you gone to write something in your journal but didn't have a pen? That's a missed opportunity right there. Find a pen you like and store it in a pen loop attached to your journal. If your journal doesn't have a pen loop, you can make one or buy them separately. 4. Keep it simple when you need toIf you have a busy week coming up, keep it simple. Don't task yourself with an artsy or complicated layout. Some weeks are just a messy scribbled list and that's okay.  5. Value the process over the end resultSometimes I make my weekly layouts and then never look at them again; other times my pages are a messy reflection of life. Either way, neither, I feel, is a waste or fail. I sat down and mindfully thought about my week. I wrote appointments, thought through projects, sculpted out time for myself, etc. Just the act of writing helped me remember, focus my efforts, and empty my mind. Regardless of how it looks or to what extent something was ultimately used, often the exercise itself is of the greatest value. 6. If you like to be creative, art in your journalCreating visual treasures in your journal help draw some back to their journal. If you like to art, art. You don't have to be good at it and you don't have to share. Your journal is for you - be it a place to practice, decompress, or showcase your skills - make what you want of it.  7. Start with dailiesIf you're new to bullet journaling, consider starting small and use only dailies rather than feel obligated to create weekly and/or monthly layouts that you may not use. Daily layouts simply allow you to get into the habit of putting your brain and your life on paper. Start small. Start scratchy. On each page, write the day and date, then list all the balls in the air for the day. Give yourself a separate page to jot down future events, so you can focus primarily on the current day. If you find over time that it leaves you with lots of empty space, either fill it with reflection, motivation, or creative expression, or switch up to weekly spreads instead, which provide less space for the tasks and appointments for each day and show multiple days in one go. Still feel at a loss for what to put on the page? Add a habit tracker, a mini monthly calendar, or switch up to using only monthly spreads instead. Continue to shrink or expand according to your needs and eventually, you'll hit your stride. 8. Habit bundle your bujoHabit bundling is a fabulous concept where you pair one thing you LOVE with another thing you are trying to love. For me, this LOVE thing is drinking coffee or listening to Outlander on audible or being creative. I pair these super groovy things with acts I am attempting to make habits. For example, I only watch Amanda Rach Lee's You Tube videos when I'm running on the treadmill. Pair planning with your favorite jazz music, a special cup or tea or while defusing your favorite essential oil. It works - I swear. 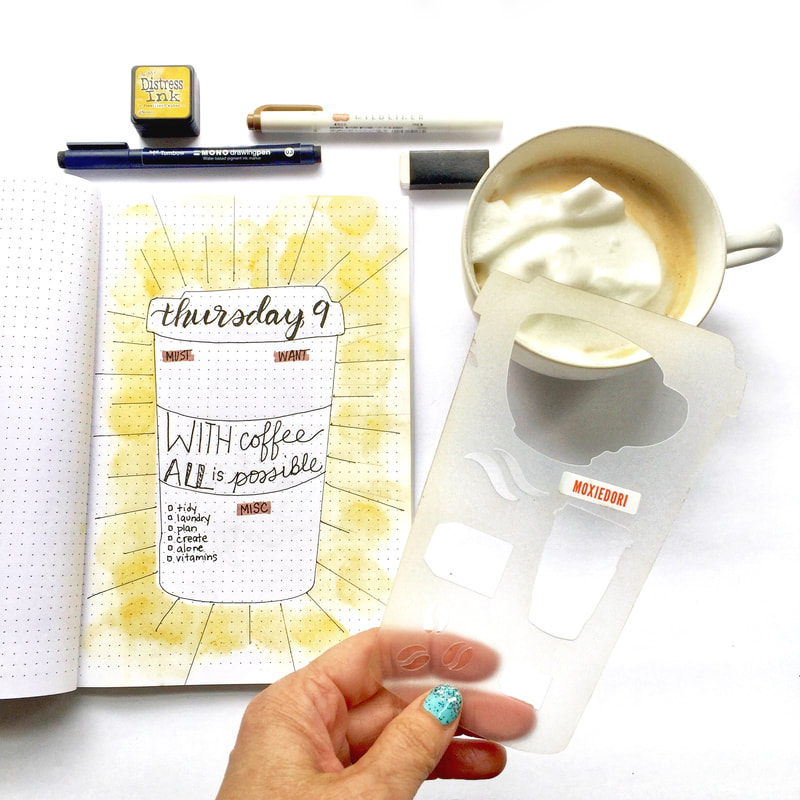 9. Note when you feel disorganizedYou know that feeling when you are mentally juggling too much and you feel like your head is going to explode? Stop and open your bujo, commit all that noise to the page, and quiet your mind. Lean on your journal. Let it save the day. If you use it, it will carry all the things so your mind doesn't have to. 10. Try different layoutsWhen your bullet journal has gone stale try to switch up the layouts you use. There are a ton of variations of daily, weekly and monthly layouts to try. Some will work for you and some won't. Variety is the spice of life, so try something new. You can find a ton of bullet journal ideas on this Bullet Journal Ideas Pinterest Board. 11. Work towards rewardsReward yourself for consistently using your bullet journal. Did you make a plan for 5 out 7 days? Did you fill out more than half of your monthly habit tracker? Treat yo' self. Take a bath with your favorite book. Or schedule a coffee with your bestie. Purchase that pen, tape, or special journal accessory you've been lusting after. Positive reinforcement will help to solidify the habit. 12. Know thyselfThe key to using your bullet journal is setting up a journal that assists you with your life. You want to create a journal that works for you, not the other way around. If monthly mood trackers simply do not work for you, don't continue to make them. If you know that you can work a weekly like a boss but fall down with dailies, don't use dailies. Your journal is yours and only yours. Make it work for you. In addition, we all have a Big Why behind our bullet journaling. For some it holds all of the details, for others it is a creative outlet, and for yet others it provides space for the hustle and bustle schedule that is life. When you find yourself slacking in your journal, remind yourself of the reason you started in the first place.  13. One place, all thingsYes, a bullet journal is a great way to customize your own planner. Prefer to start your week on Monday? You can do that. Tasks on the left, appointments on the right? Yep, you're making it, so you get to decide how it looks. However, a bullet journal can also be where you jot down that running list of books you want to read, plan your next vacation, or think through that difficult discussion you need to have with your boss. The more you go to use it, not just as a planner, but as an extension of your own mind (replacing all the post-its, scratch pads, lists, and more), the more likely you'll be to continue using it on a regular basis for planning too. 14. Accept incompletion and imperfectionDid you miss a day or a week? Maybe you made an amazing mood tracker but only filled in two days? Or better yet, added two Tuesdays to this week. Do yourself a favor and don't forgo using your journal for fear it won't be perfect. Because it won't be. There will be jagged lines, misspelled words, smears, smudges, and months missing the 4th entirely - because you are human. The downside to all of the glorious bujo inspiration on social media is that it can set up unrealistic expectations. As someone who posts that eye candy, I can tell you that the page before the one I photographed and shared is often all jacked up. Allow yourself some grace and adopt an "Oh well" attitude. Jump back in wherever you are, without shame or guilt and just move forward. 15. Connect with the communityConnecting with like minded folks provides validation, inspiration and reinforcement. If you are looking for a Facebook group where you can ask questions, share successes and post photos, please consider joining us over at Bullet Journaling Tips and Tricks. MoxieDori hosts this kind, generous, and calm group of over 19,000 people and we'd love to see you there!   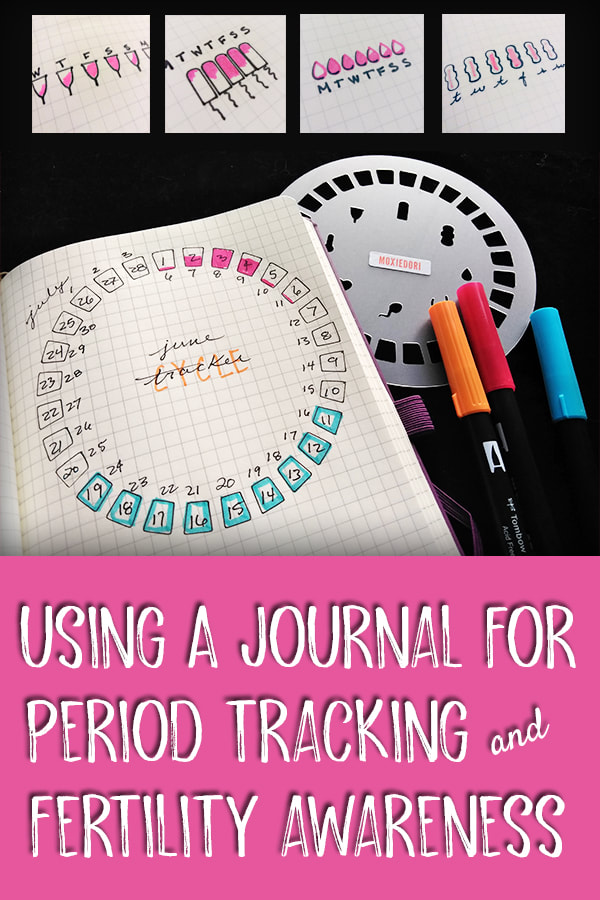 OH BLOODY HELL, IT'S SHARK WEEK... AGAIN When I was younger, I used to be completely surprised by the arrival of my period. I was also a little fuzzy about when exactly I was most fertile each month, even after I became a mother. Twice. (I know... right?) Fast forward to last year when, in my late 40s, I decide to study up in order to answer a frequent Bullet Journaling Tips & Tricks request, "Let me see your period trackers." Thanks to you all, I am now far less clueless about the female cycle! Oh, how I would have loved what I'm about to show you when I was younger. Better "late" than never I guess? (Har, har!) Anyways, below I'll describe how to track the length of your cycle, better predict the start of your next period and identify the portion of each month you're more likely to be fertile. I'm using the Period Fertility Tracking Stencil we designed to make the whole process both simple AND lovely.
LATHER, RINSE, AND REPEAT Since the length of your cycle can vary slightly from month to month, keep track of your cycle for at least 5 or 6 months initially in order to get an overall average of your cycle lengths. FERTILITY AND FAMILY PLANNING Intercourse during the first seven squares on the circle will have a very low likelihood of resulting in pregnancy. However, somewhere between squares 8 through 19 will be a fertile period of approximately 6 days, during which there is a higher likelihood of getting pregnant if you have unprotected intercourse. Here's how you can get a little bit closer to figuring out where your 6 days will fall each month using trackers.
Becoming more aware of your cycle can give you an idea of when to use additional birth control methods if you want to avoid pregnancy or help highlight the days during which you're more likely to conceive if you're hoping to start a family. Identifying the day you actually ovulate and the days that proceed and follow it when conception is actually possible is a more involved process. It involves tracking your menstrual cycle as described above, combined with the Temperature Method where you take your temperature in the morning every day before you get out of bed and the Cervical Mucus Method where you check your cervical mucus (vaginal discharge) every day. We've included the icons in the center of the Period Fertility Tracking Stencil to make recording these types of details in your daily, weekly, or monthly spreads more enjoyable as well. LASTLY, PLEASE NOTE: NOT EVERYONE IS THE SAME
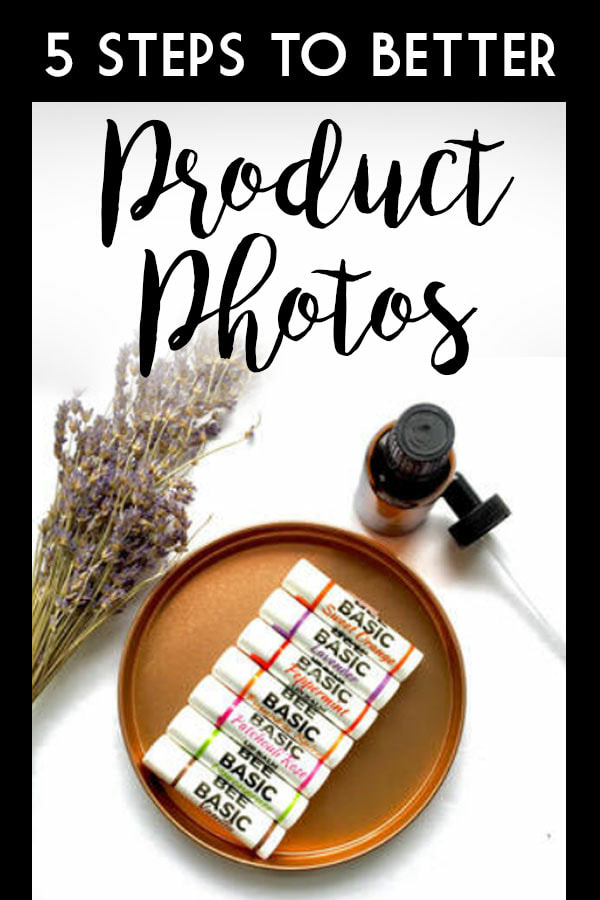
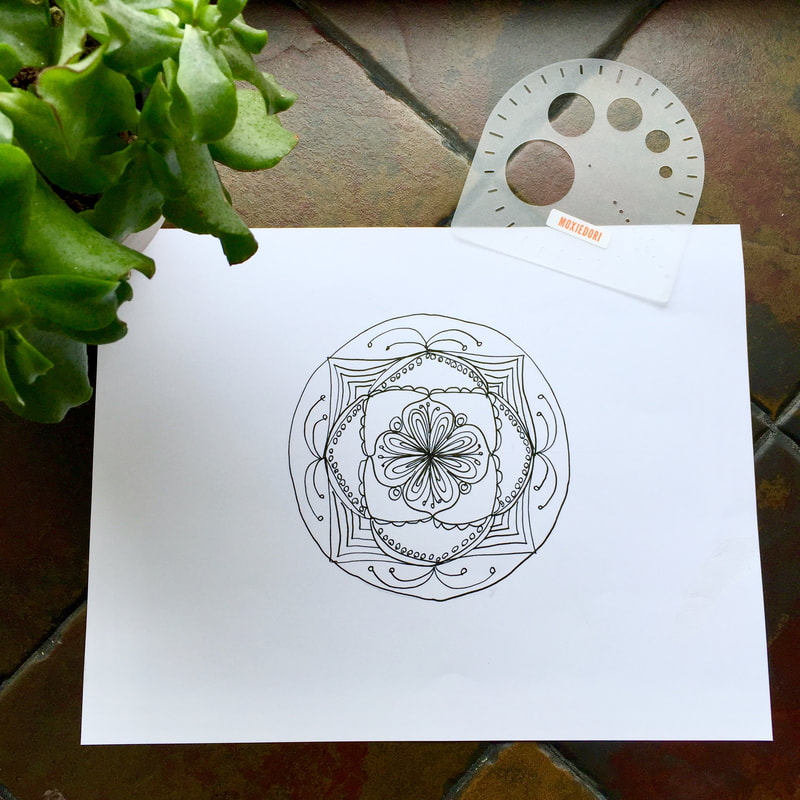
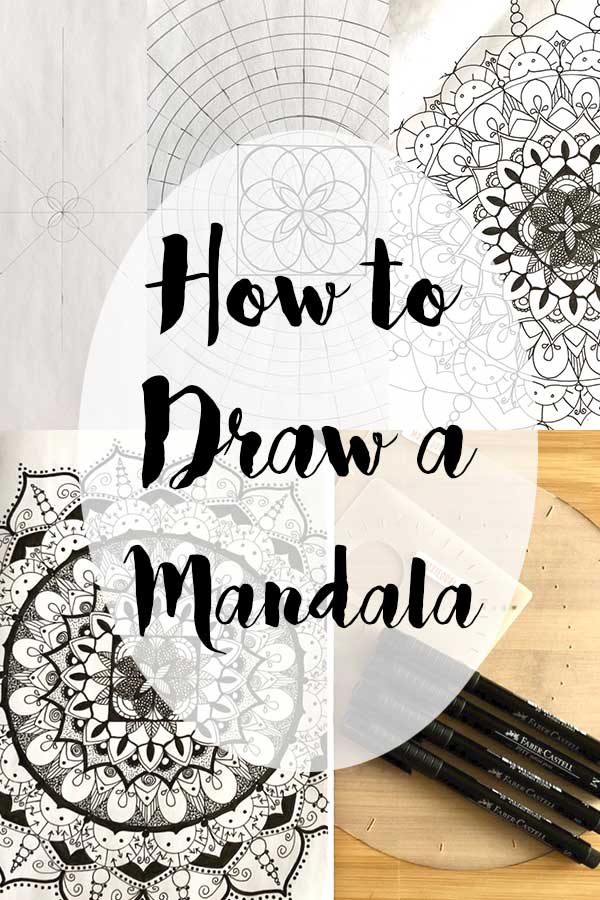
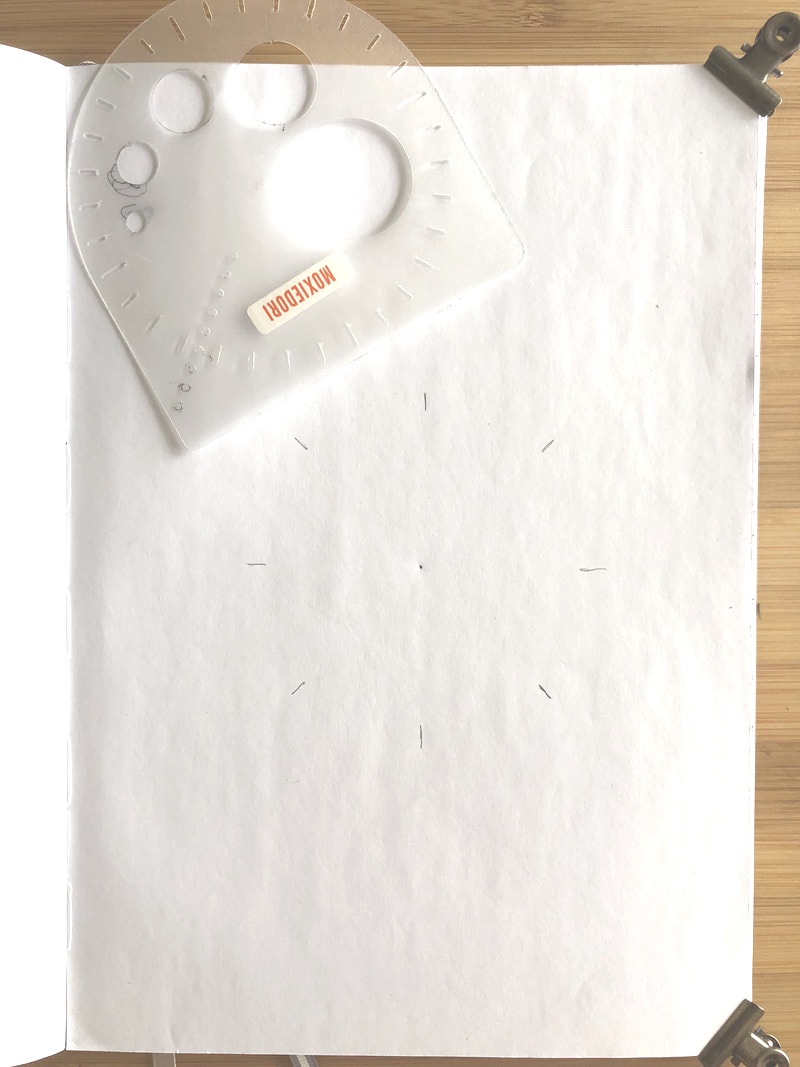
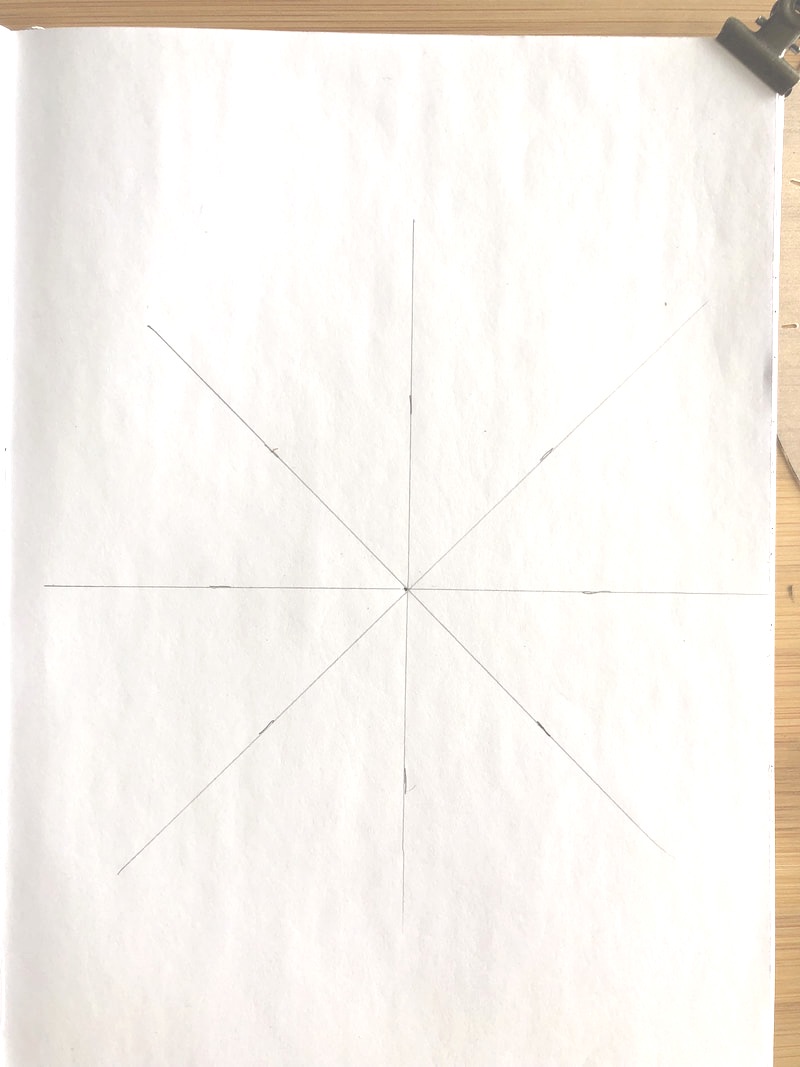
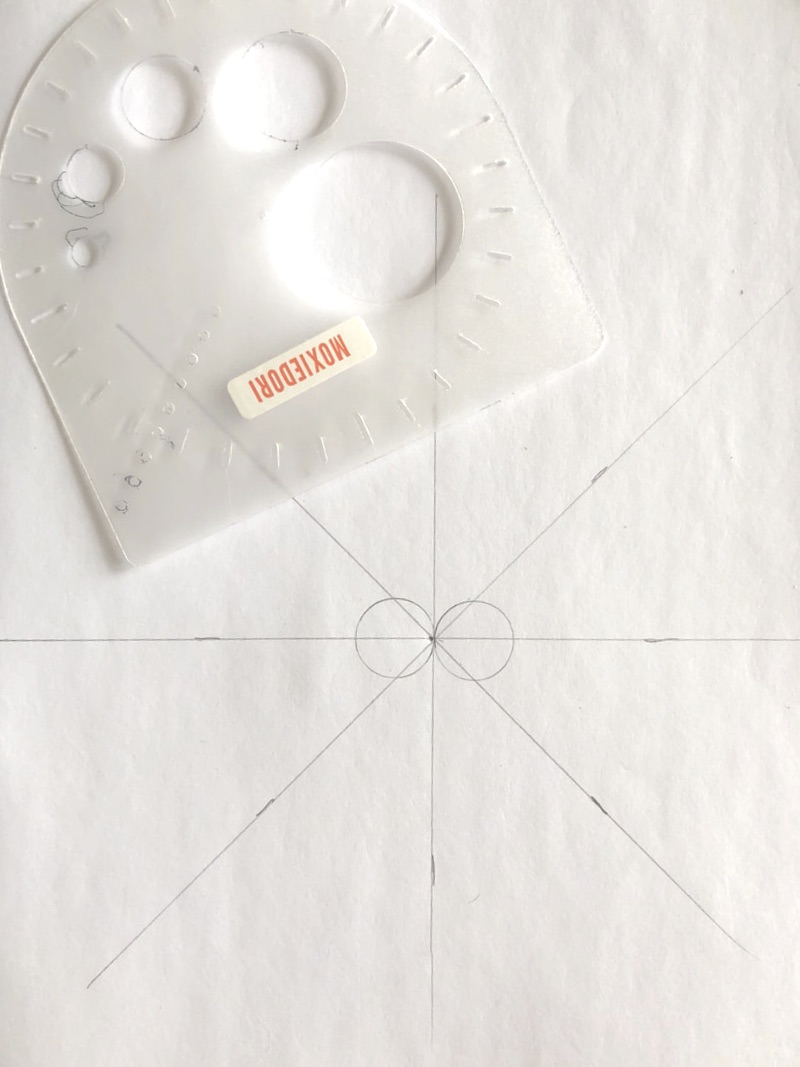
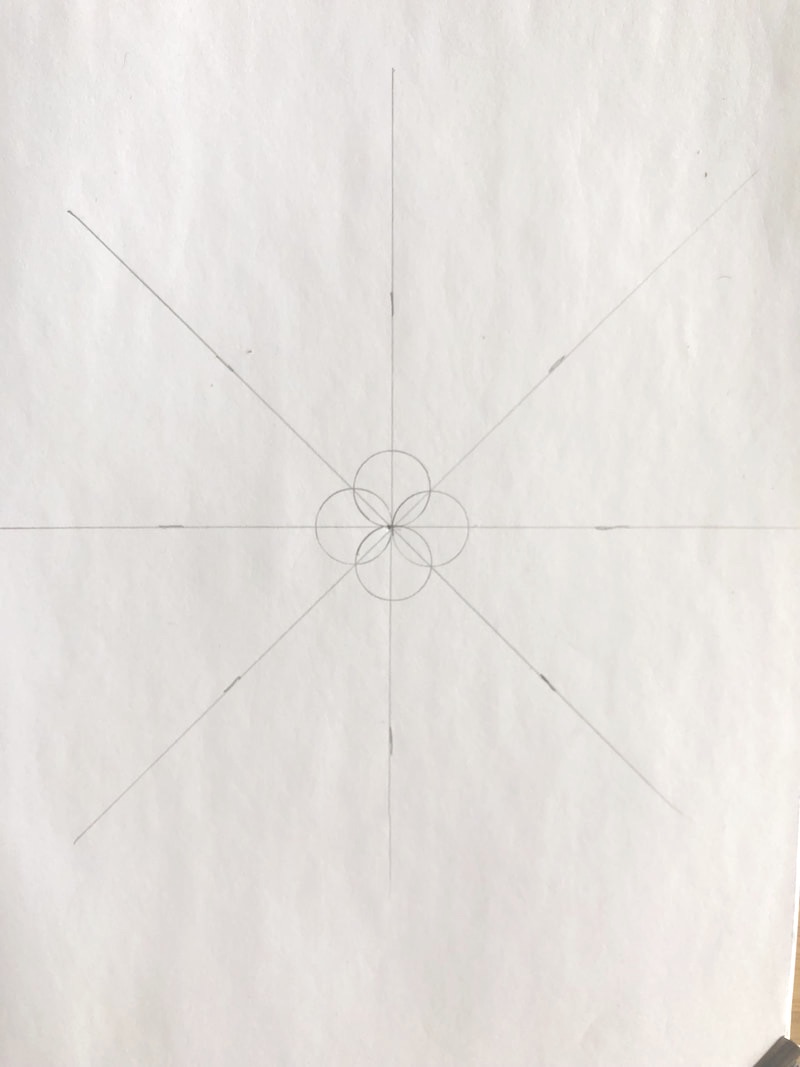
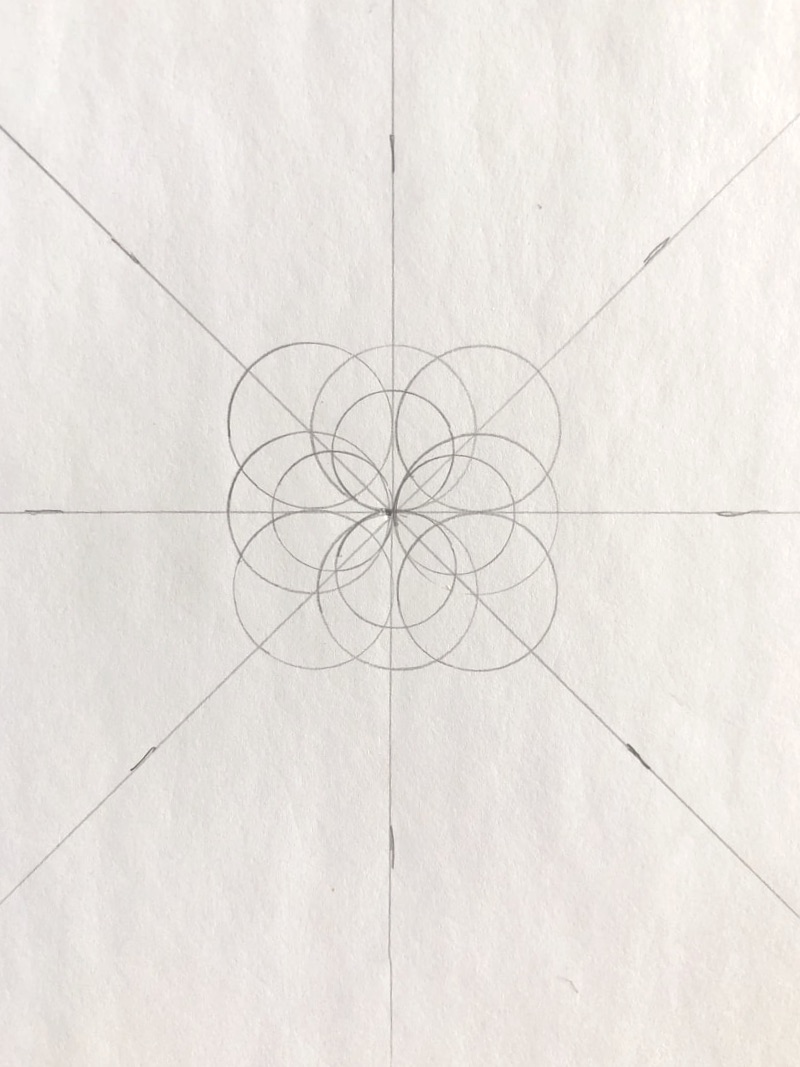
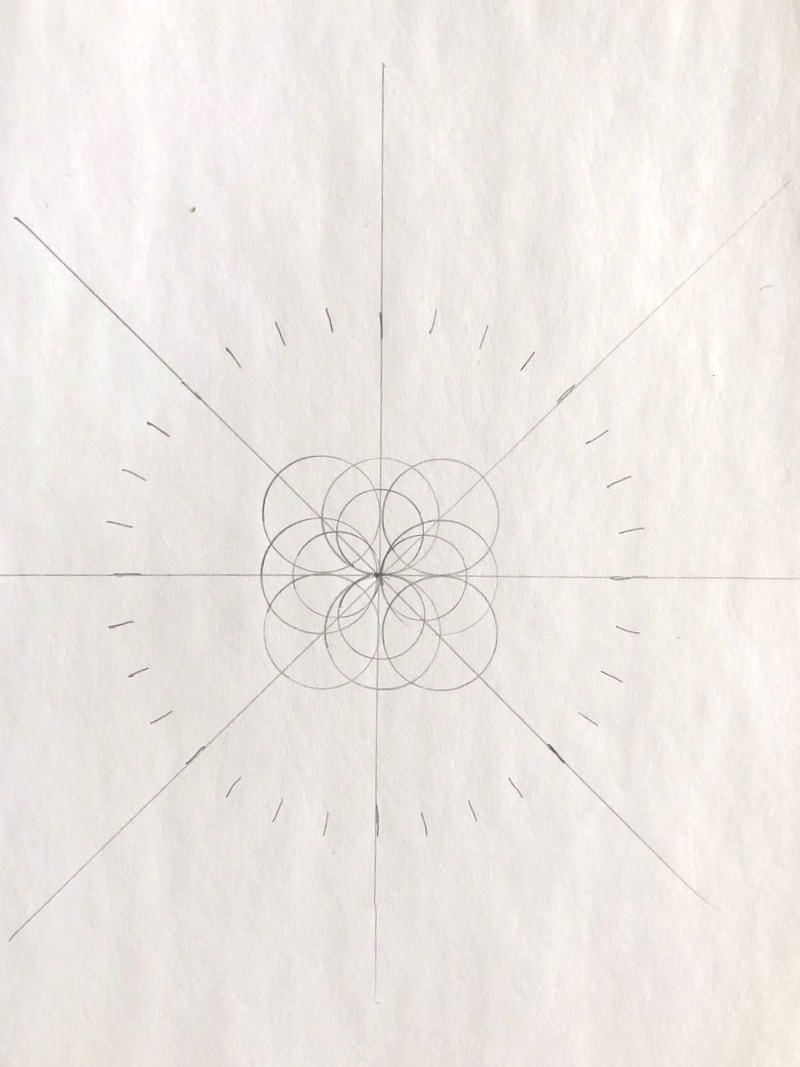
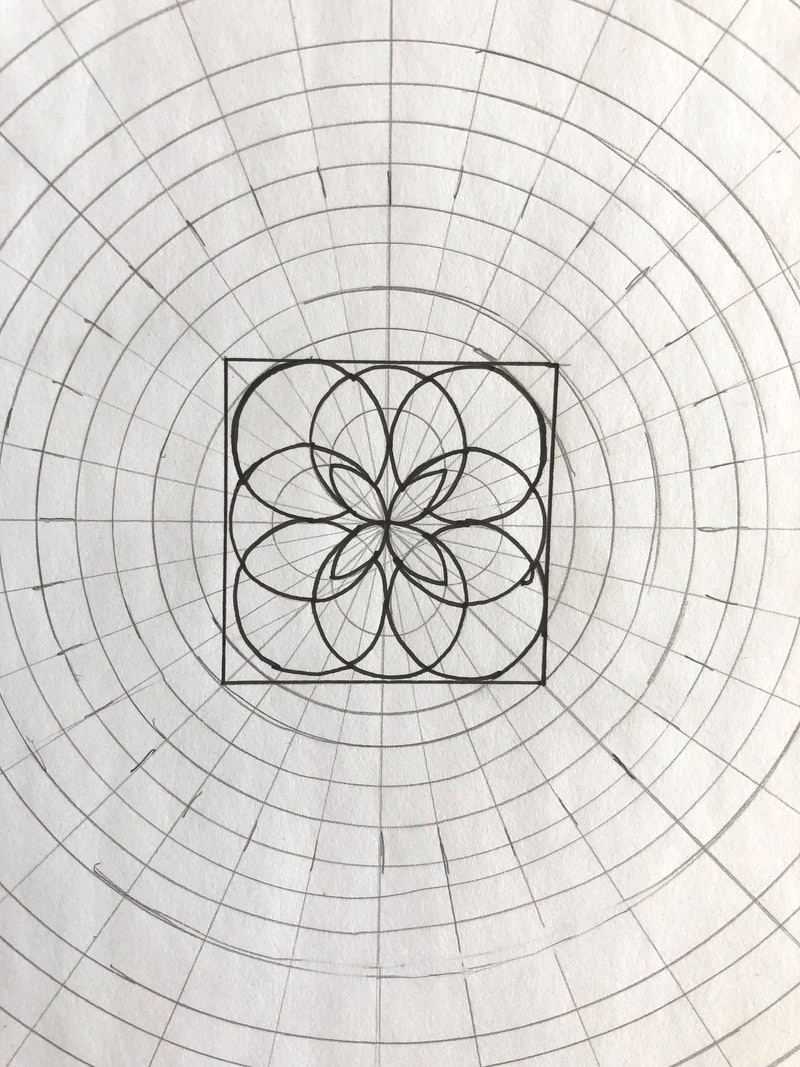
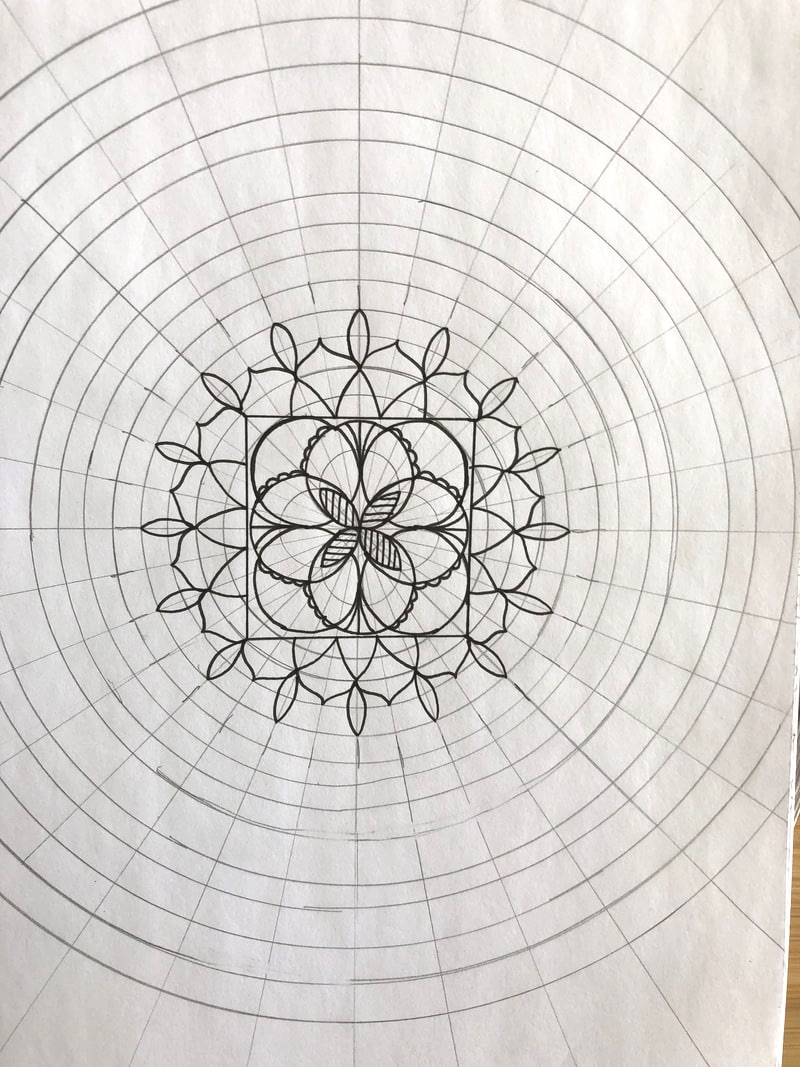
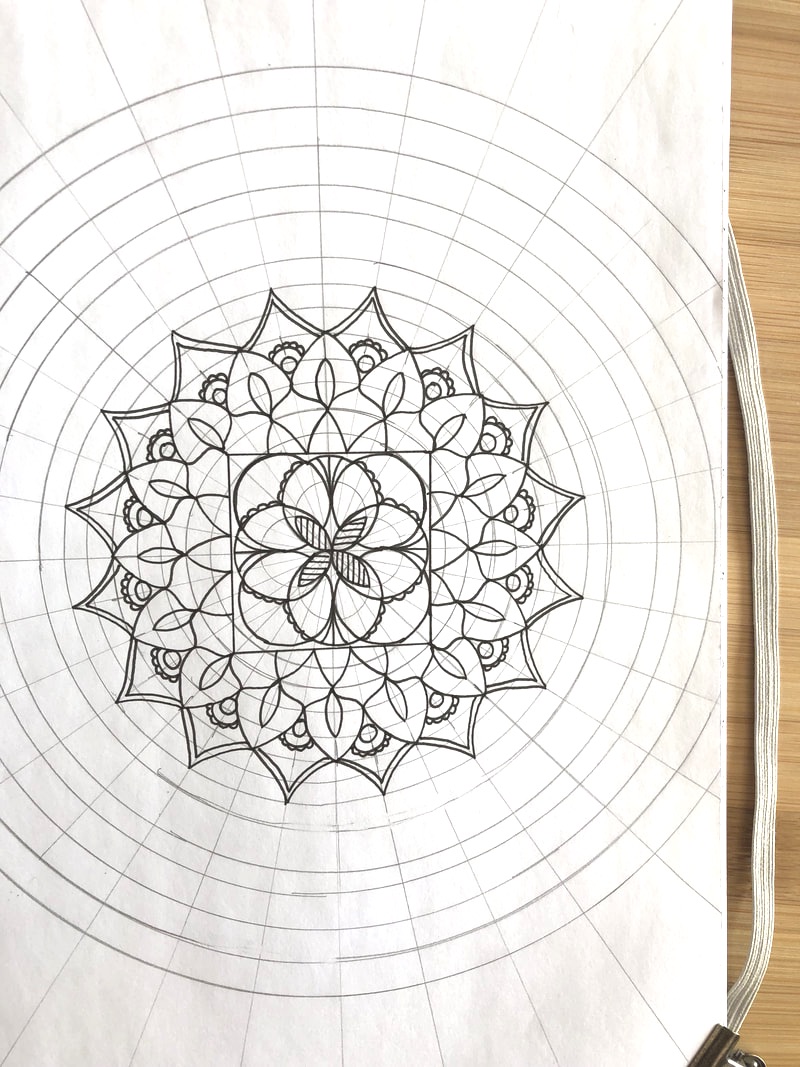
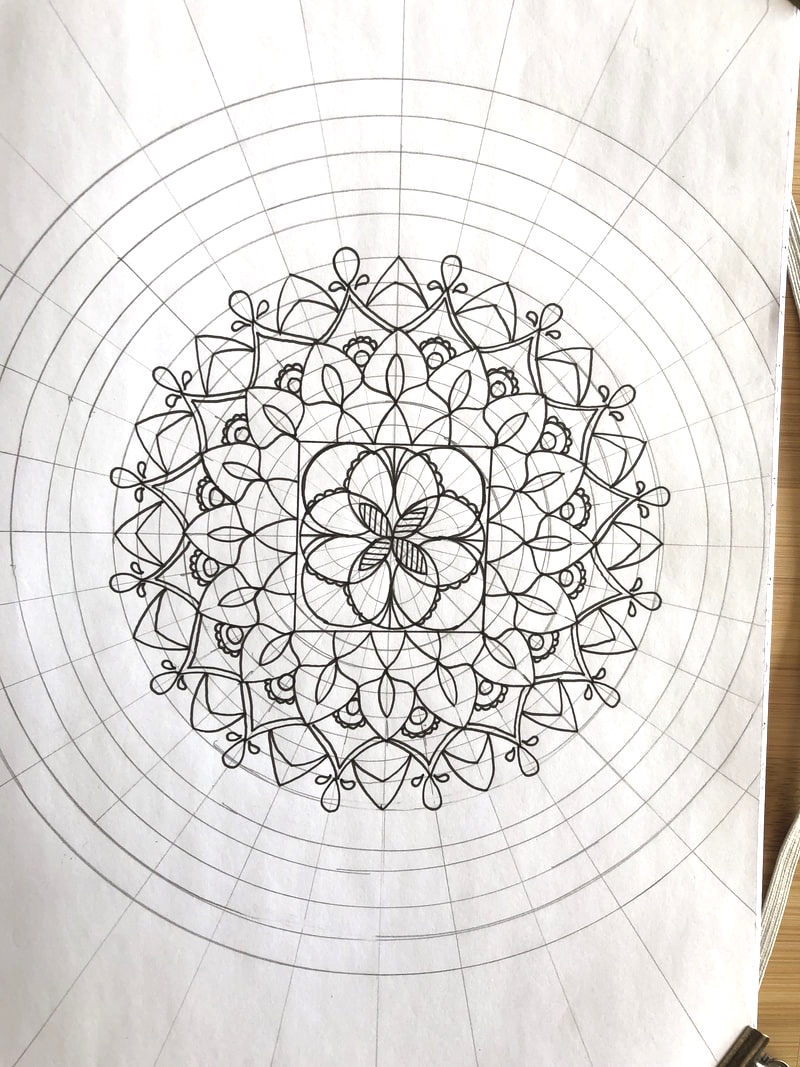
This tracking technique is effective if your menstrual cycles are regularly between 26 and 32 days long. Determine if your cycles are in this range and whether they stay in this range first before you use a tracker like this for family planning purposes. If you have cycles outside this range, you should use a different family planning method to prevent pregnancy. It's also advisable to use more than one method of birth control at a time if you want to avoid becoming pregnant. 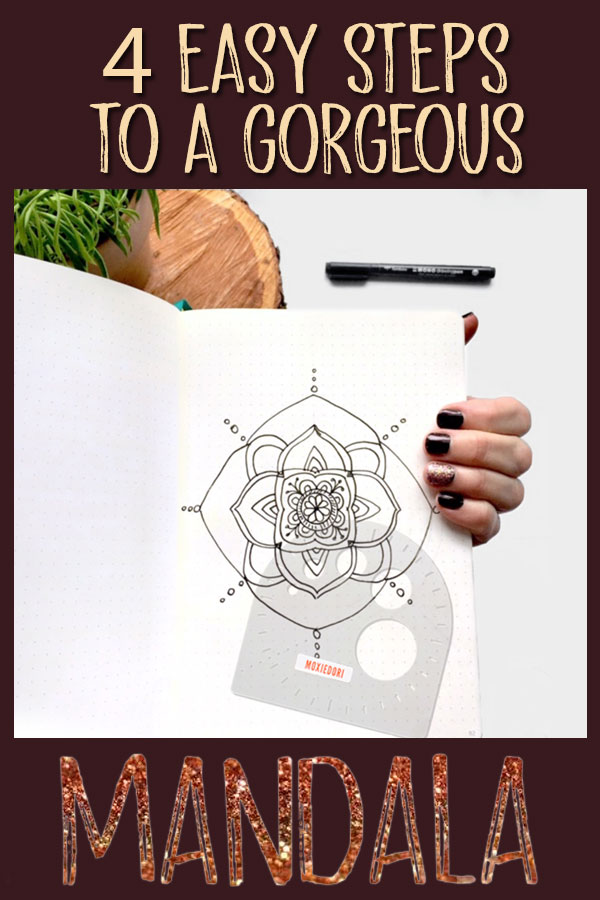 Join me in creating a mandala using these simple, step by step instructions. Grab your Compass Protractor, Mandala Maker or compass and protractor. Also gather a pencil, your bullet journal and a pen such as an 03 Tombow Mono Drawing Pen. Let's get started! Step 1: Draw Concentric CirclesPencil a light dot where you want your circles to be centered, then using the MoxieDori Compass Protractor™ or Mandala Maker™, create about 6 - 8 concentric circles at a variety of distances apart. Step 2: Divide the CirclesUsing the notches of the Compass Protractor or Mandala Maker, make a light mark at the top (12:00), bottom (6:00), right (3:00) and left (9:00) of the circles. Make additional marks halfway in between each, again using the notches of the stencil. This will result in eight marks total around the perimeter of the circles. * For a more detailed mandala, make one more round of light marks halfway in between all the existing marks, using the notches provided by the stencil. This will result in sixteen marks total around the perimeter of the circles. Using the straight edge of the stencil or a ruler, connect the opposing marks (12:00 to 6:00, 3:00 to 9:00, etc), lining them up with the registration dot in the center of the circle. Step 3: Add Center CirclesAdd a few smaller circles if you’d like, using the straight lines to help place them on center. Step 4: Pen in the Mandala ElementsBeginning with the center circle, start adding mandala elements with a non-smearing pen. Use the circles and the straight lines to guide the height and width of the elements, remaining inside the lines of each pie-piece section to create a balanced and consistent look. Repeat the same element 16, 8 or 4 times as you rotate your notebook in a 360 degree circle. (Rotating your notebook makes drawing consistent elements easier.) Decorate each subsequent circle, adding elements of varying in shape and size. Do not fret about the perfection of each individual element. The mandala as a whole will be beautiful regardless of a few imperfections. Enjoy the process as well as your final product. Erase your pencil marks, leaving your penned in decoration plain, or color them in for additional creative or meditative expression. Please share your mandalas or questions with us in the Facebook group Bullet Journal Tips and Tricks. Also, if you would like a pdf download of written directions on how to draw a mandala, hop over here: https://www.moxiedori.com/members.html#mandala 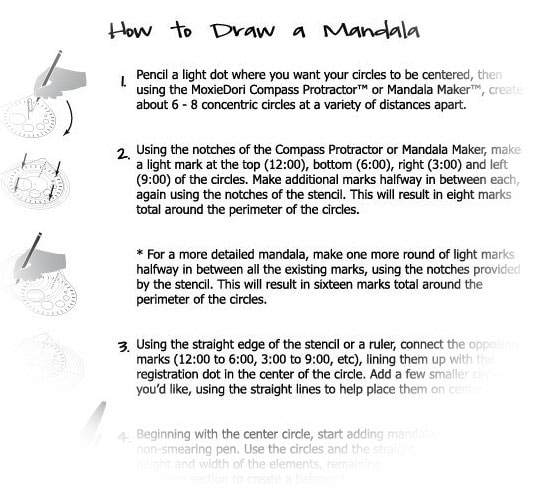  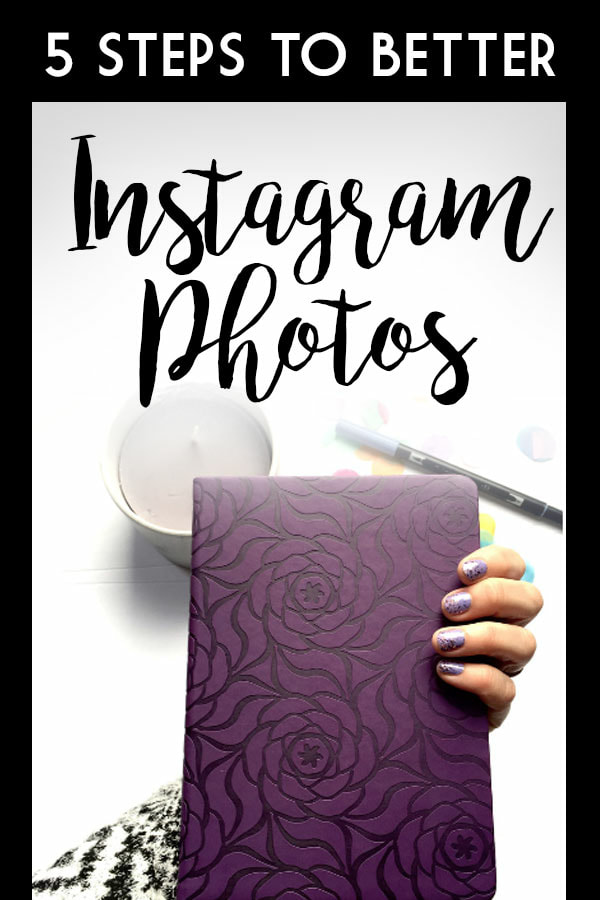 Great photos are key for catching attention, sparking interest and kick-starting engagement. Whether you want to improve your bullet journal Instagram photos or lure clients with great product shots, these five simple steps will help you do just that. 1. LightingNatural light is everything. Turn off overhead lights, as they create shadows and cast yellow hues in photographs. Find a window with filtered light (not direct sunshine) and set up there. I find the light to be the best between 10:00 am and 2:00 pm in my north facing window. You'll have to find your personal sweet spot.
2. BackgroundIf you want to convey the color of your item, use a white background. I use a white foam board from the Dollar Store. If your item is mostly white and you want to set it off, use a dark background. I like to use a dark wood table that doesn't have a lot of grain to it as I want the focus to be on the bullet journal spread, the stencil and the journal rule.
3. CompositionPut three things in your photos. Number one will be your main item of interest. It should go in the center and be in focus. Now add items two and three and create an upside down triangle with the three objects. The observer's eye will start at position 1, travel to either 2 or 3 and then back to 1. Then the observer's eye will travel to the opposite item and finally land back on item 1. This causes people to look at your main item again and again. Attempt to use items in positions 2 and 3 that tie in thematically and/or have a similar hue as the primary item. Finally, get your hands in the photo. Hold your item and take the photo from the angle and distance that would naturally occur during normal use of that item. Psychologically the observer enters the photo and they feel as though they are holding that item. I have noticed that photos with my hands in them get much more engagement on social media than traditional flat lays do. 
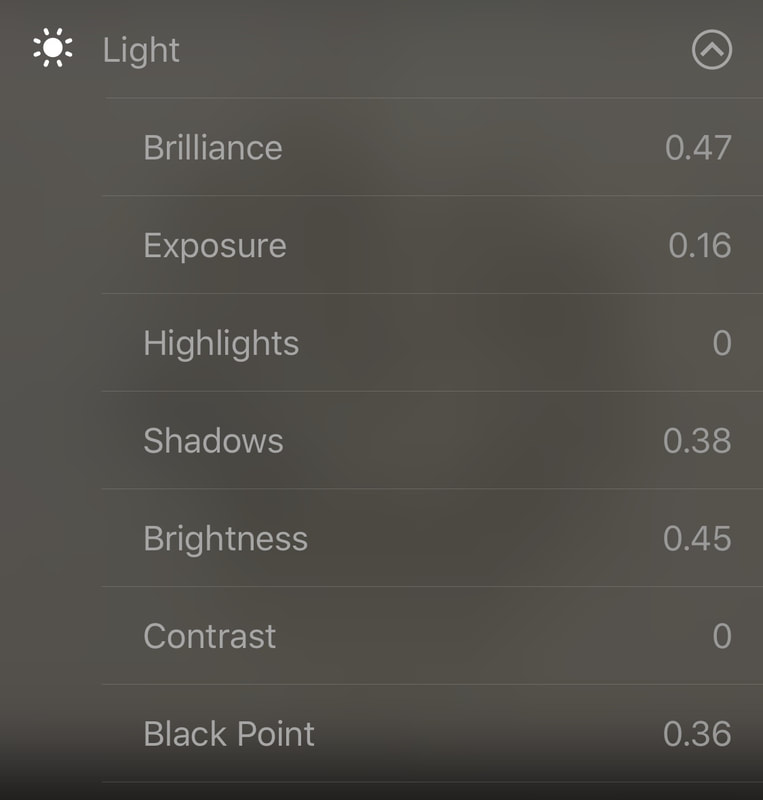
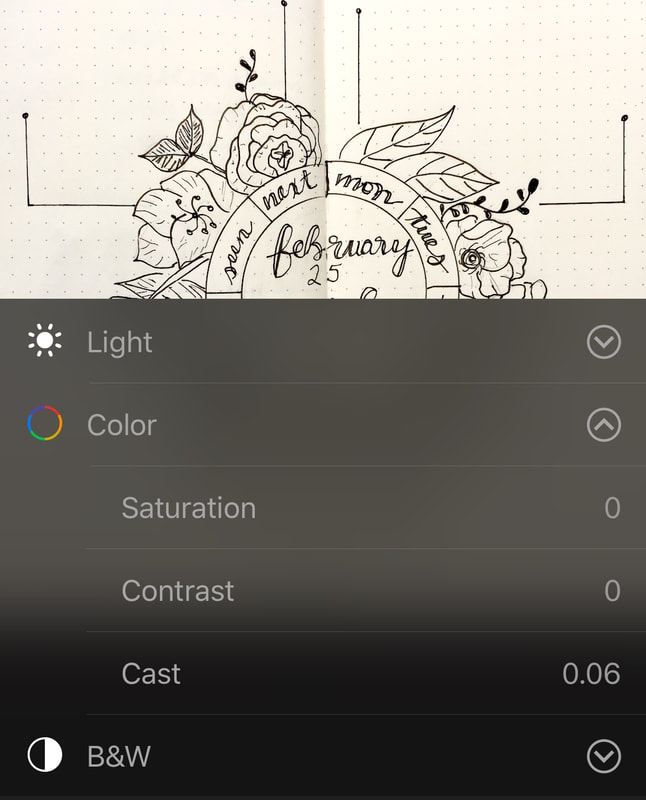
4. iPhone Camera EditMy first photo edit is on my iPhone's camera app. I always shoot in Square and crop if needed. When editing, I start by adjusting the Light. I almost always increase the exposure first. I slowly adjust the brightness and brilliance. At that point I go over to Color and adjust the cast. I then go back to the Light and adjust the shadows, the black point and sometimes the highlights.
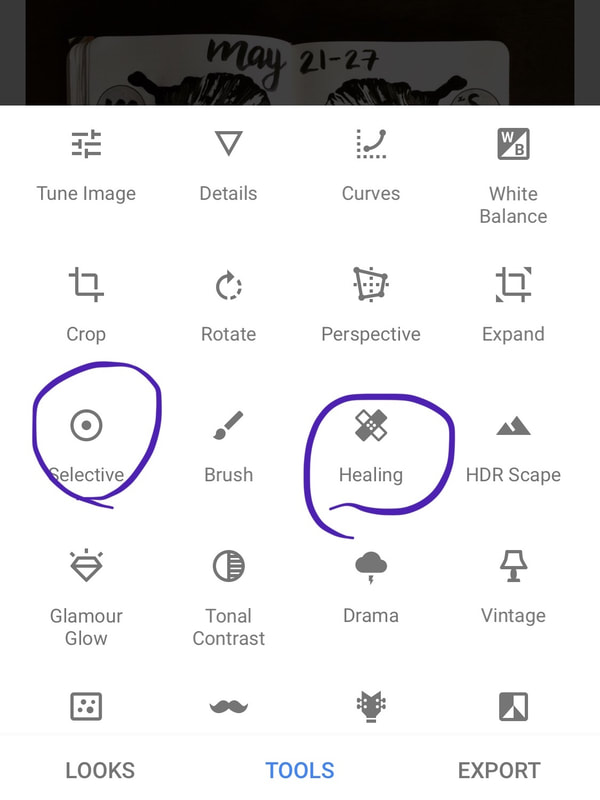
5. Snapseed EditI make my final editing touches on Snapseed. It is an amazing app and it is really easy to use. I resist using the "Looks" and head over to Tools. While I use Selective and Healing the most, I sometimes use White Balance to adjust the color of my bullet journal page. Selective allows you to choose certain points on the photo to adjust Brightness, Contrast, Saturation and Structure. Use the Healing tool to "erase" small flaws in your photo.
We hope this was helpful. Hop over to MoxieDori on FB and share your before and after photos with the community. We'd love to see! Before and After
  Join our blow out party to celebrate our website expansion!!! There will be a fabulous giveaway and a discount code for the new shop. MoxieDori Launch Party!!!!!
Do you love galaxy watercolor paintings? Today is your lucky day! Rosanne Schuurmans of @rosannecreates is sharing her galaxy watercolor technique with us. Grab your Tombows and create along with! 1. Gather your supplies. 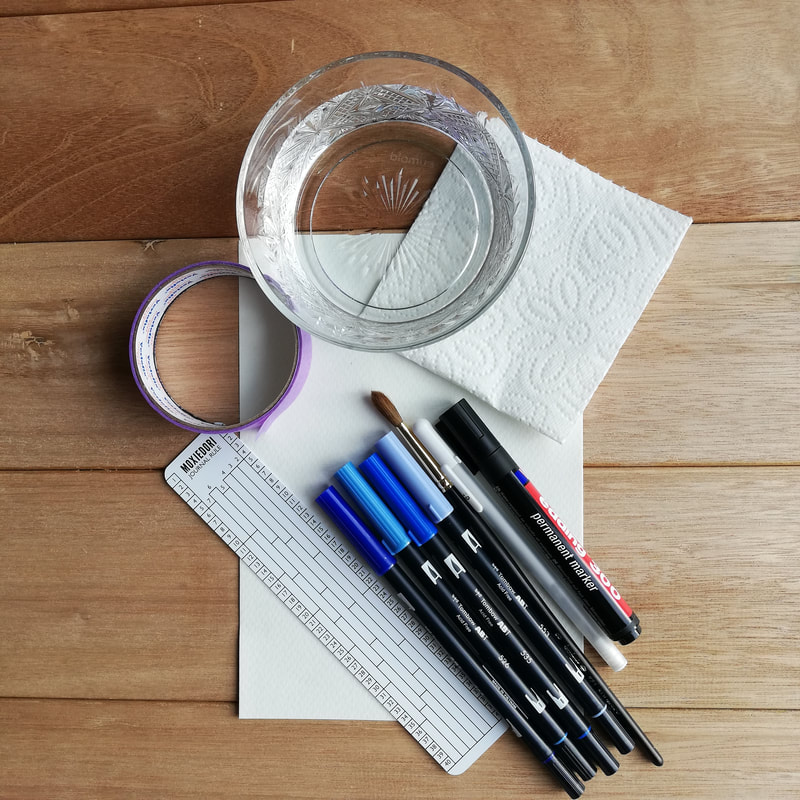 Gather your supplies! It’s very important to use watercolor paper for this technique. It doesn’t have to be the best/expensive you have, but it should be at least 200gsm in weight and smooth (so you don’t fray your markers). I love blue, but you can use any color Tombow markers you have. 2. Draw a window using the Journal Rule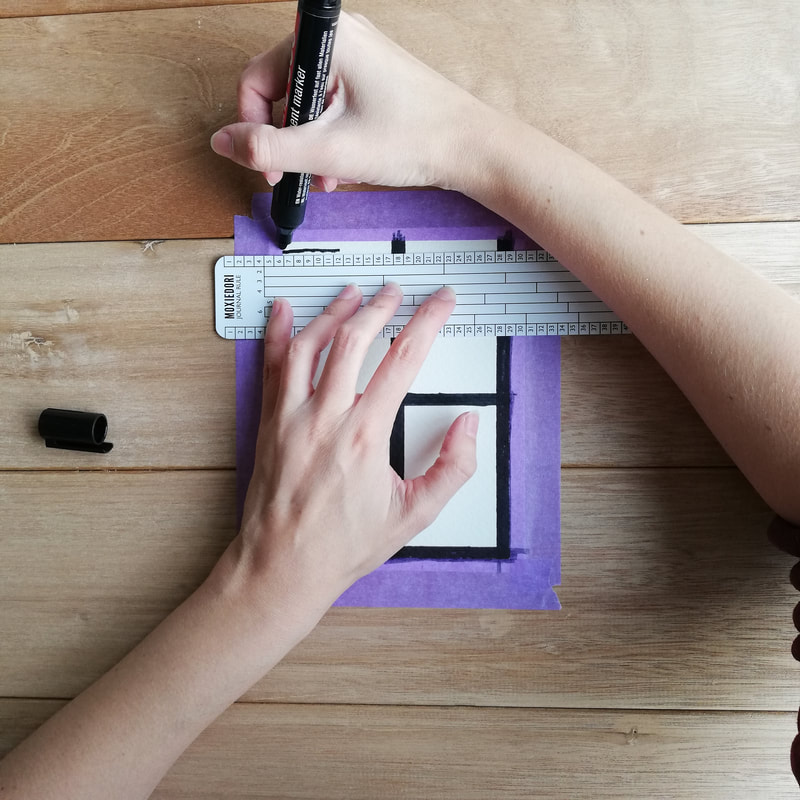 Tape your paper down to a flat surface, and use the MoxieDori Journal Rule and a black alcohol marker to draw out your window frame. It is important to use an alcohol marker, because that will not react with water in later steps. 3. Start coloring!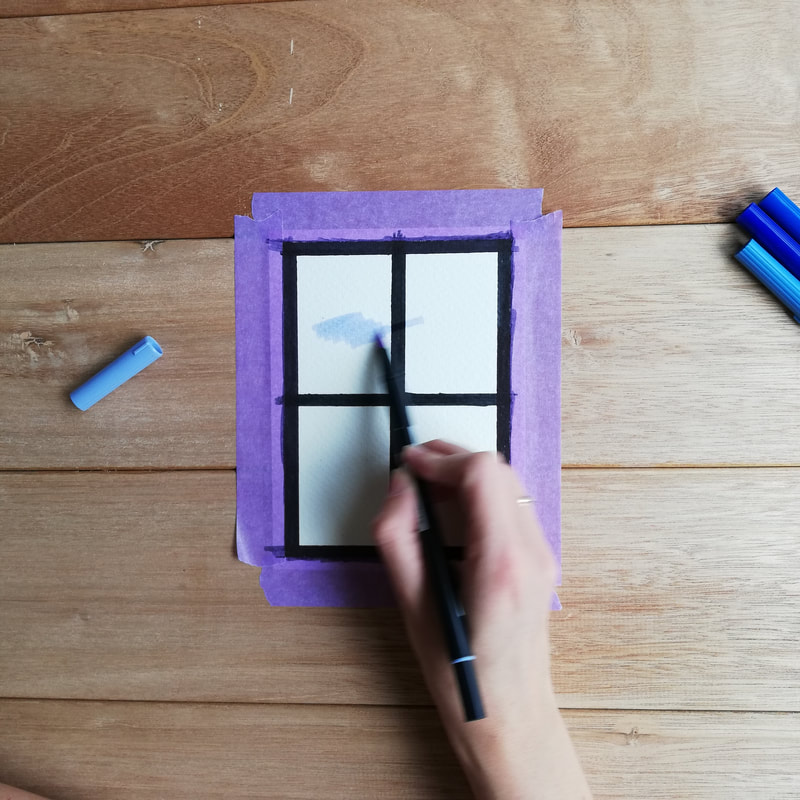 Lay down the colors with your Tombow markers. Start with the lightest color and work your way out to darker tones. 4. The fun part!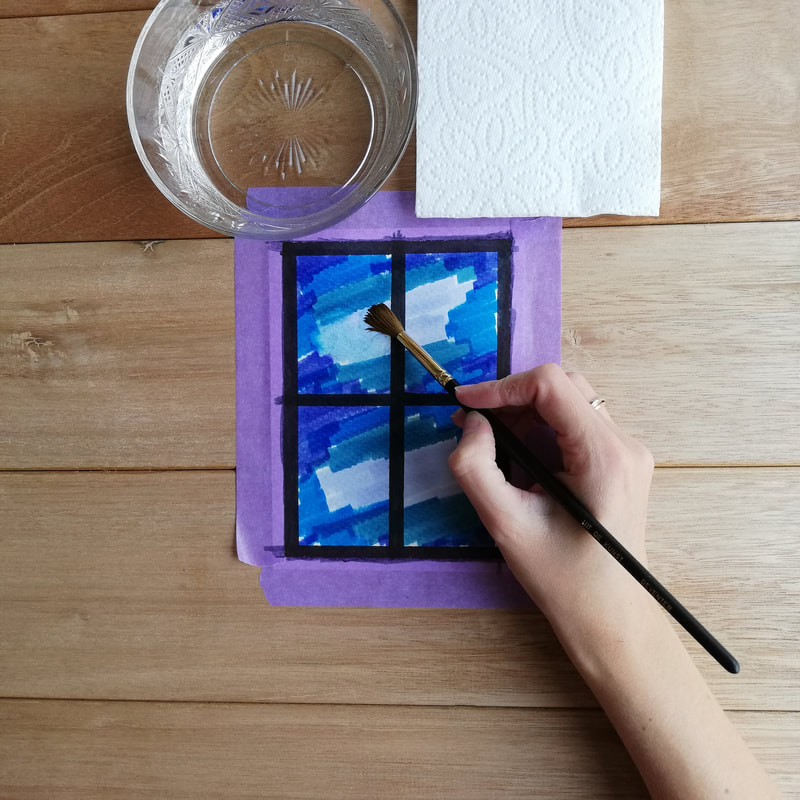 Use a wet brush to go over the colors. Start with the lightest parts again and carefully work your way out. You will see the colors start moving on the paper and blending into each other. Don’t use too much water, only enough to blend. Let your work dry completely before moving on to the next step. 5. Draw the cat. Draw a cat silhouette with the same black alcohol marker. You can use the Moxiedori Cat Doodle bullet journal stencil for this step! You can of course draw a different silhouette. You could try a vase with flowers, or a Christmas tree for December. Get creative! 6. Draw the stars. I use a white gel pen to draw the stars. You could also paint them on with white gouache or acrylic paint, or splatter them on with a toothbrush! 7. Peel off the tape.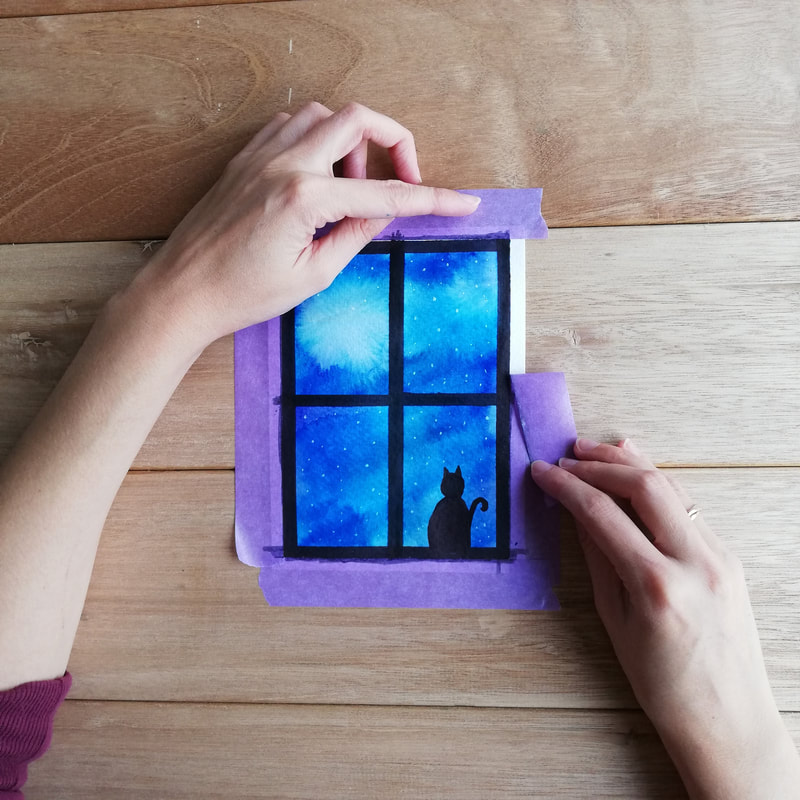 Your artpiece is finished! All that is left to do is peel off the tape. Do this very slowly and carefully, you don’t want to rip the paper! It helps to heat the glue of the tape a little with a heatgun or hairdryer. 8. Tadaaa! Marvel at the beautiful painting you made! You can paste it into your journal, make it into a card or hang it in your house. Rosanne also has a lovely etsy shop full of her original works. Hop over to RosanneCreates to check out her beautiful watercolor paintings. 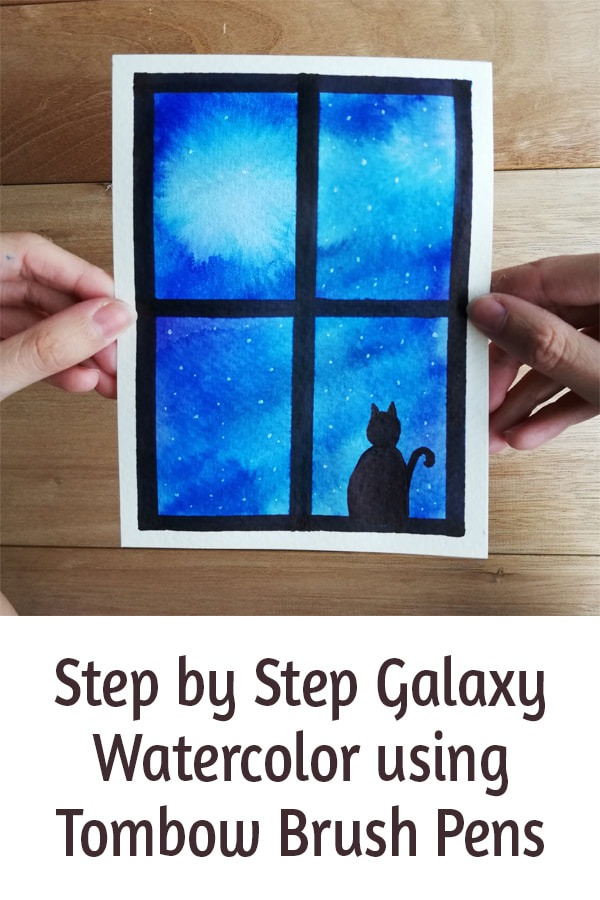 Evenings are getting colder and many of us have picked up our knitting needles again to finish up projects in time for the holidays. Here's a cute little doodle step-by-step how-to of a ball of yarn and set of knitting needles that you can add to your journal layouts. I added a cat with mine for a little extra added fun (because ours is ALWAYS up in my business when I knit) with this great little Cat Doodle Stencil on etsy.   Here's the how-to for the yarn and needles! 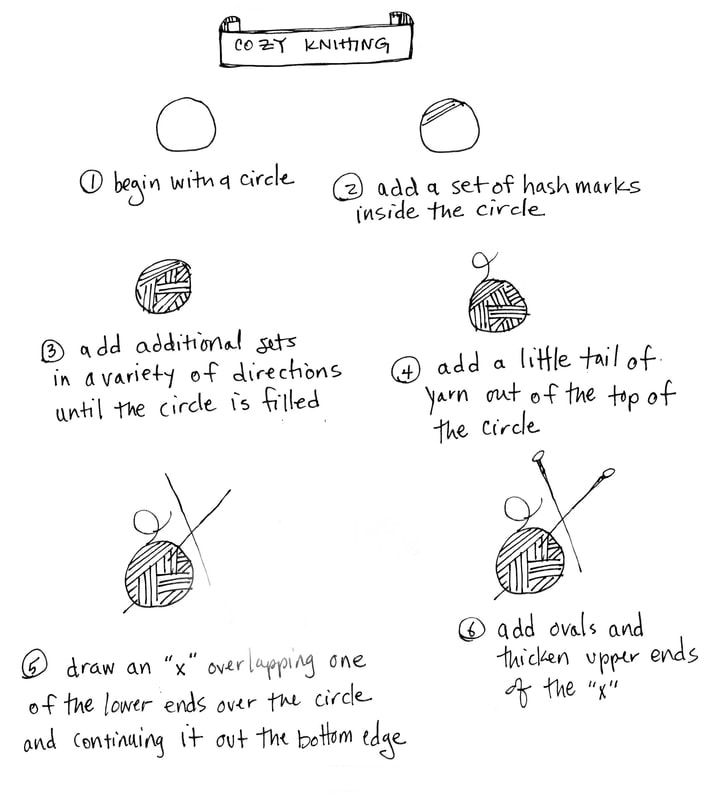 If you're looking for knitting related spread and layout ideas, check out this incredible Craft-related Journaling board on Pinterest!  'Till next week, happy doodling!
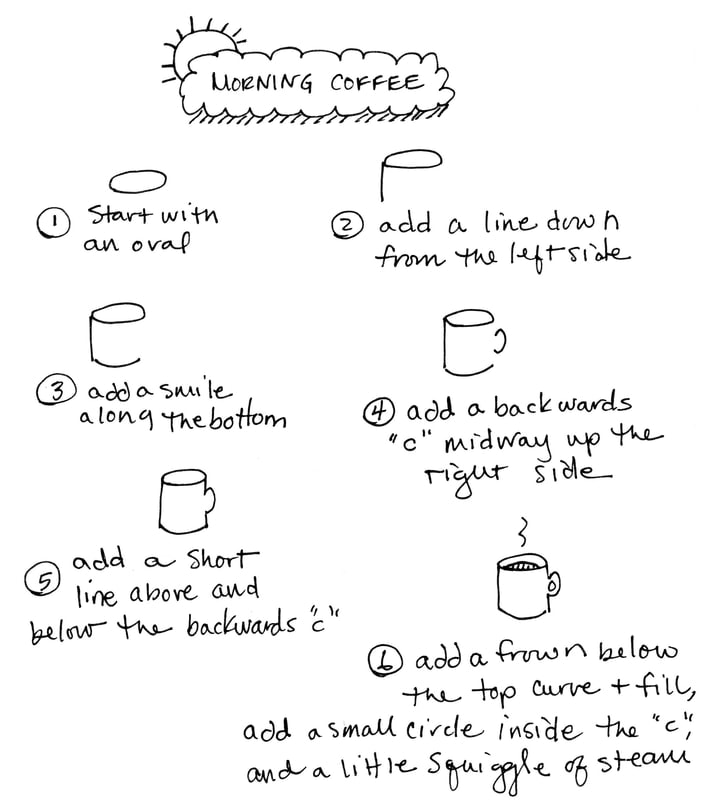
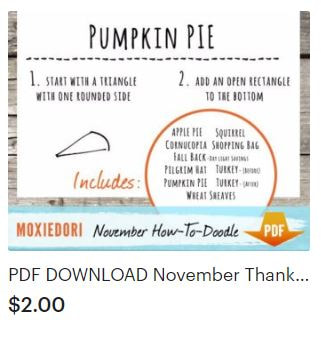
I grew up, a football-ignorer, in a football-frenzied house. To me, this doodle inspires a good book and nap. But I know most people in the United States, and many of you, LOVE that pigskin, plan parties around each game, have entire wardrobes centered around that favorite team, etc. So this one is truly a gift from me, to all of you. November Weekly Doodle - Week 2 - FOOTBALL (or in our house, Sportsball - yes, I married a man who has zero interest in the sport. Ha!) 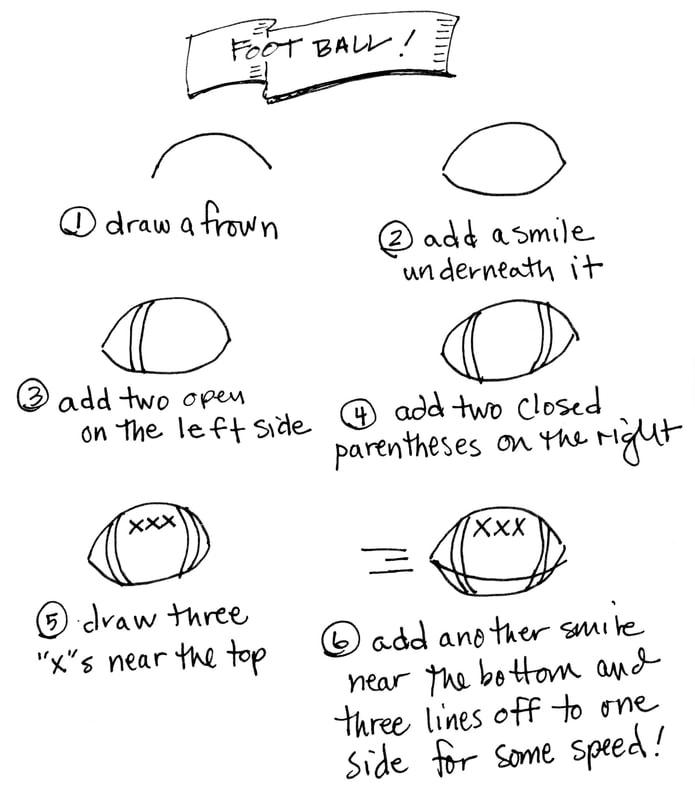 Now, after doodling daily throughout October, you didn't think we'd ask you to stop cold turkey did you? No way! Once a week, throughout the month of November, we'll continue to share a doodle you can add to your daily, weekly, or monthly journal layouts! Speaking of turkey, we've got Thanksgiving Turkey, Pumpkin Pie, and more in our November Thanksgiving Holiday How To Draw Bullet Journal Doodles printed booklet or PDF digital download! November Weekly Doodle - Week 1 - MORNING COFFEE! Enjoy and doodle on!
Are you looking for a new fun mood tracker? Check out this Geometric Mood Tracker. 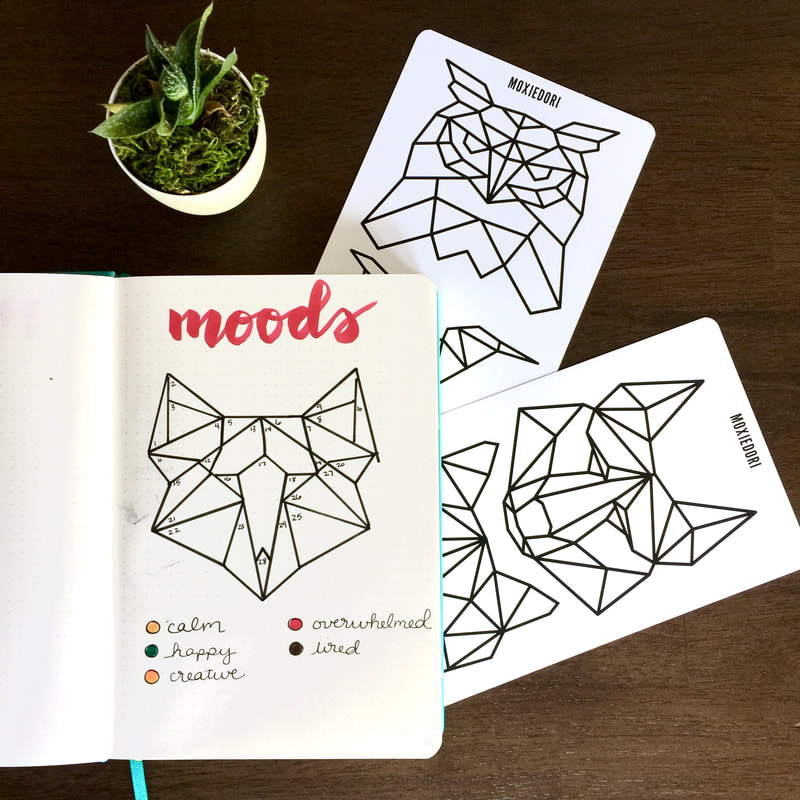 Grab your Geometric Animal Tracing Cards and join us in creating one of these fast, fun trackers. Once you create yours, please tag us on Instagram #moxiedori or share in the Facebook Group Bullet Journaling Tips and Tricks.
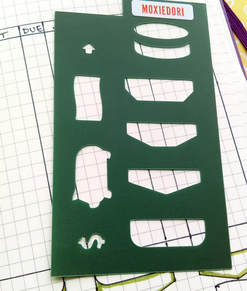
Do you love your bullet journal but sometimes feel overwhelmed by how much time it takes to make your layouts? Check out these bullet journaling stencils that help you to create layouts quickly and accurately. 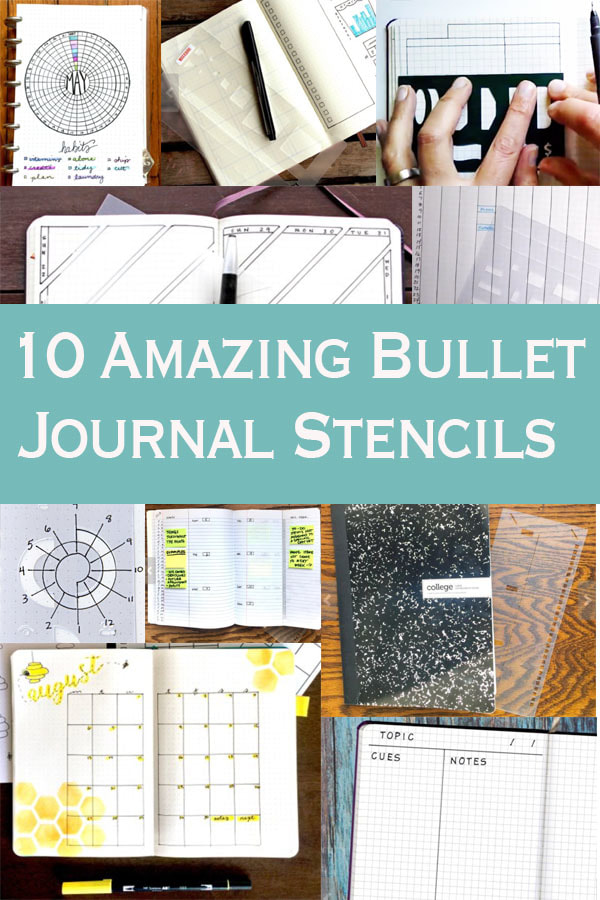 1. The Tidy Slider
If you use a horizontal weekly layout, this is the stencil for you. The Tidy Slider has a vertical slit for you to slip pages into to anchor it in place. The exposed portion of the stencil is wide enough to make the standard six column horizontal weekly spread. The stencil also has notches to create a one box gutter between the columns, horizontal guide marks to create half columns and perfectly sized task boxes. Want to see The Tidy Slider in action? Check this out: 2. The Super Slider
Do you use a vertical weekly layout? The Super Slider will make your vertical weekly layout in short order. It has a slit in its center for you to slip your page through. The right half of the stencil is perfectly sized to make a vertical line down the exact center of your page. That's right - no more measuring or counting because it's all measured for you. The stencil also hosts a horizontal line of the perfect length to pen the daily horizontal sections. The Super Slider also features a 1x1 grid task box, a 2x2 grid tracker box, a 7x8 mini calendar box, a water cup for tracking fluids, a 4x4 box for habit tracking, and several corner cuts for the date. The Field Notes Super Slider performs the same functions in a FN journal. Check out how easy your weekly layout could be: 3. Diagonal Triangle Weekly Stencil
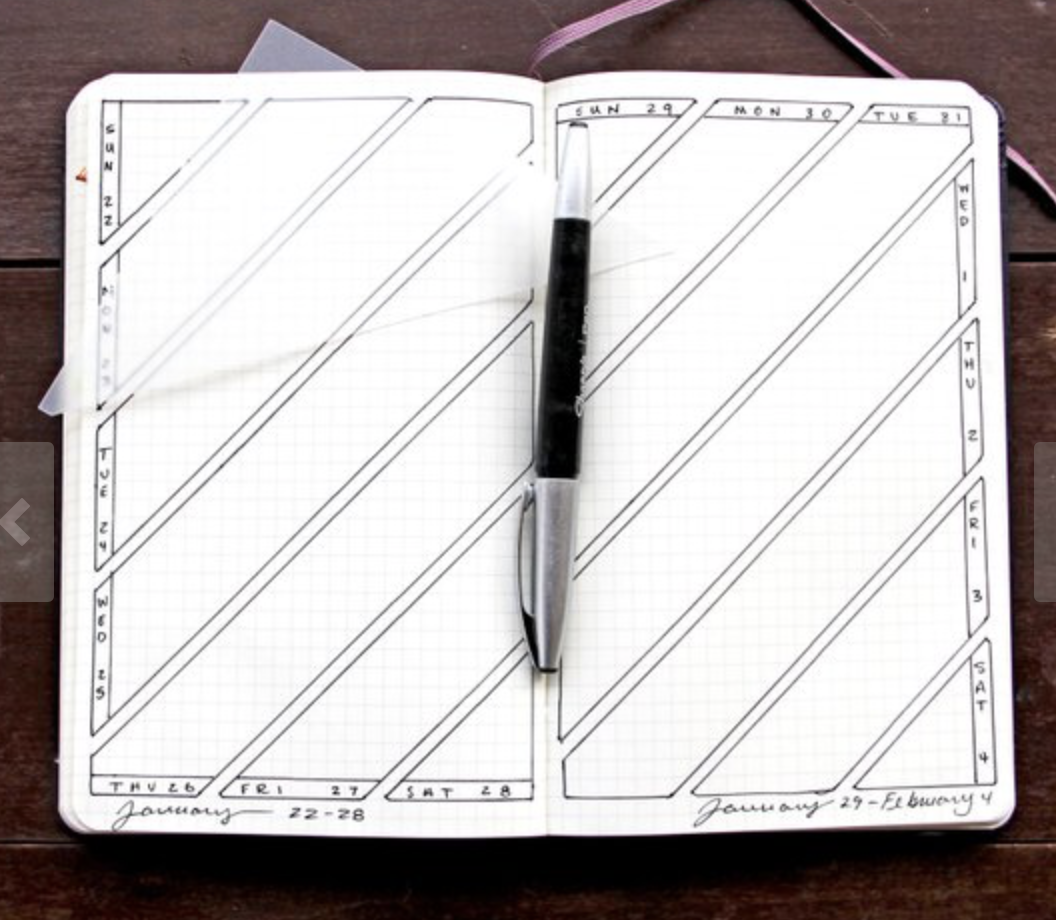
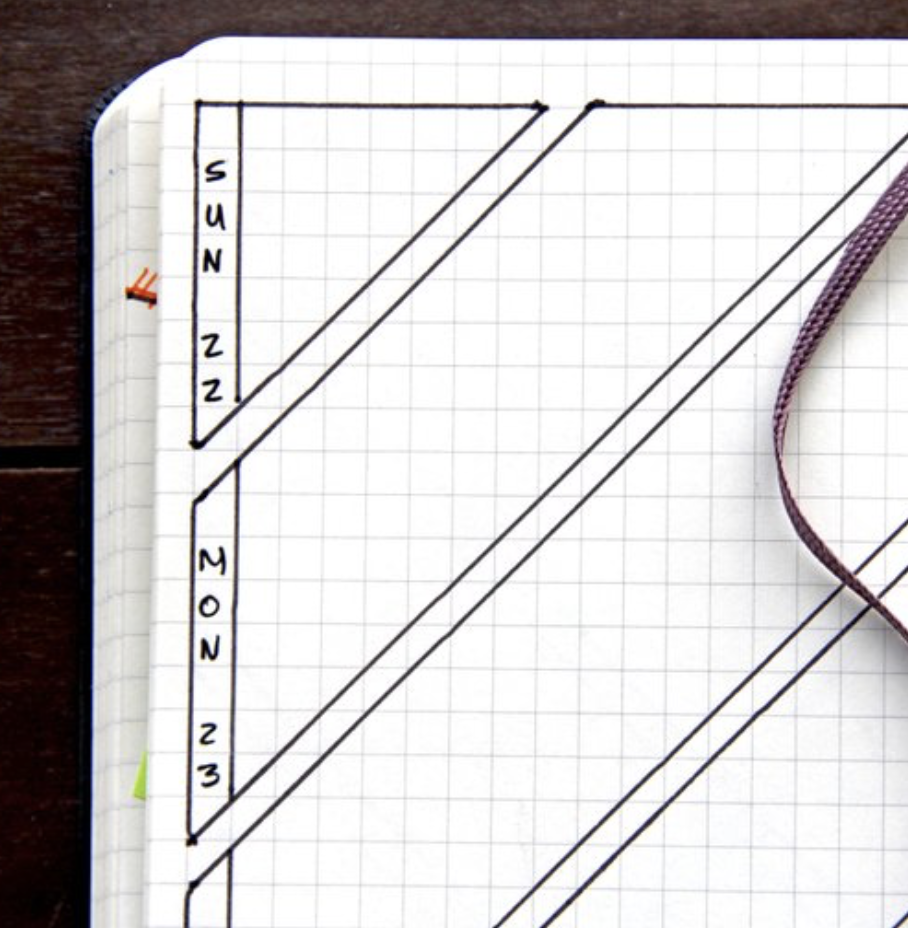
Do you love the look of those minimalist, diagonal layouts but shy away from them because they are hard to make? . The Diagonal Triangle Weekly Stencil makes this layout easy to make. This triangular stencil hosts perfectly measured angles and notches that create evenly spaced diagonal columns. You can make them all go the same direction or create a chevron pattern. There are notches on the triangle to mark exactly where you start and stop. You can also make a large triangle layout with this stencil. Once again, the notches guide you so you create a perfect sized triangle that repeats the perfect number of times on the A5 bullet journal page. Watch how easy this spread is to make: 4. Moxie Journal Rule
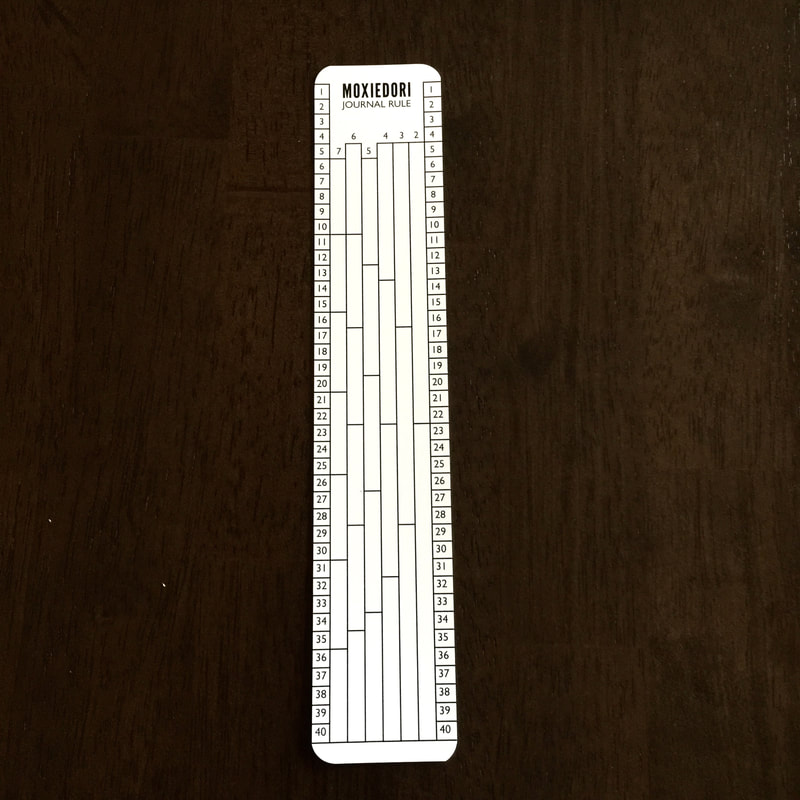
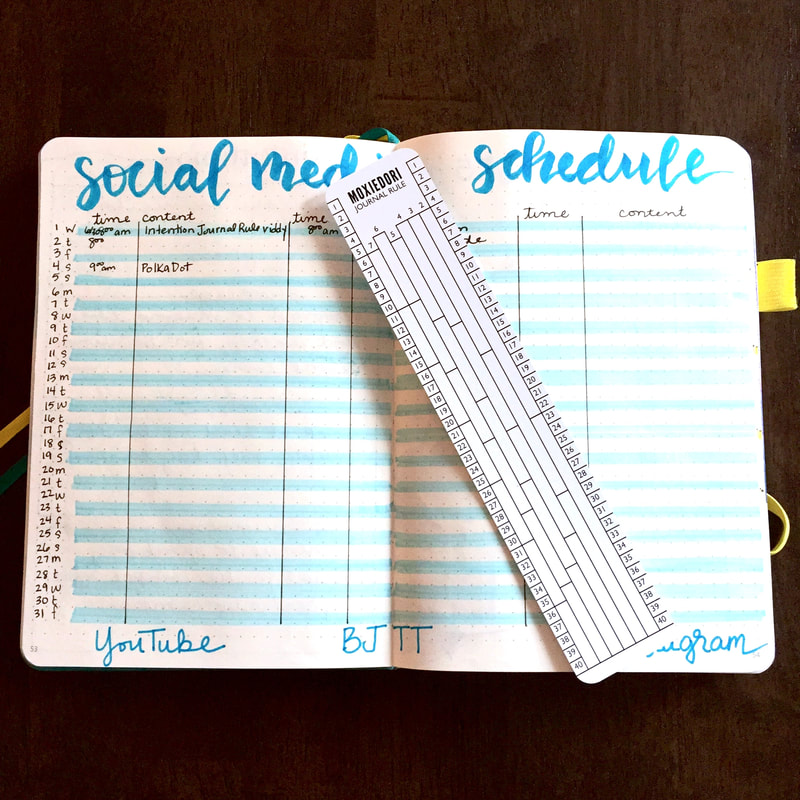
Are you looking for an all around functional tool? This one can be used to make all layouts. The Moxie Journal Rule is a straight edge, a ruler, a column and row measure, a bookmark, and likely to be one of the most useful planner accessories you own. It is made of flexible, durable, plastic, with 5mm increments printed on both edges that perfectly align with a standard 5mm grid. You can easily and quickly divide your page into 2, 3, 4, 5, 6, or 7 equal columns or rows. Watch this tool in action: 5. Composition Notebook Stencil
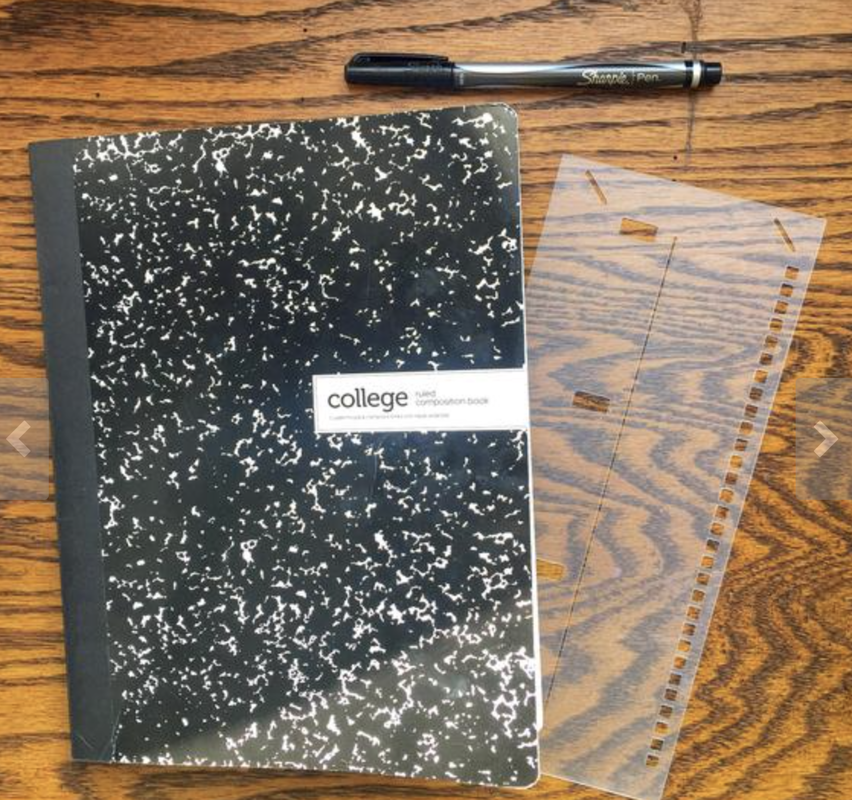
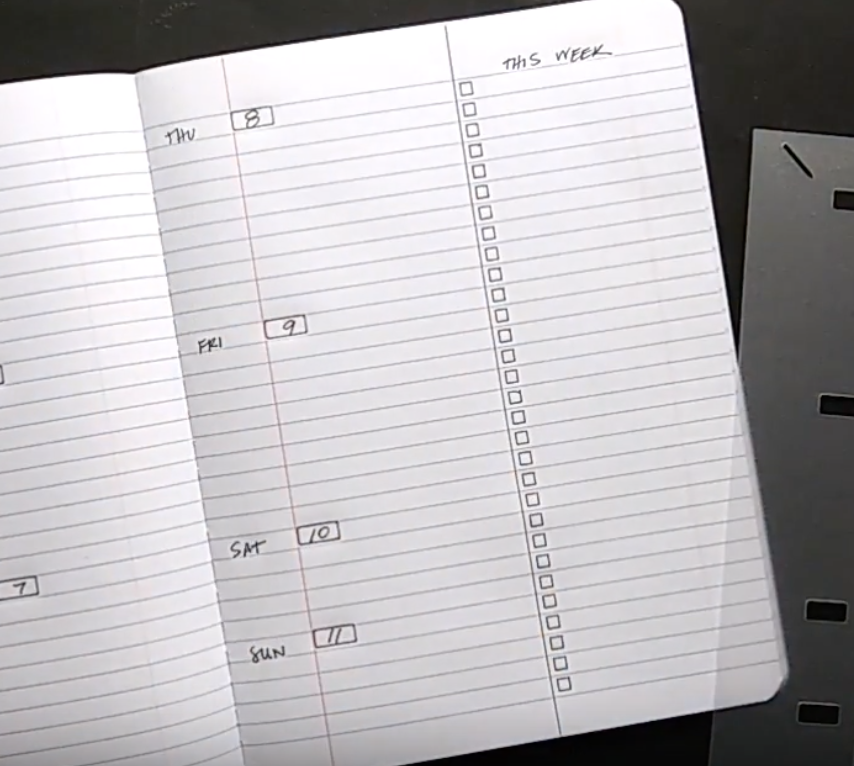
Looking for a way to get straight to it and bullet journal on a budget? This cleverly designed stencil does it all. The Composition Notebook Journal Stencil turns an ordinary, inexpensive college ruled composition book into a bullet journal planner. Use it to create yearly, monthly and weekly spreads. The stencil includes 30 perfectly placed tick boxes, rectangles for weekly dates, and pen guides for one third page monthly column dividers. The stencil itself is just wide enough to create the dutch door fold over task area that allows you to see both your monthly and weekly spreads at the same time. Find out how to use this stencil here: 6. Time Spiral Stencil
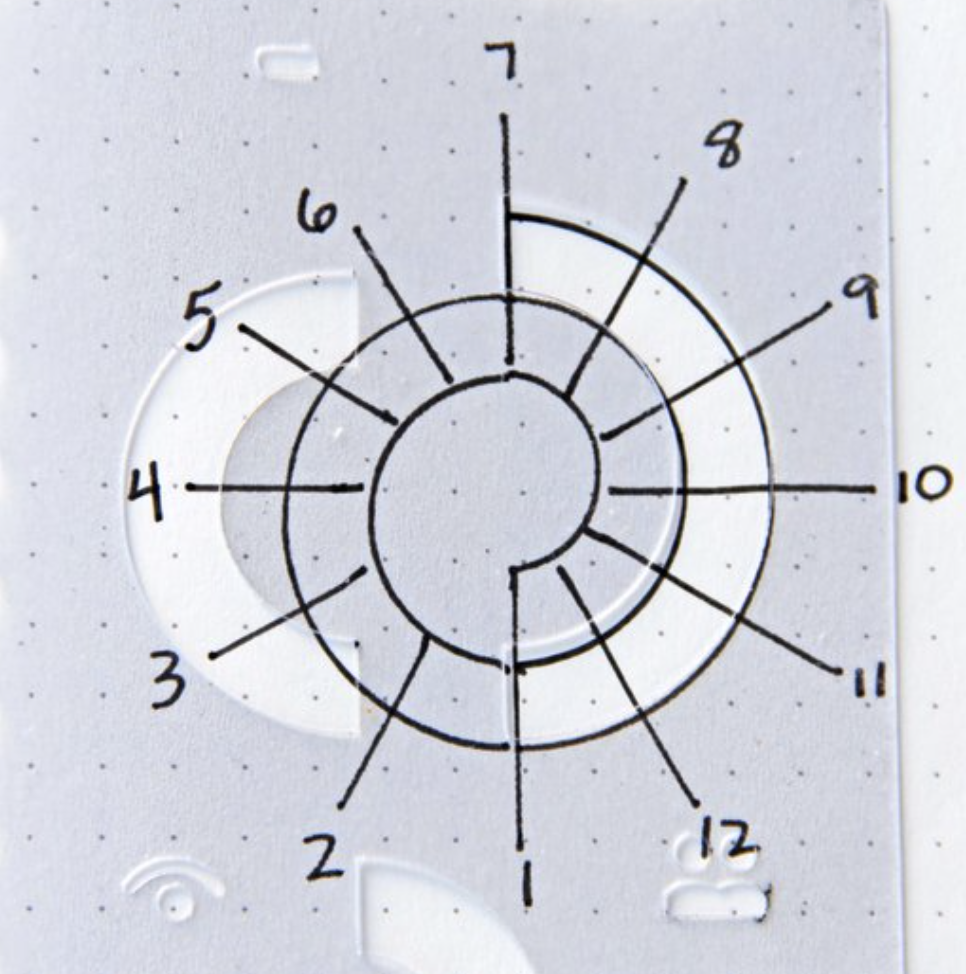
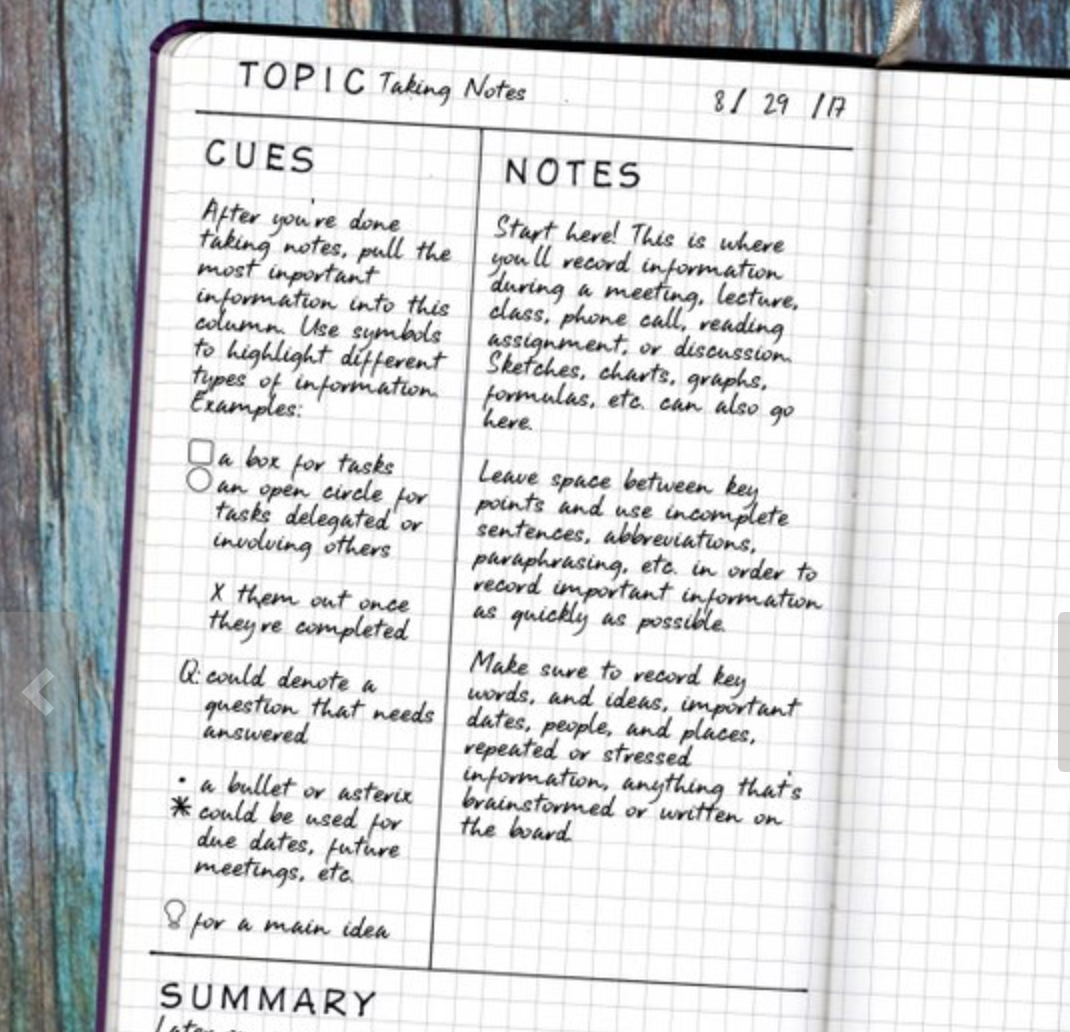
This stencil is a must for those who track their time. The Time Spiral Stencil is comprised of three essential elements for daily time tracking. The Time Spiral tracks 24 hours per day. The Timeline tracks up to 18 hours per day in a vertical, or linear, format. The stencil also hosts time keeping icons such as awake, asleep, start, stop, meeting, a pin, and a pencil. 7. Student Note Taking Stencil
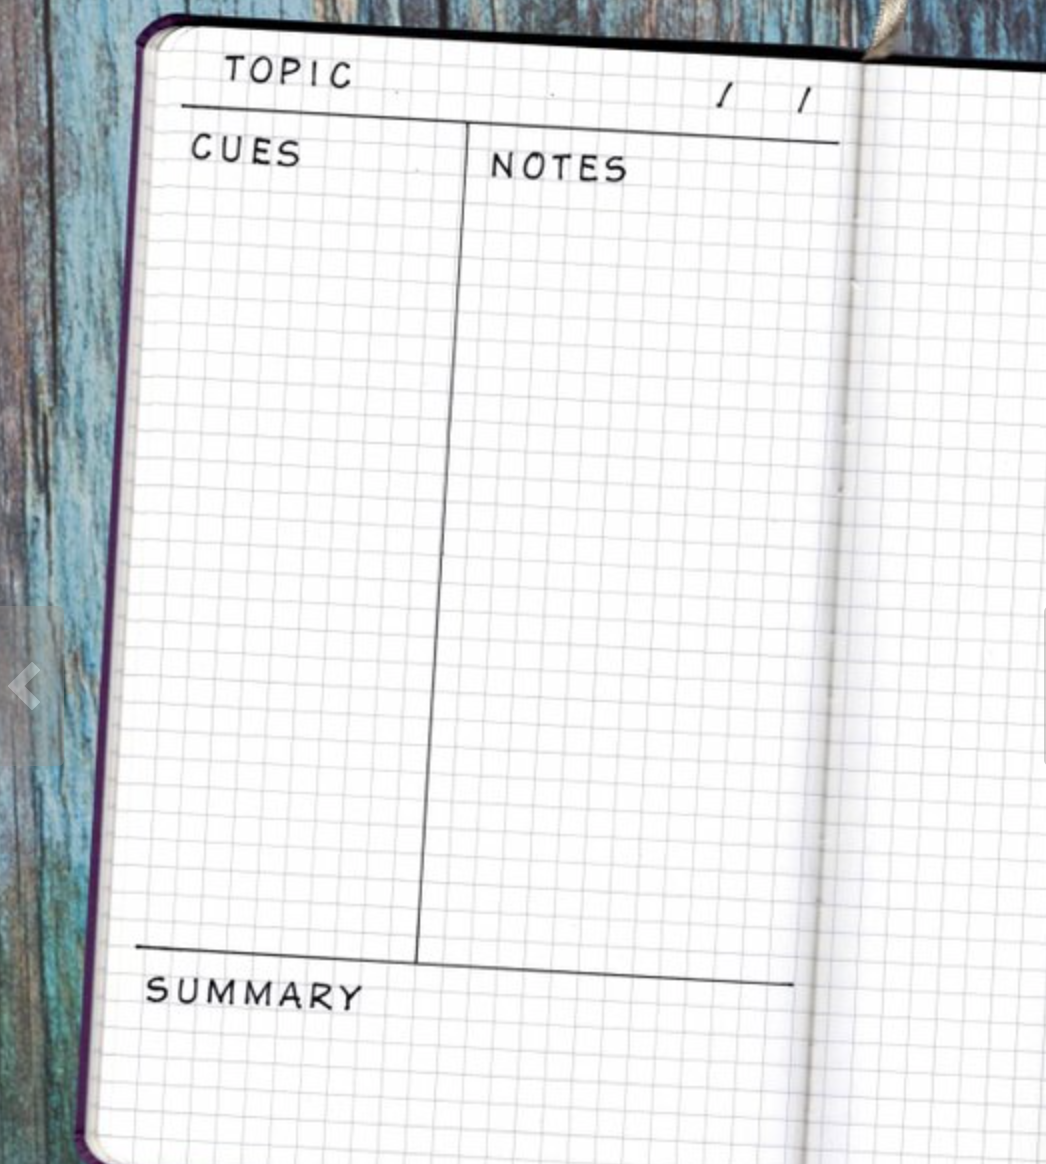
Do you take notes for classes, training, or business meetings? Are you looking for a consistent, logical, tested layout to organize information? The Student Note Taking Stencil was inspired by the Cornell Notes method of note-taking and proves to be the structure that many need but have difficulty creating. Learn more here: 8. Budget Tracker Stencil
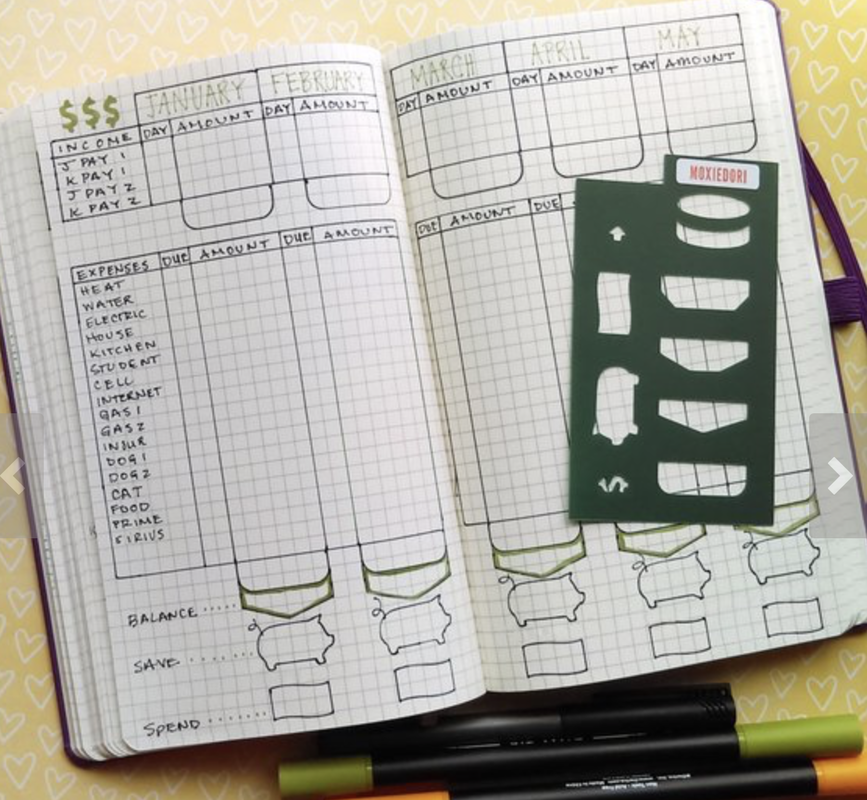
Want to create a budget spread but need help with the structure? This cleverly designed Budget Tracker Stencil assists you in creating budget and savings layouts. In addition to the 9 budget elements on the stencil, the stencil itself is perfectly shaped and sized to make budgeting spreads. The tabbed top of the stencil creates a perfect monthly row. The stencil is perfectly sized to make rows and columns you need to pen a concise, accurate layout. Use the tab elements to capture the totals, gather lists of reoccurring expenses, or document due dates. Watch this to learn how to make an all encompassing budget layout: 9. Monthly Calendar Tracing Card
Set up your monthly calendar with ease. This Monthly Calendar Tracing Card is used for penning a monthly calendar. Slip this vinyl tracing card behind your page and trace your calendar. The lines fit perfectly on grid and dots journals. The card is double sided - left page of spread on one side, right side of spread on the back. Watch how easy this process can be: 10. Compass Protractor
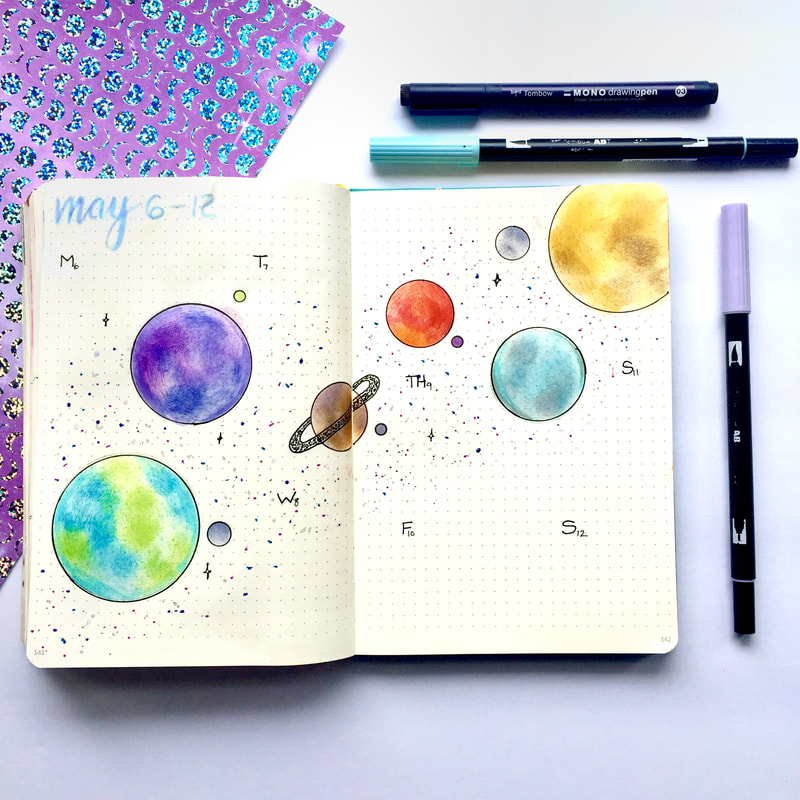
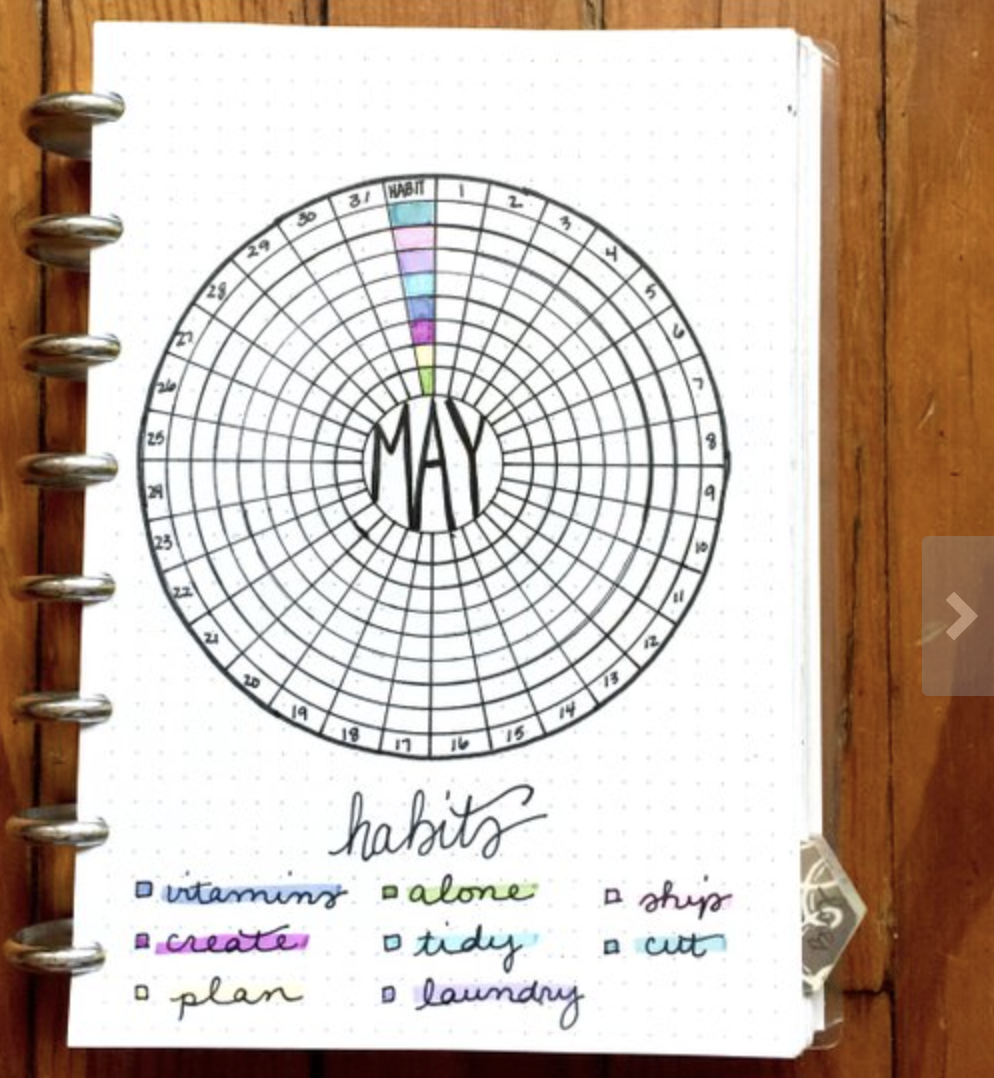
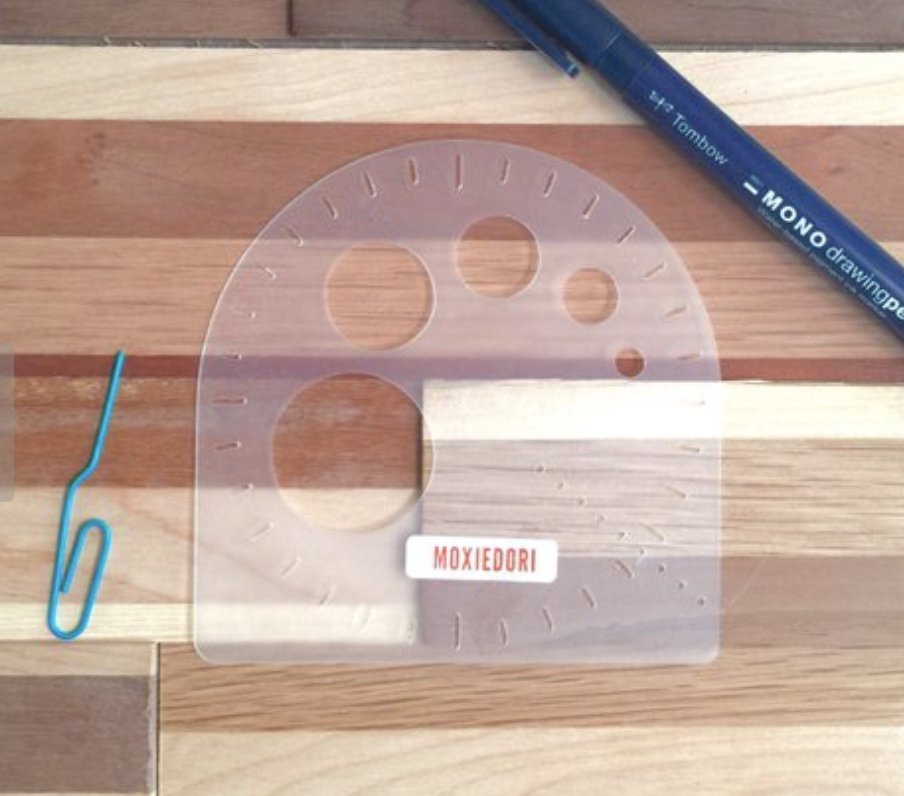
Do you like those circle dailies, monthlies, trackers, intention wheels, mood mandalas, etc. but can't for the life of you get all of the circles to fit nicely to your journal grid and sections drawn just right? The Compass Protractor is for you. It's three tools - a compass, a protractor, and a straight-edge. This stencil makes concentric circles from 5mm to 120mm in diameter. It also measures out segments, sections, or "pie pieces" every 11.25 degrees, which means it divides a circle into 2 to 32 equal segments, perfect for making monthlies, dailies, and mandalas. Here is one of the multitude of ways this stencil can be used: Kris and Amy love creating for the vibrant and supportive journaling community. Thank you so much for supporting our small women owned business. We truly appreciate and love our clients.
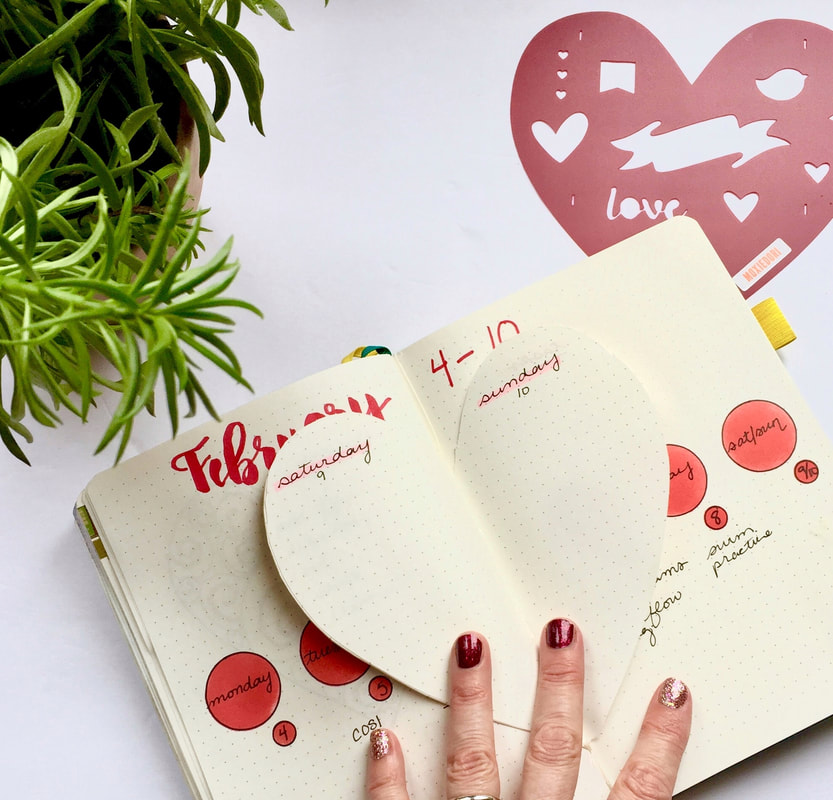
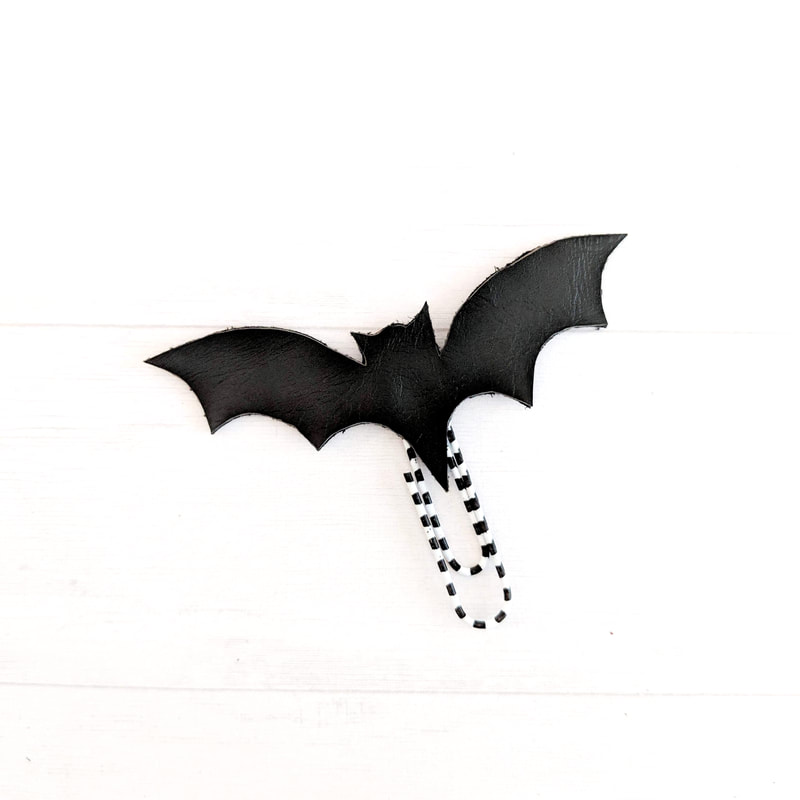
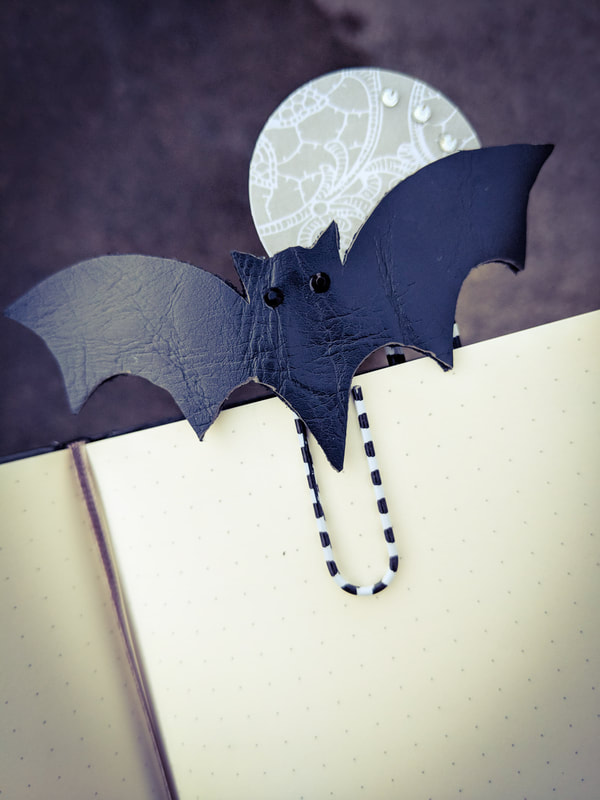
If you would like to join us in sharing and inspiring one another, come join our Facebook group Bullet Journaling Tips and Tricks. 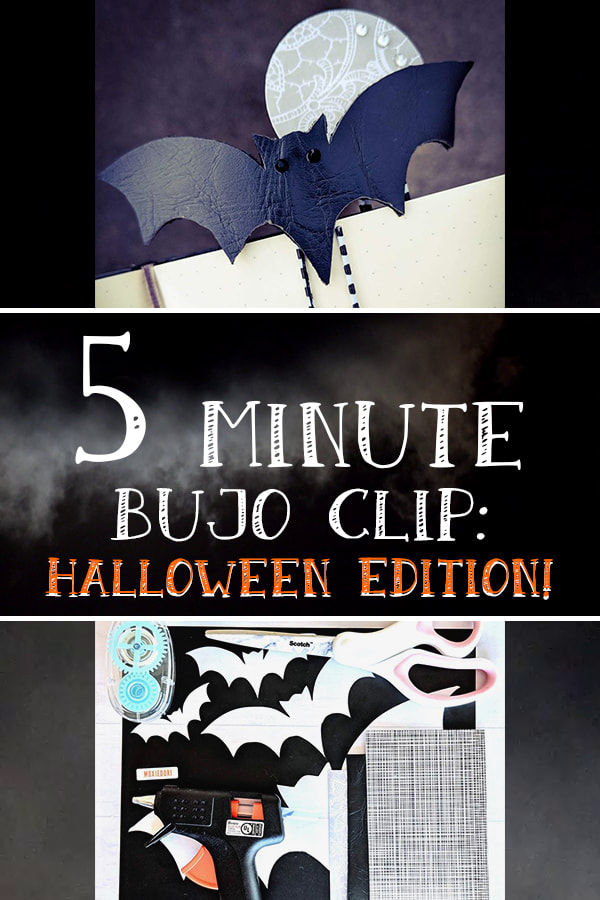 Megan Futo of @megansonfireee was kind enough to share her DIY planner clip crafty knowledge with us today. She PMed me and showed me the bat bujo clip she made using the Halloween Bullet Journal Kit and I was WOWED! I asked her if she would teach us and she said yes! So, without further ado, here's Megan. We are taking the stencil off of the Bujo page and upping your top game. Top game? Ehhh, what is she talking about? Fun and fancy paper clips for your Bujo or planner! The MoxieDori Halloween kit is perfect for this and you can have a new clip in 5 minutes or less, I promise. Let's get started. 1. Gather Supplies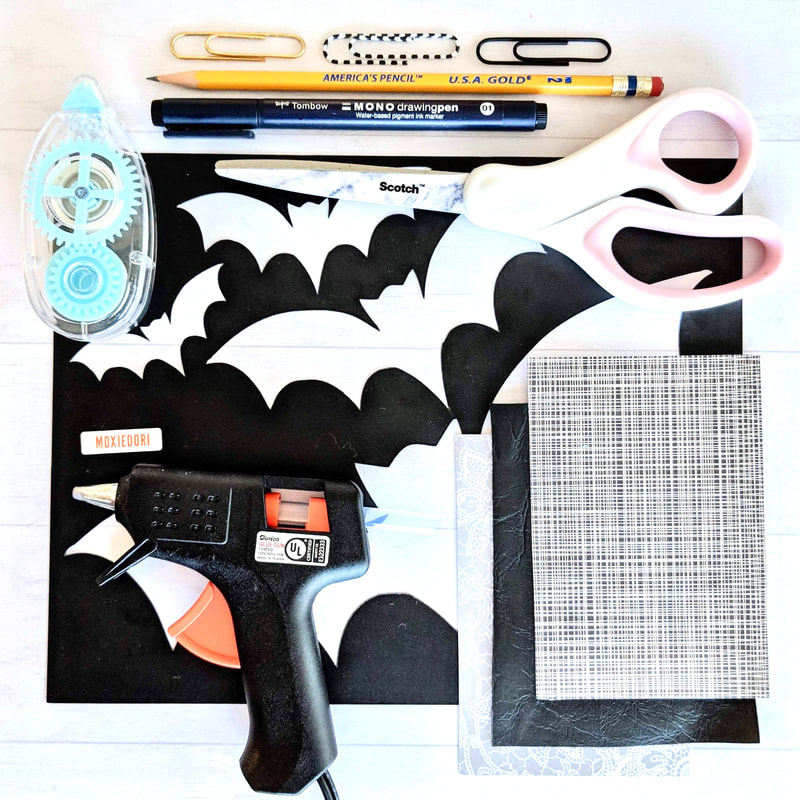 Gather your supplies. Clips can be made from paper, felt, fabric, vegan leather, the options are endless. For this tutorial I chose the vegan leather and my hot glue gun. If using paper for your clip, a glue runner works well. 2. Use the Stencil to Trace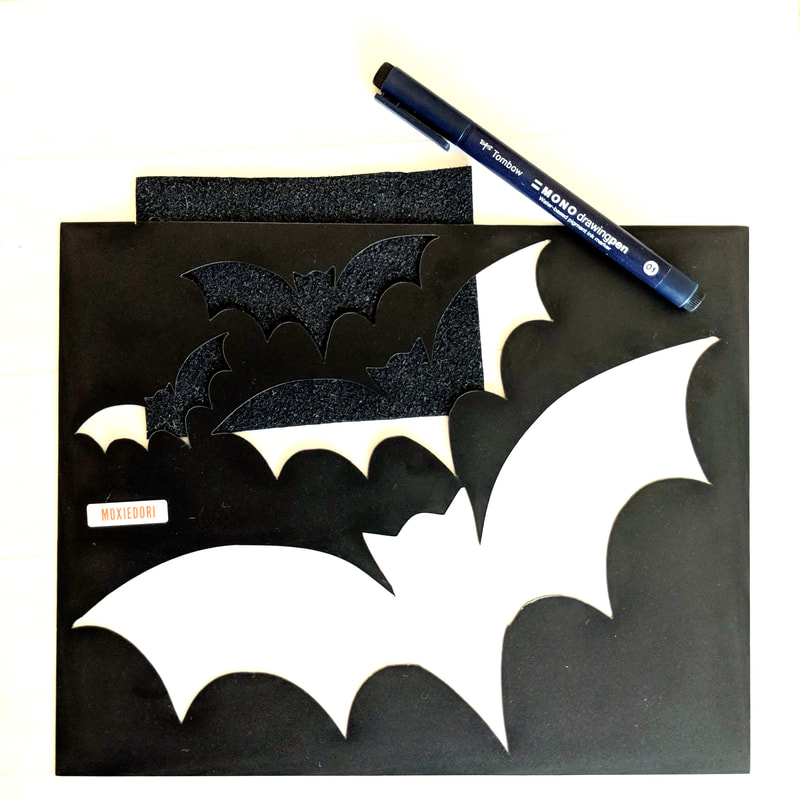 Pick your bat size and trace. I chose the second smallest bat on the Bat Scene stencil for my A5 Moleskein because the scale is perfect for the journal and a full size paperclip. 3. Cut out the Bat Cut out your bat and backing piece. My backing piece is about ½ inch in length and about ⅝ of an inch in height. 4. Assemble the Bujo Clip Center your paperclip over the back of your bat. 5. Glue Together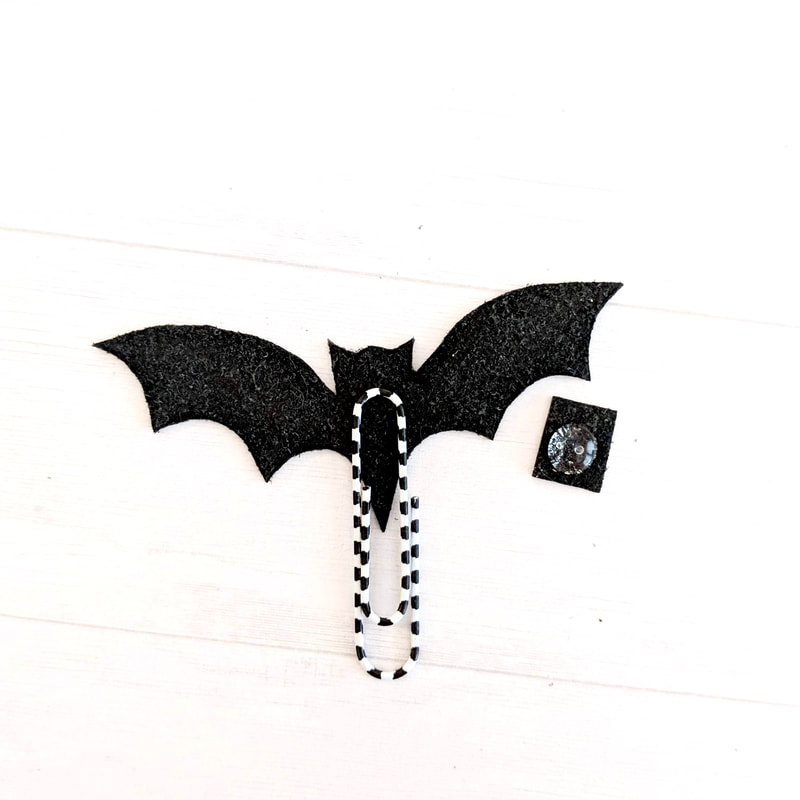 Add a pencil eraser sized amount of hot glue to the backing and place it down centered over the paperclip and bat. 6. Almost There!!!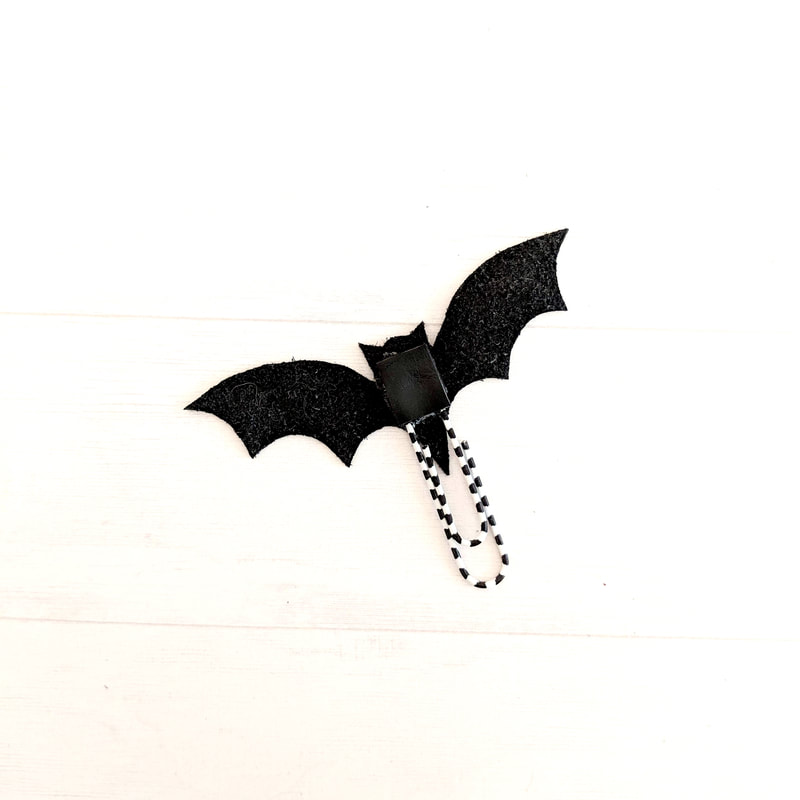 Press firmly! You want the backing piece, paperclip, and bat to become one. 7. Enjoy!!!
Admire your work and enjoy!
Thanks a ton to Megan for taking the time and energy to share with us. We appreciate your creativity and creations. We LOVE to see what you make with our tools, so please share photos of your work with us. If you are looking for more Halloween Bullet Journal inspiration, check out this Hair Raising Halloween Bullet Journal Layouts post or this Halloween Bullet Journal Pinterest board. Facilitating your creative flow is the very reason why we do what we do. We appreciate your support of our small, woman owned business.
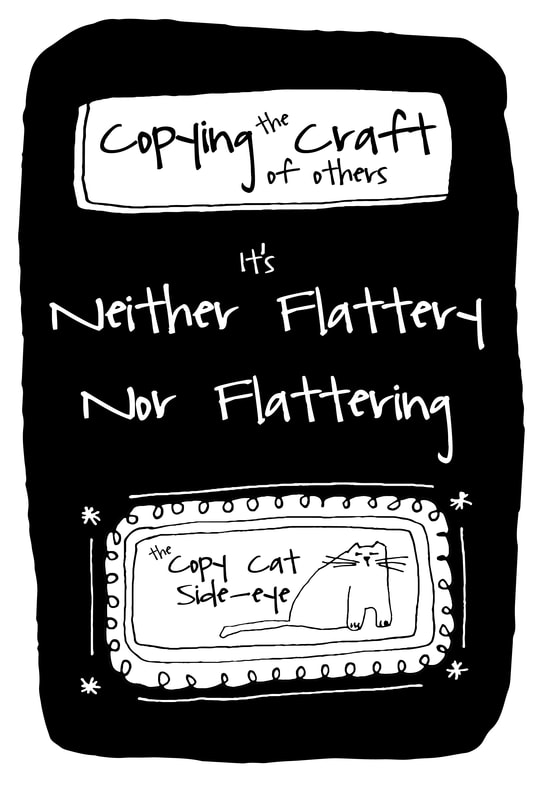
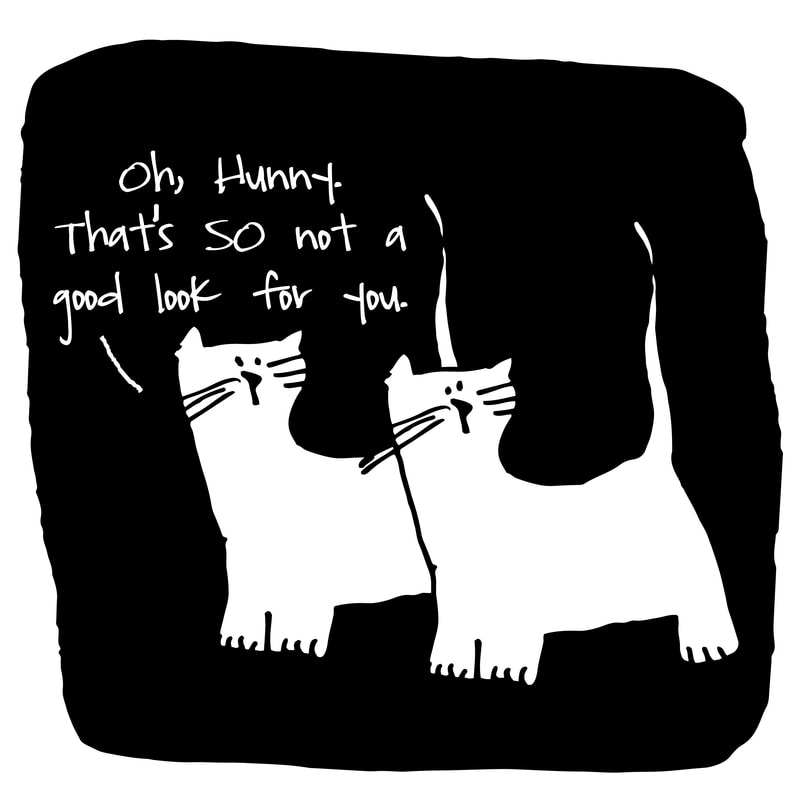
To mitigate our frustration, Amy went to yoga and "sweated out her rage", and afterwards we reminded ourselves of the following tenants we offer to you, fellow makers, in case you've endured your own copycat or two.
Be kind to each other out there, folks.
Love, Moxie
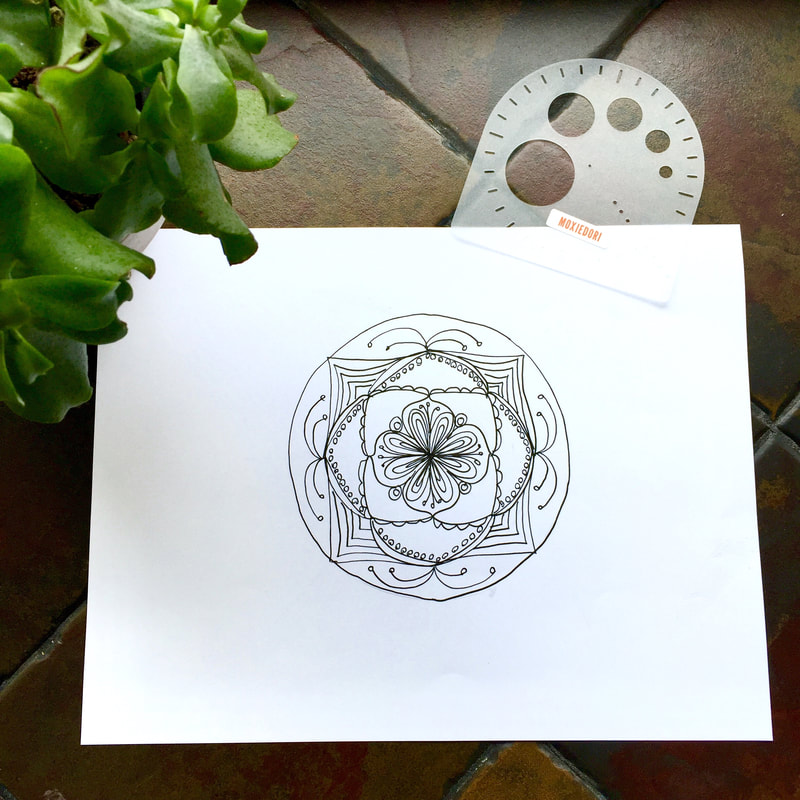
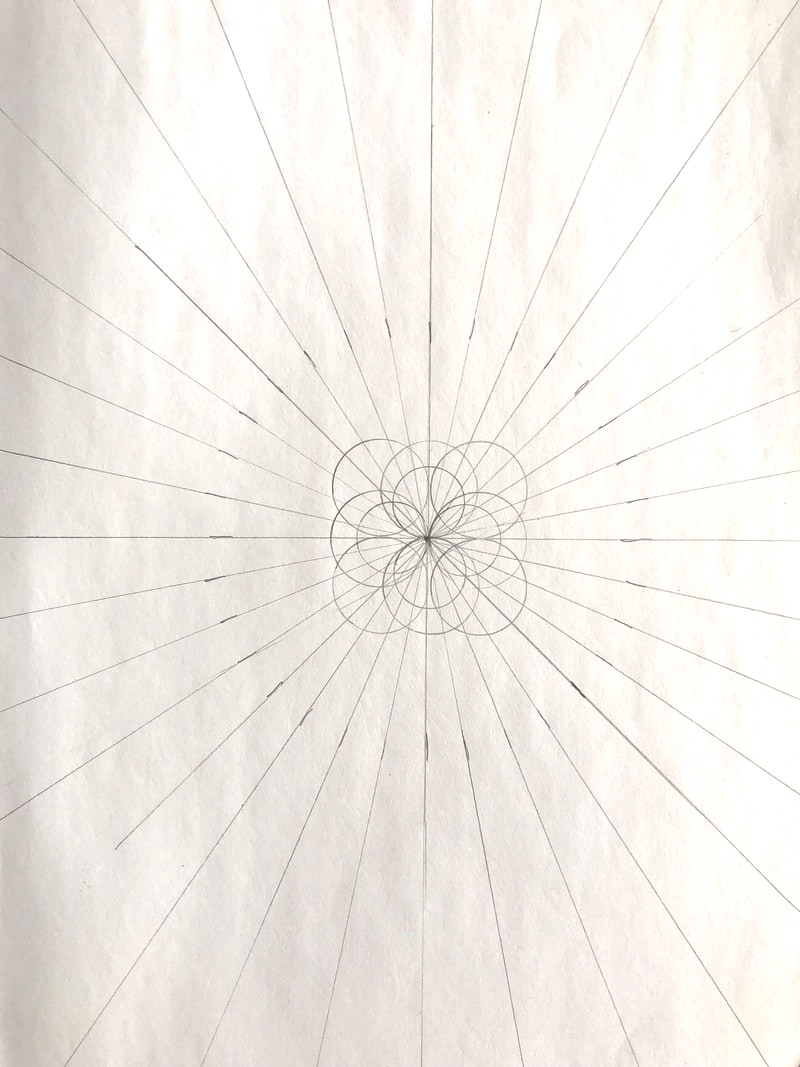
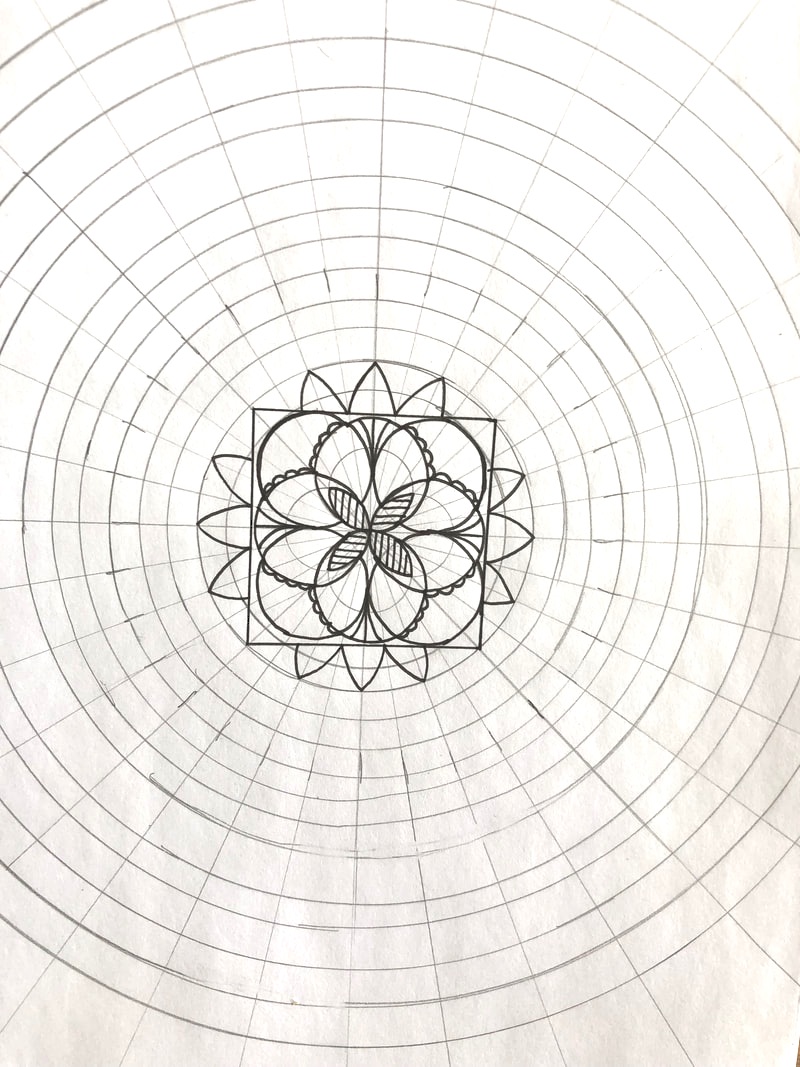
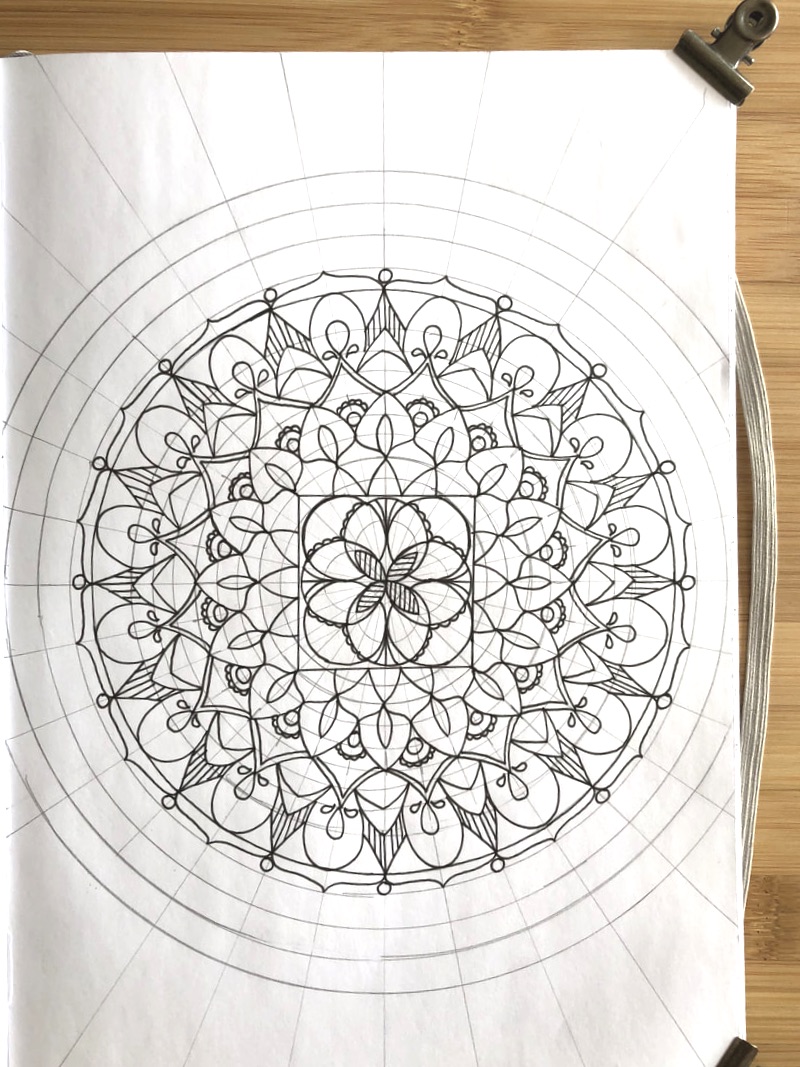
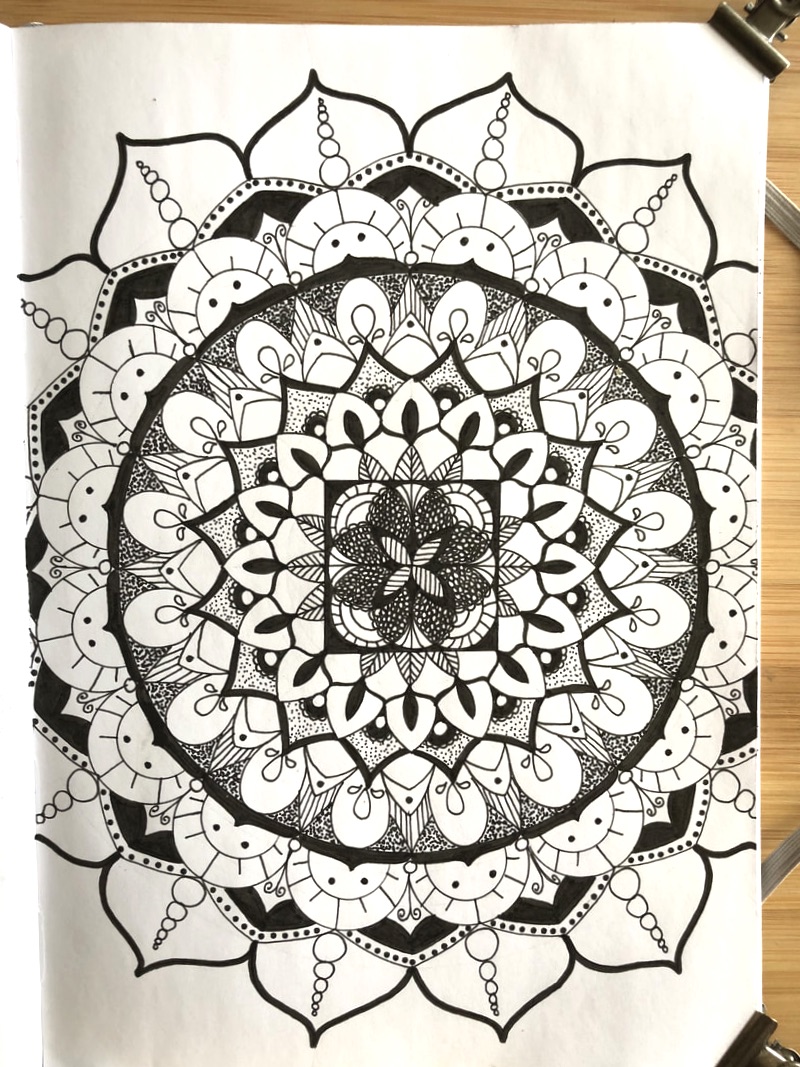
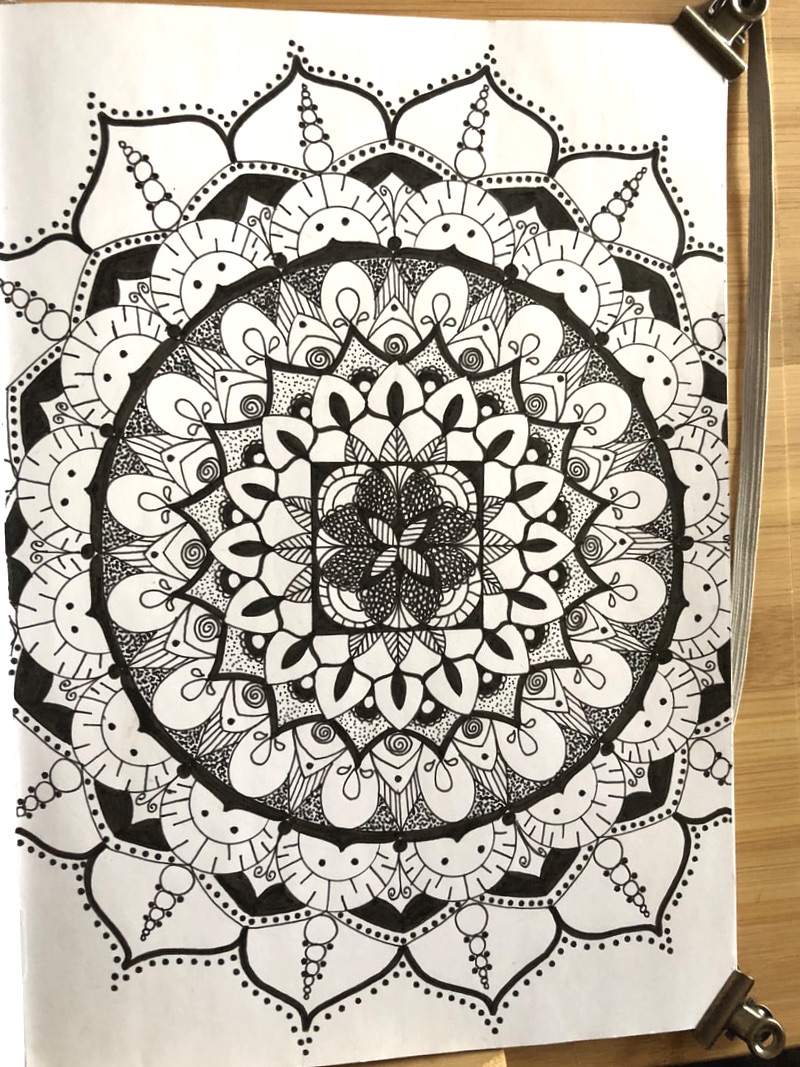
Gather Your SuppliesStacey uses the MoxieDori Compass Protractor, the Mandala Maker, Faber Castell pens and her bullet journal to make her mandalas.
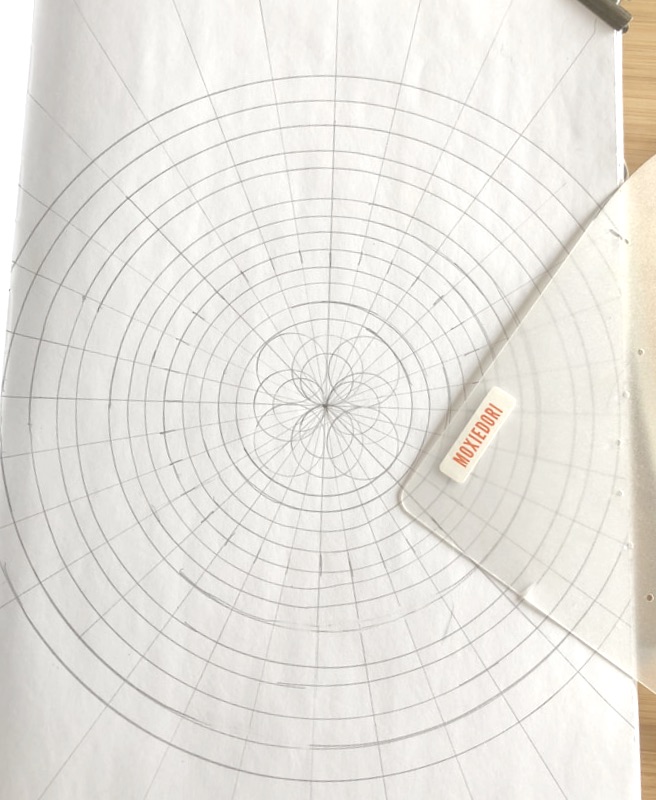
MoxieDori ships free within the US on orders over $35. The Compass Protractor and Mandala Maker are exclusive designs of MoxieDori and are only sold at MoxieDori.com and the MoxieDori Etsy Shop. Both tools come with written directions and there are easy to follow how to tutorials on the listing pages. Amy and Kris at MoxieDori provide excellent customer service and are available for questions. Main Guidelines and CenterStacey first marks the center of the mandala using the center hole of the MoxieDori Compass Protractor. She then uses the hash marks to divide the page into eight equal parts and connects opposing hash marks with a straight edge.
Next, Stacey uses one of the circle cutouts on the compass protractor to create a design in the middle of the piece.
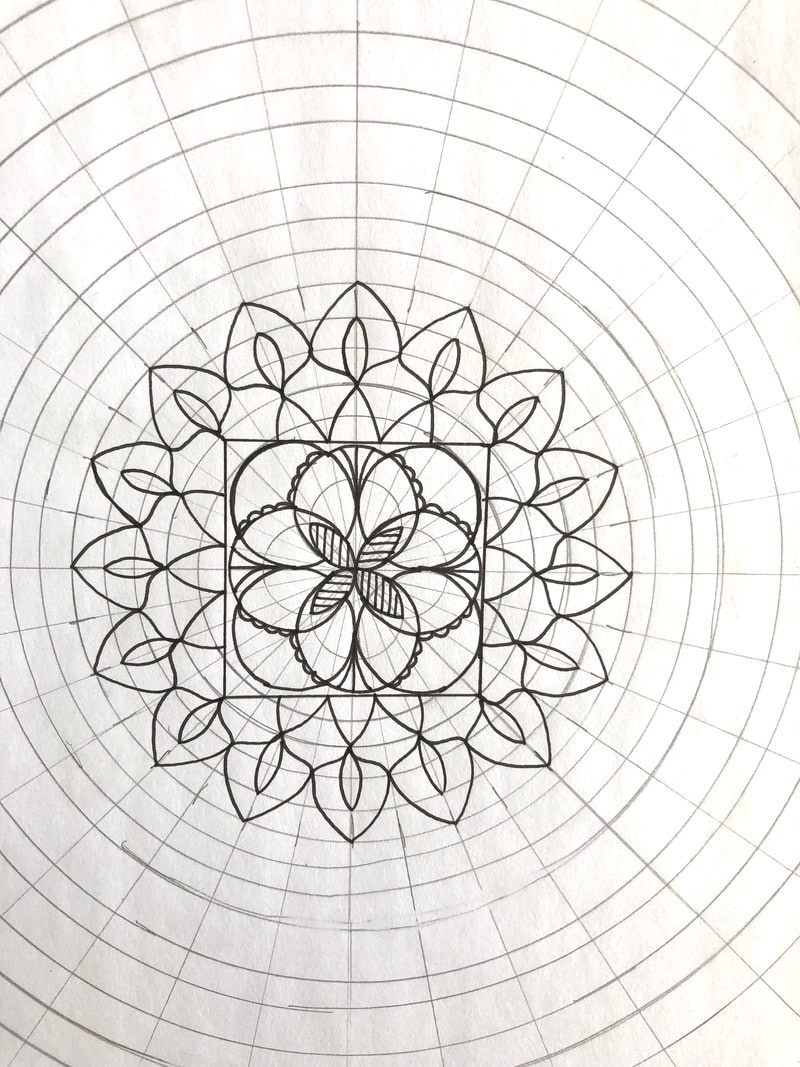
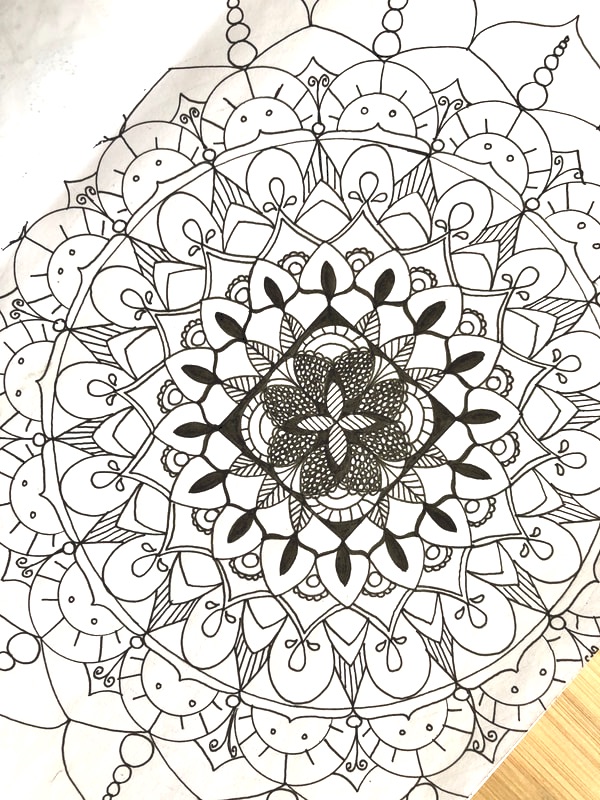
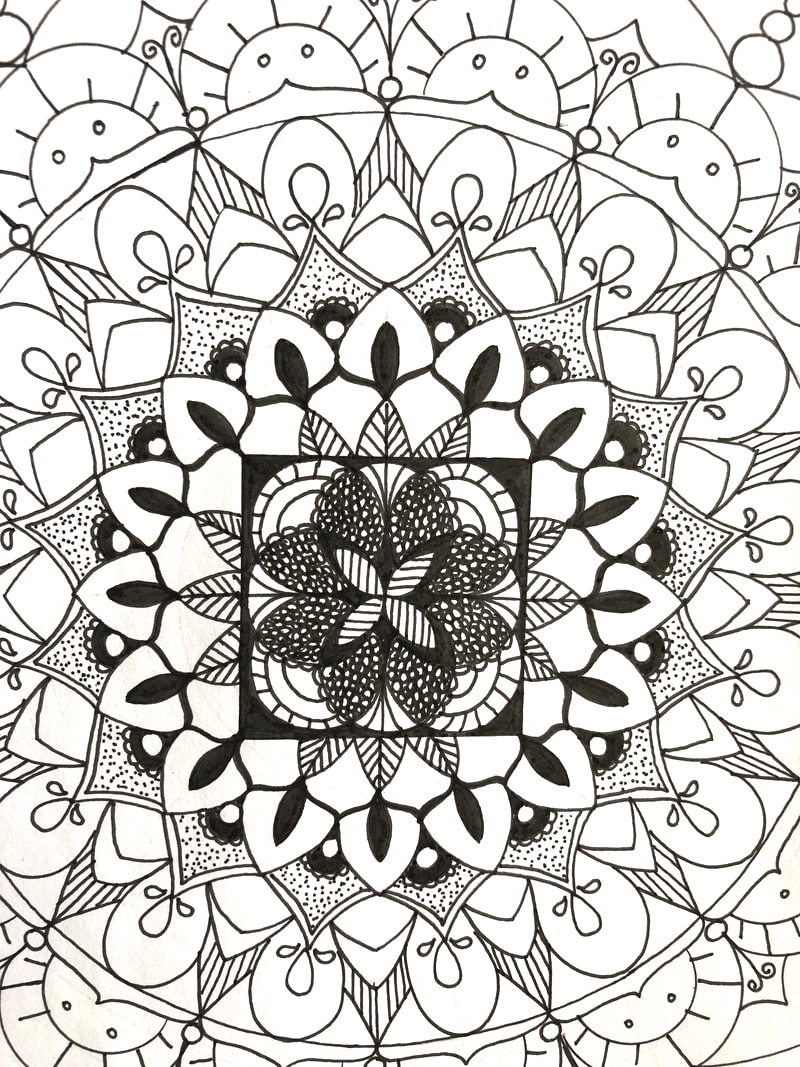
Supporting Guidelines and Concentric CirclesWhile mandalas are usually drawn using circles divided into 16 equal parts, Stacey's intricate creations have 32 equal parts. In doing this, she creates a complex structure to support her smaller elements and detailed shading. She uses the Compass Protractor to divide the circles in 32 pieces.
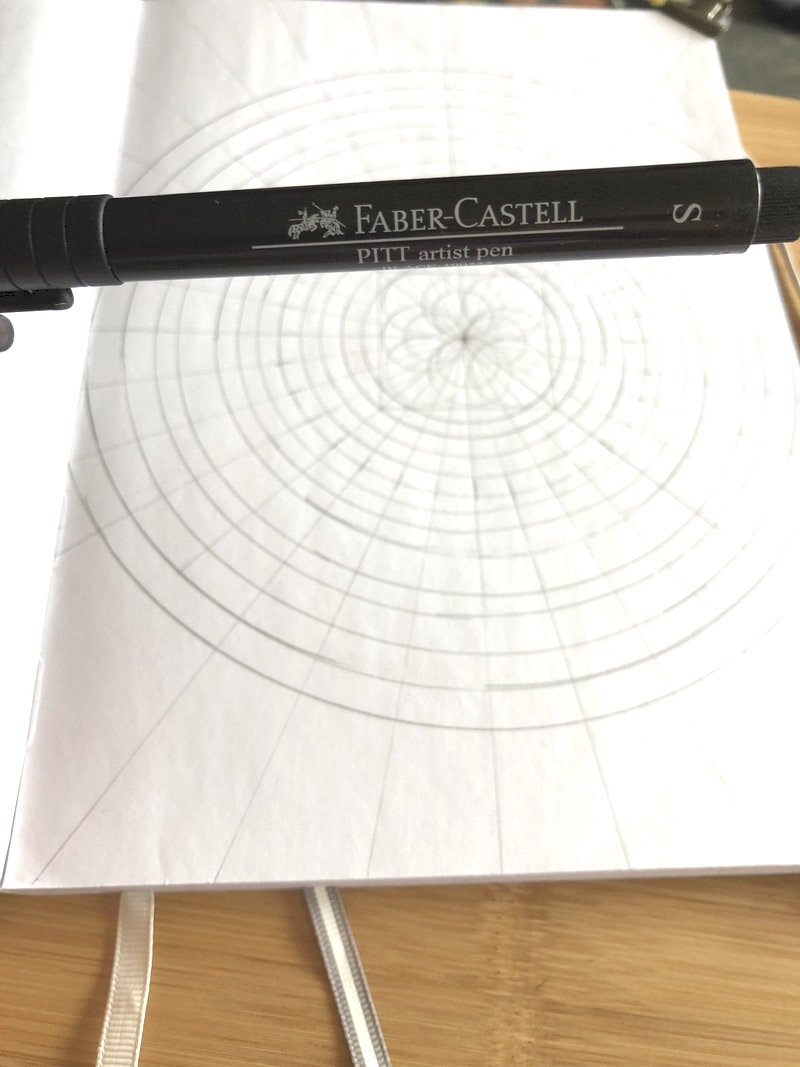
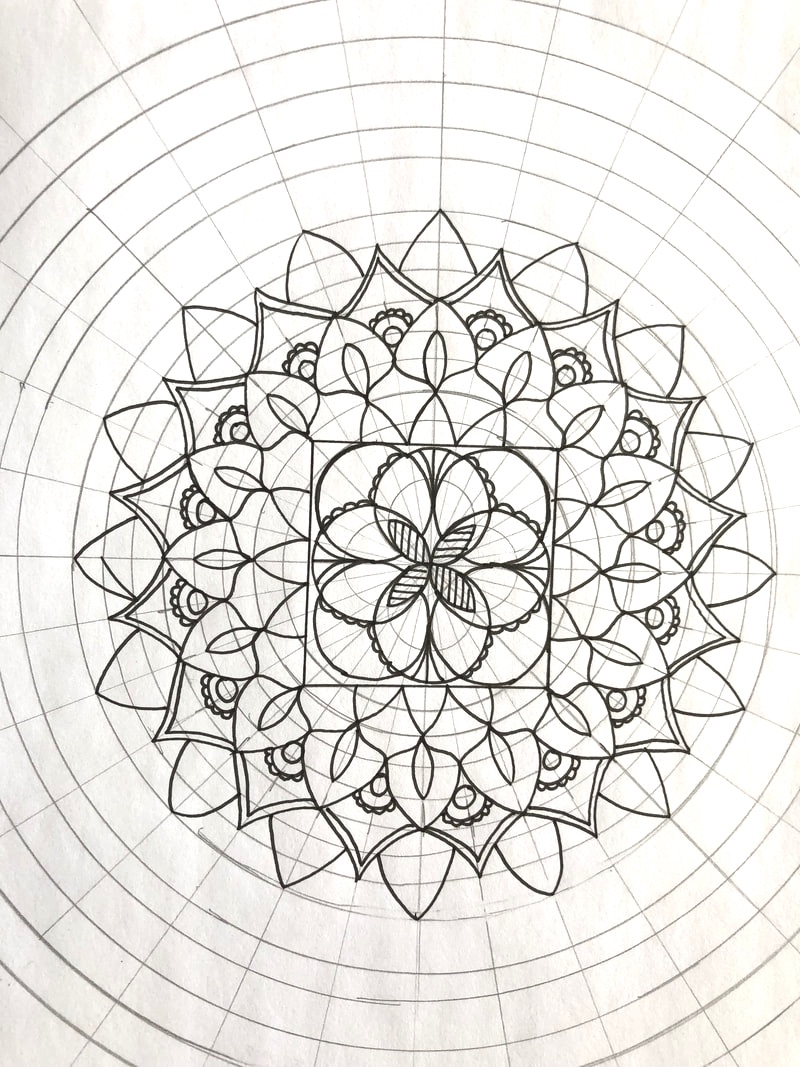
Pen to PaperOnce the framework is penciled in, Stacey took a fine nib pen, such as the one in this Faber-Castell Pitt Artist pen set, and made permanent the mandala elements on her grid. She starts from the center and works her way outward.
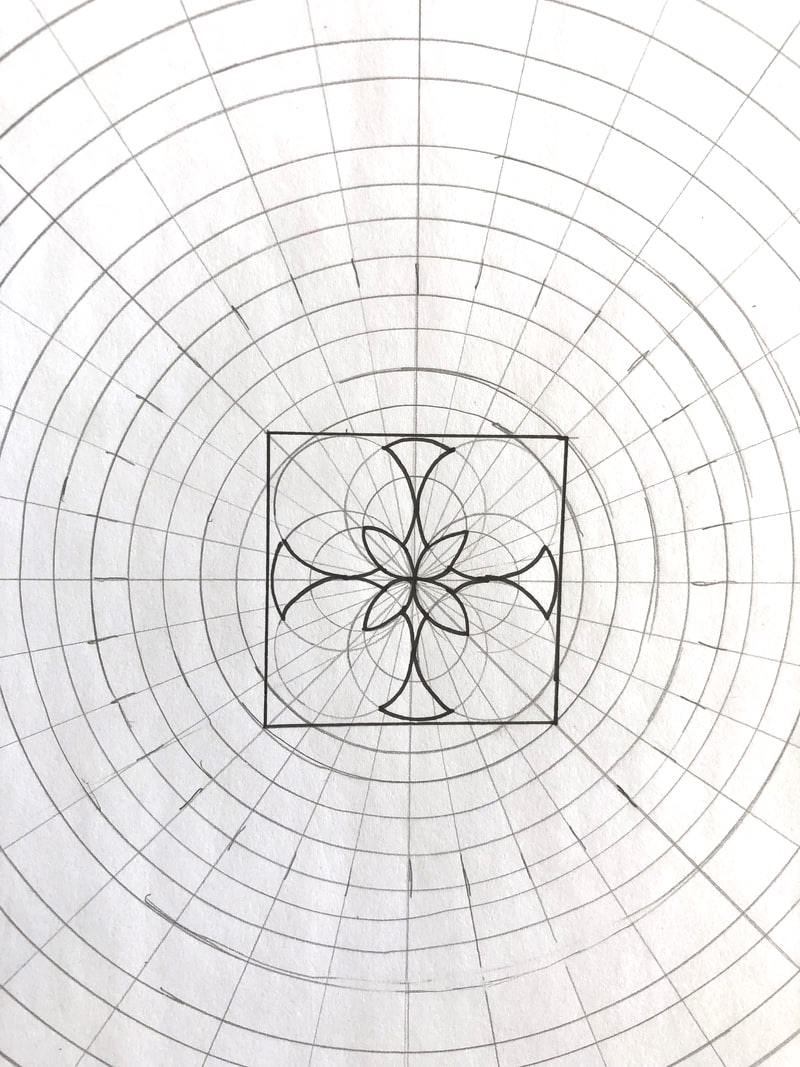
Keep on GoingNext, Stacey chose any elements she liked and placed them around the circle, using the guidelines to space them out equally. This Mandala Making Pinterest Board has a ton of gorgeous mandala elements for inspiration.
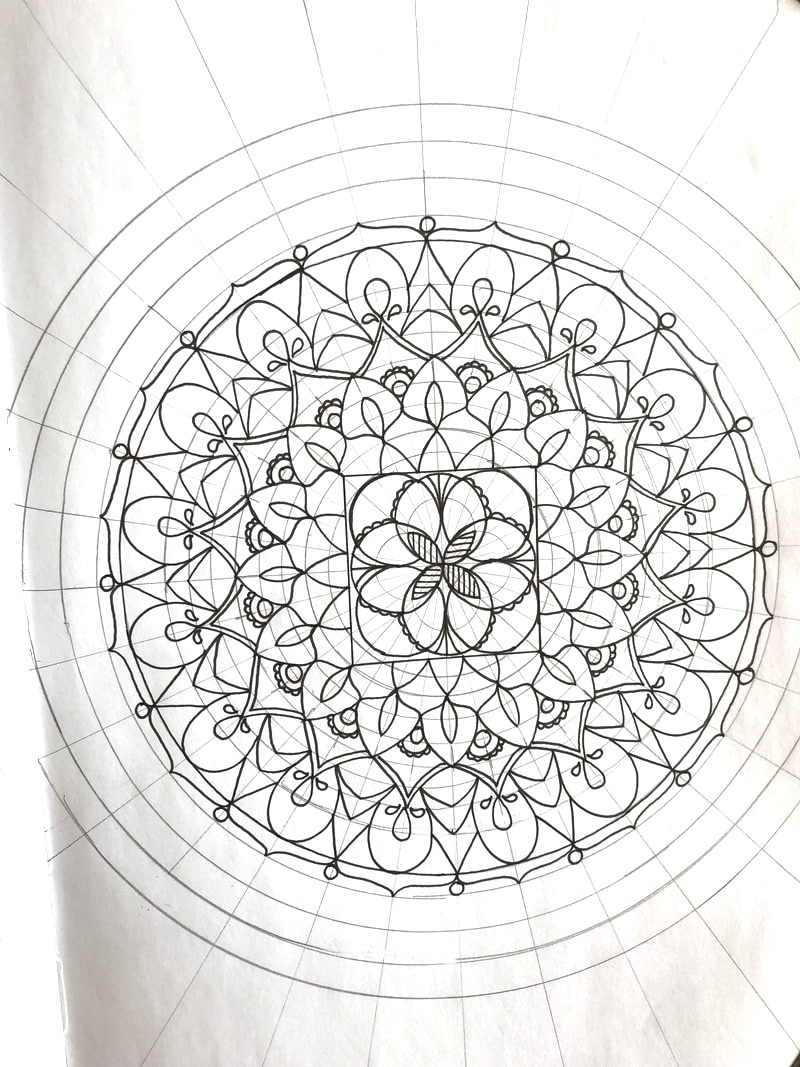
Shading, Outlining, Accentuating and TexturizingStacey explains that she turns away from the mandala and goes back to it so she can see where she needs to outline, accentuate, shade or texturize. While this isn't mandatory in the mandala making process, Stacey creates stunning mandalas using these techniques.
Stay in the MomentStacey suggests that you don't become overwhelmed with the big picture. Don't fret about mistakes. Just concern yourself with the exact element and row that you are working on. The mandala will unfold itself to you. If you would like to learn more from Stacey, visit her YouTube channel or check out her lovely Instagram account @thoselildetails.  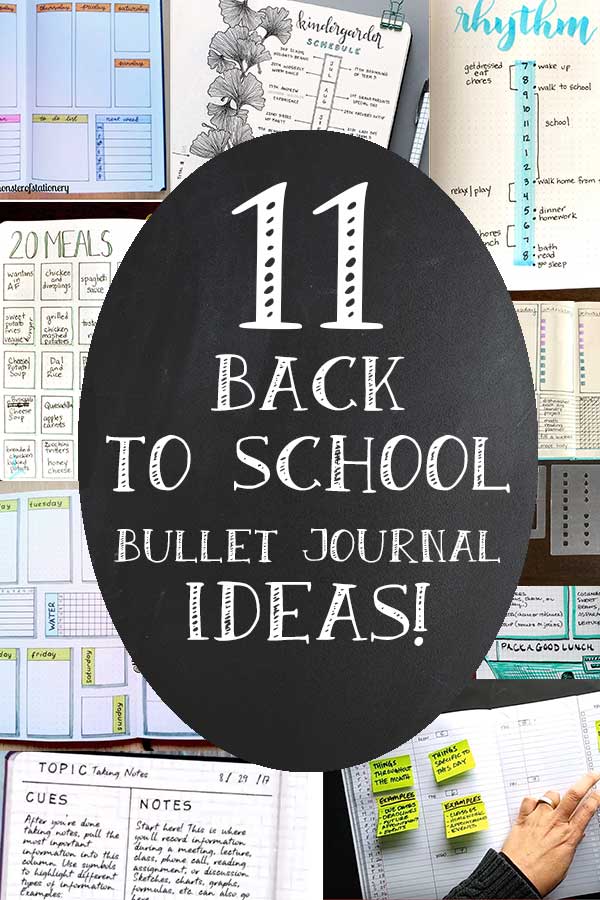
Summer is coming to a close and it's back to school we go! So grab your bullet journal and let's get organized. Join us in creating bullet journal layouts that will help you manage your family schedules, lecture study notes, activities, meals, playdates, deadlines, routines, appointments and school calendar, kid-friendly self-care layouts, homework trackers, chore trackers, a how to pack a lunch layout, and more!
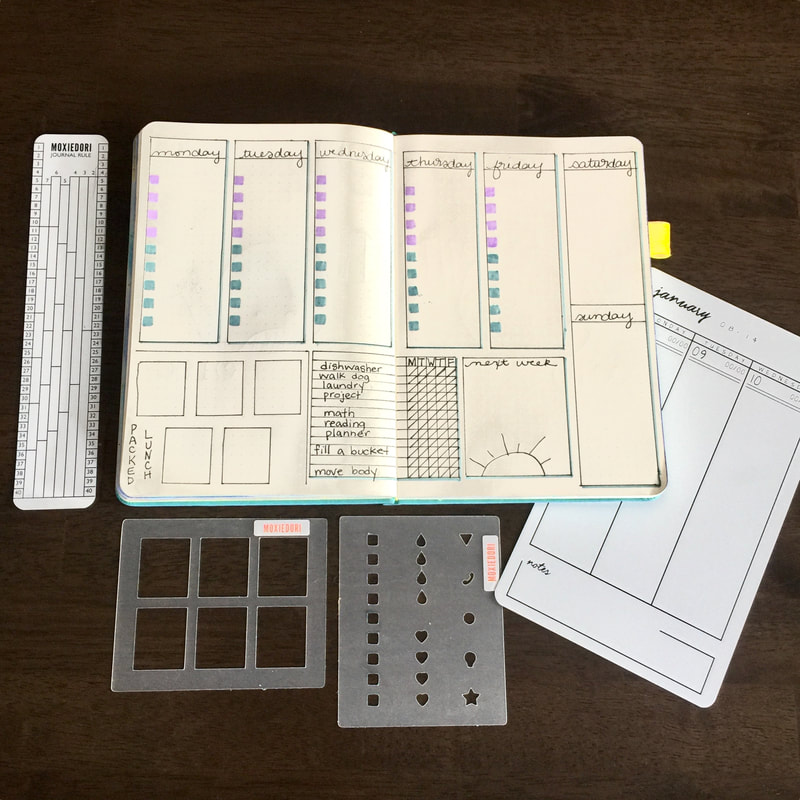
1. During the School Year Weekly Spread #1
This weekly spread combines the schedules of both the adults and children in your family. The basic vertical layout contains, organizes and tracks in one quick to make layout. Just place the Vertical Weekly Layout behind your page and trace the spread. Add color coded task boxes (lavender for me, aqua for the kids) and a packed lunch meal plan using the Mini Set of Stencils. Create a chore, homework and self care tracker for the whole family using the Journal Rule and you're good to go. You have it all covered and everyone is set up for success.
2. Future Planning for School
Never forget a school event again. I don't know about you but the school, classroom, and PTA calendars HAVE to be in one place or I inevitably make goofs. Who likes to make a Thing One costume the night before? Answer: No one. Kimmy Ly of BumbleCreated.com penned this simple and gorgeous yearly outline for her son's kindergarten year. All of the things in one place.

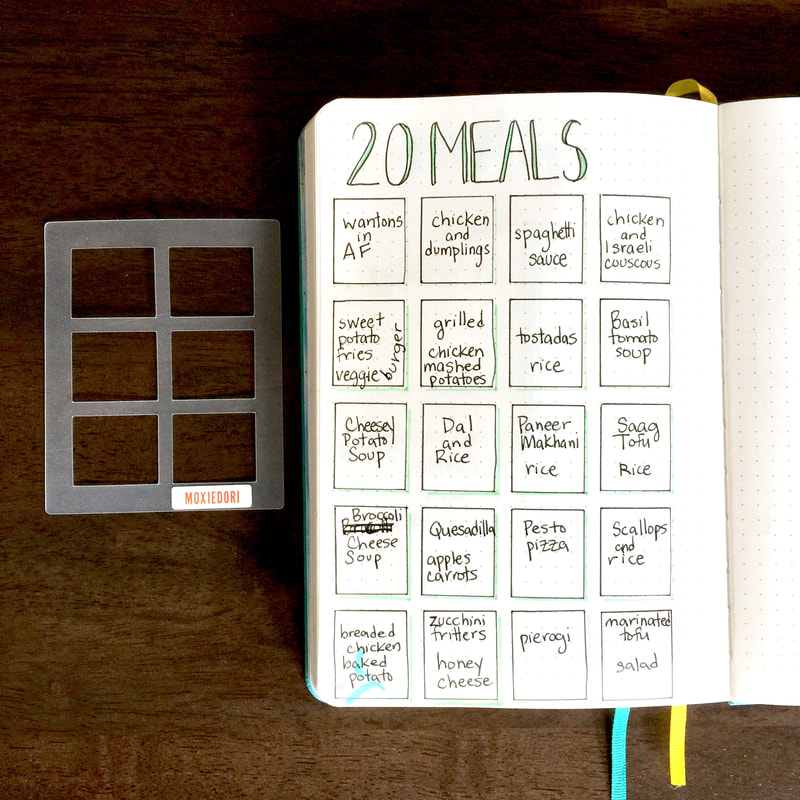
3. Flexible Meal Plan
If you know what you're having for dinner next Tuesday, more power to you. I, however, am not that person. This flexible meal plan layout contains 20 go to meals that I can choose from every day at 4:00 when I'm standing in front of my open refrigerator with the omnipresent question, "What's for dinner?"
4. During the School Year Weekly Spread #2
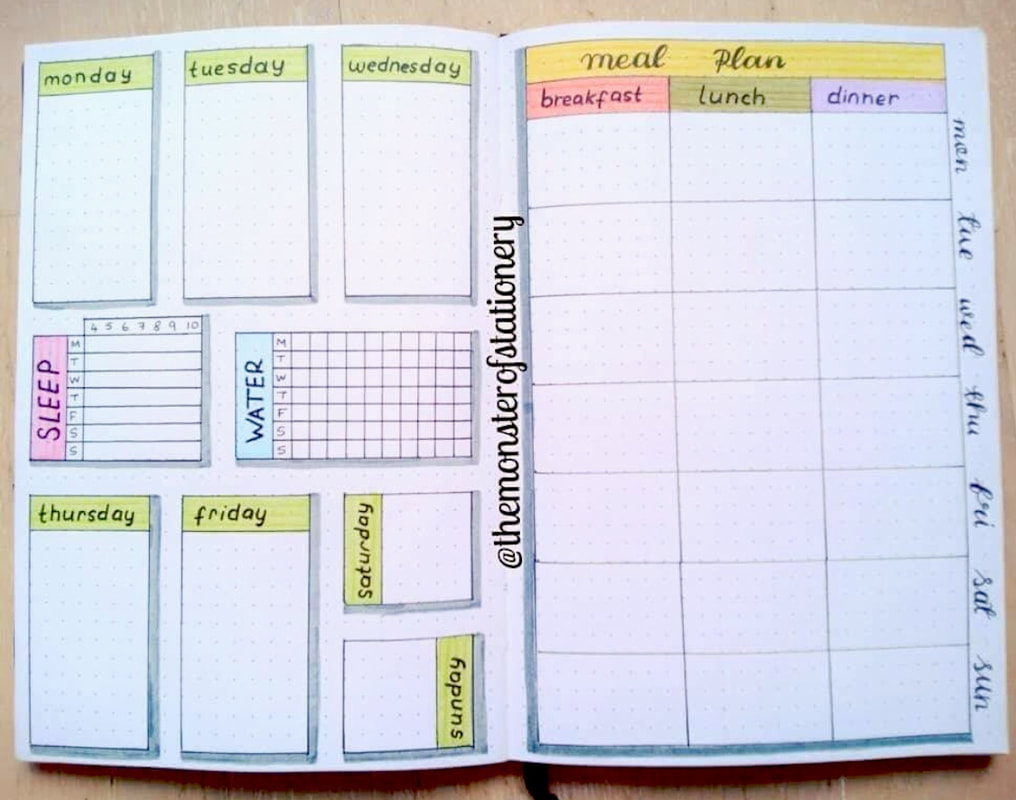
Di Lara @themonsterofstationery designed this weekly to include daily school notables, meal plans and next week. Everyone's information has a place on this two page spread and can be easily seen at a glance. The clean look and detailed sections of this layout makes it soothing and purposeful.

5. Self Care for Kids
The first week of school is a rough transition for the whole family. In times of stress, we turn to the book, "Have You Filled a Bucket Today?" This tender book teaches about compassion, self care and kindness. The "Fill Your Bucket" layout is an outgrowth of this book where my children can brainstorm activities or experiences that help them go back to center.
6. Student Planner made with a $1 Composition Notebook
Share your love of bullet journaling with your kids. They can make a bullet journal to keep track of their activities, chores, schedules, deadlines, homework, projects, volunteer time, reading log, sports activities and everything else in their busy lives. Click on the video below to learn how to use the Composition Notebook Stencil to create a bullet journal using a one dollar composition notebook.
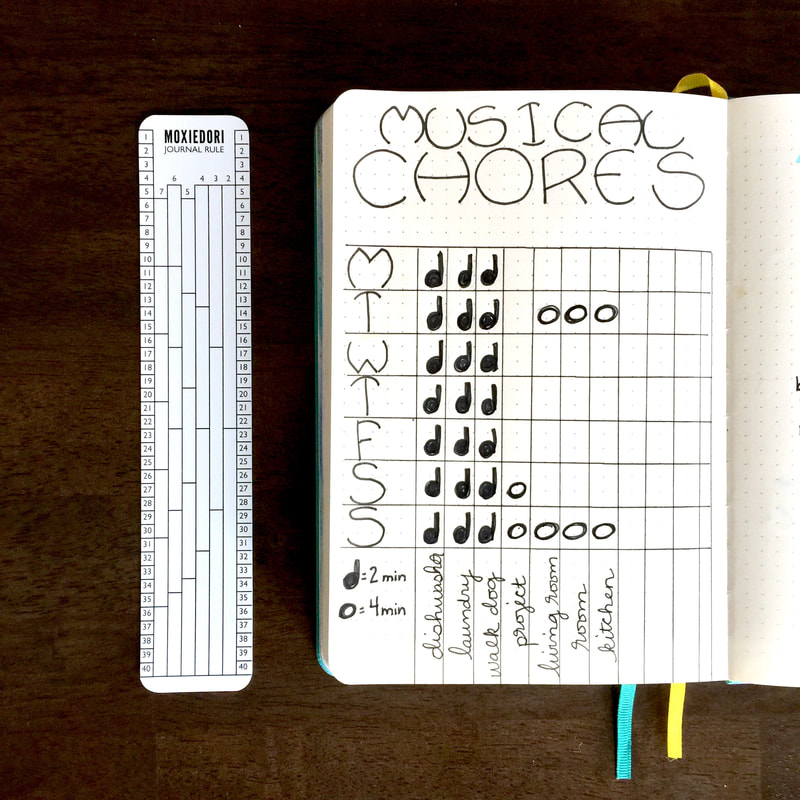
7. Kids Chore Tracker
Musical Chores is a spread designed for kids to see how much time is required for their chores. In my home, we do all of our chores to songs that the kids choose. They take turns picking a song. When the song is over, the chore is abandoned. (Usually we have time to spare.) The half note represents half of a song and the the whole note represents an entire song. In doing this, the kids have input and control while knowing that there is an end in sight. Seeing the chart helps to reassure them that the chore list has a definite end and they know beforehand how much is expected of them. It's been a game changer for our house. The MoxieDori Journal Rule makes creating this and similar chart layouts quick and easy.
8. Meal Planning Weekly Spread
Di Lara @themonsterofstationery has created this compact meal planning weekly spread. Organizing a meal plan ahead of time removes some of the pressure from the dinner time hour. Once things are written down, you can grocery shop knowing what dishes you are making that week. When you get home from work and school, you'll know that the ingredients and recipes are all ready for you. Your family can make dinner together and chat about your day.
9. Daily Rhythm Time Blocking
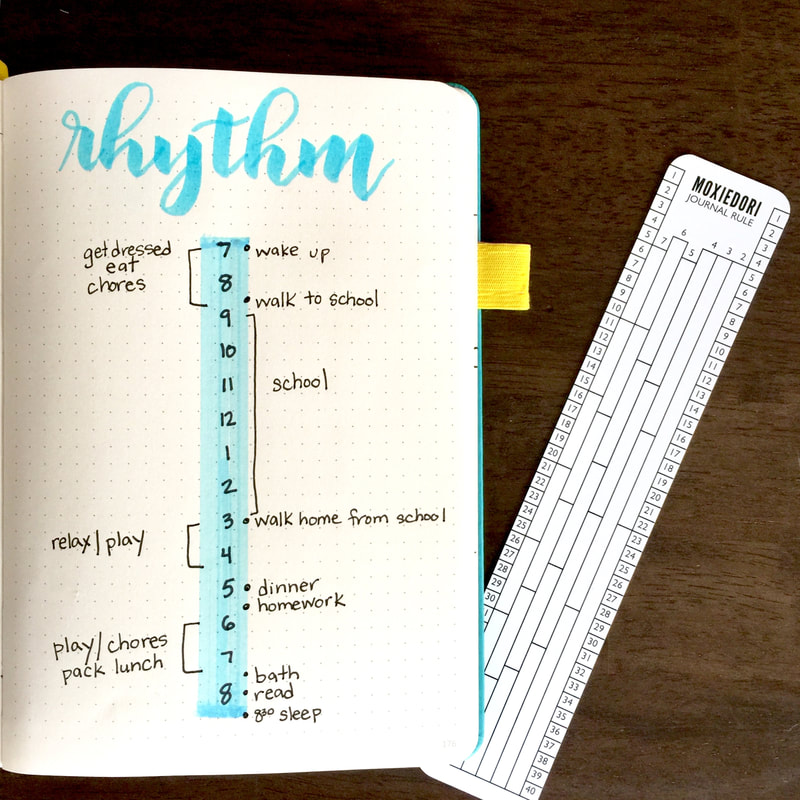
As a teacher and a mother, I find that children understand things better if it is written down. Time is definitely one of those things. Creating a "Rhythm of the Day" layout has helped my children to understand that we are under time constraints. We have a schedule to keep, places to be, and deadlines to meet. We all have to be mindful of how we are spending our limited time to make sure that we aren't stressed when it is time to transition to a new event. Tools used: MoxieDori Journal Rule and Brush Lettering Tracing Strips.
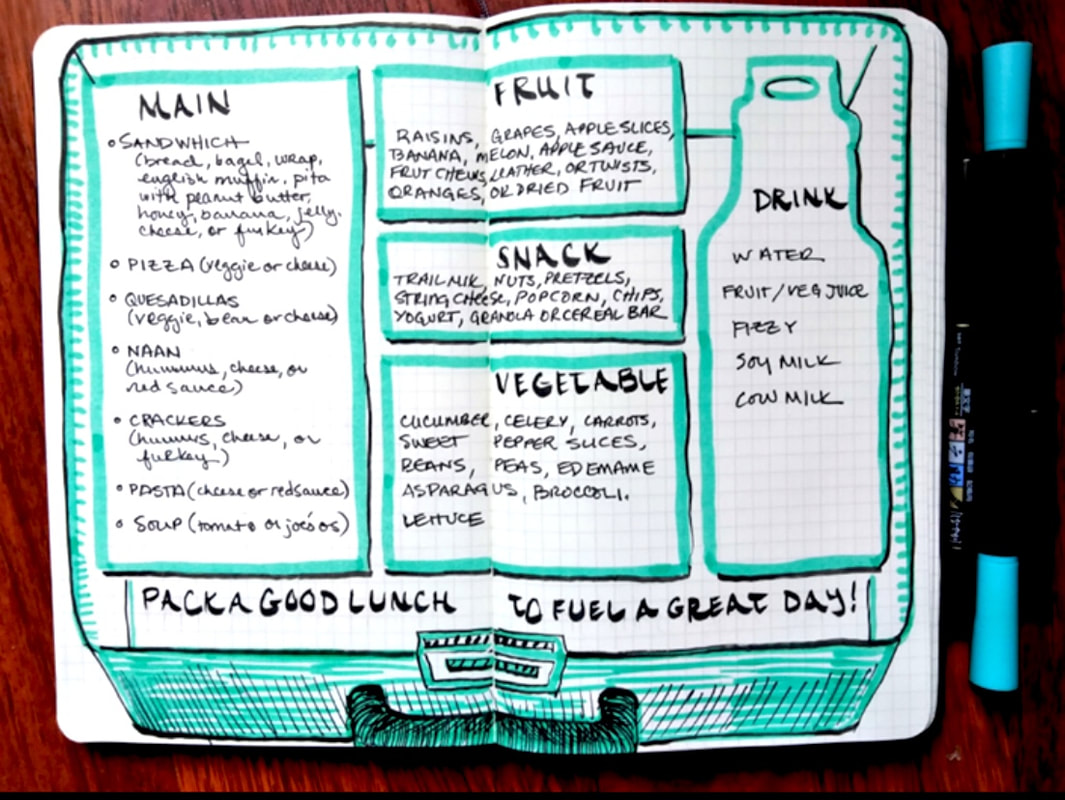
10. Packing a Lunch Graphic
Teach your children how to pack their own nourishing lunches by creating a Packing a Good Lunch Graphic. Provide them with choices that are best for your family. We pack our lunches the evening before to avoid rushing in the morning. Treat yourself and pass along this chore.
11. Student Note Taking
Students need to be overtly taught how to take notes. The Student Planner Note Taking Stencil was designed to create note taking layouts based on the Cornell Notes Method. Using this method, students will learn a proven, methodical, consistent way to take notes during class, phone calls, business meetings or lectures. The video below demonstrates how to set up this note taking layout.
Back to School can be an easier transition with a little bit of preparation. Including the whole family in the process will increase their ownership and participation. It will also provide everyone with tools they can use to control situations that feel out of control. Check out the MoxieDori Back to School Bullet Journal Pinterest Board.
If you'd like to learn more about bullet journaling, we host a great bullet journaling FaceBook group called Bullet Journaling Tips and Tricks. We'd love to have you join! We also have a Beginning Bullet Journal blog post for folks who want to learn the basics. Enjoy! 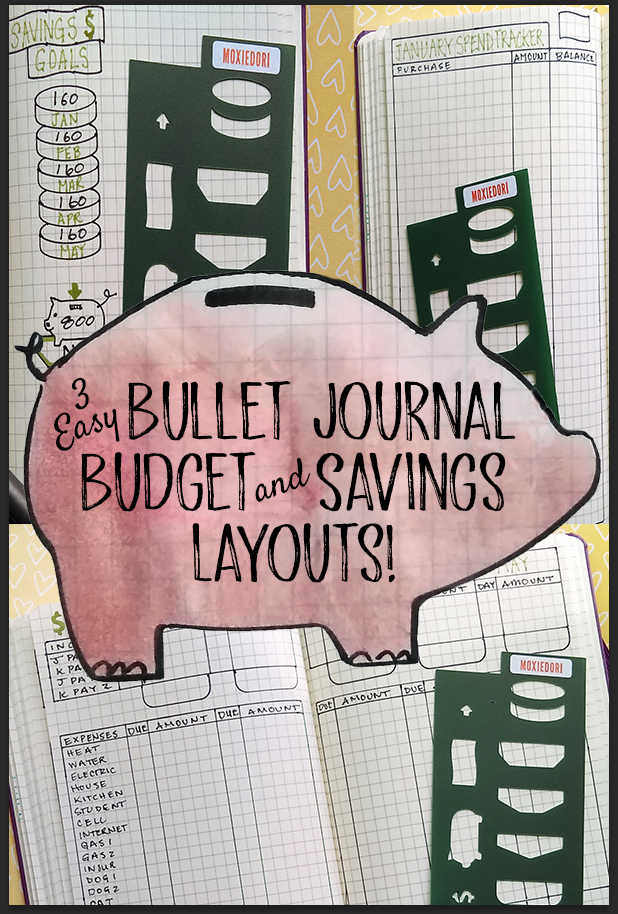 Use these quick and easy journal spreads to plan your budget and get a handle on spending for the new year.
Income Section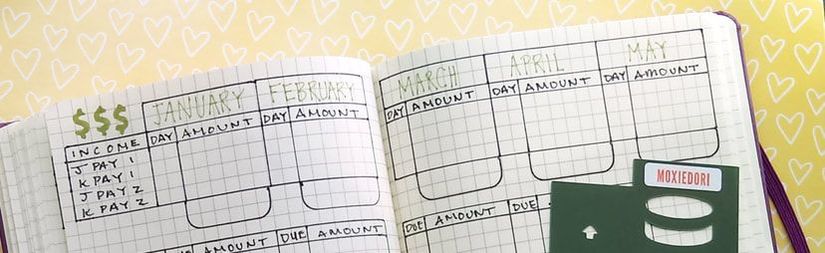 https://www.moxiedori.com/store/p58/BudgetStencil.html Expenses Section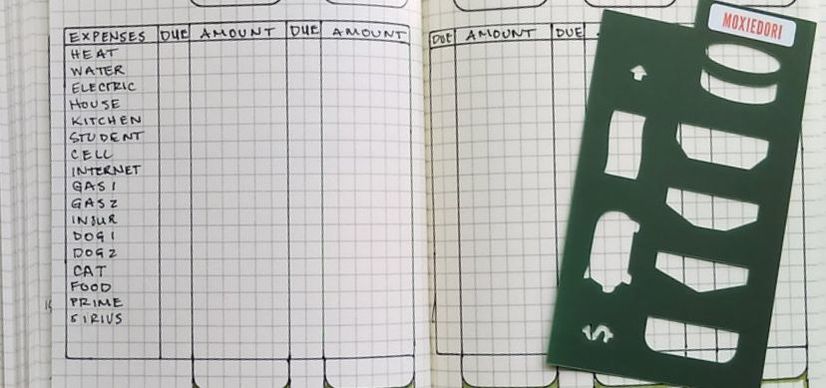 Use the longest edge of your stencil to create a header row, one row for each reoccurring monthly bill, and one or two blank rows for any additional reoccurring expenses that may arise over the next few months. Continue the rows across the spread to the right, to reflect five months. Add the total shape from the stencil to the bottom of each amount column. Record estimated or actual bill amounts, then total the amounts column for each month. Budget Section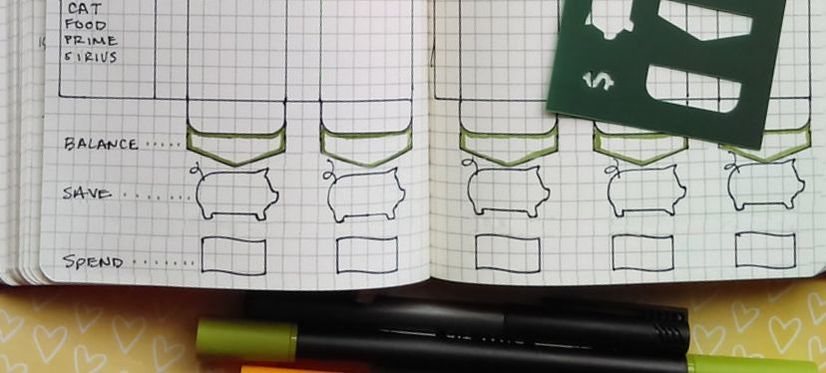 Add a different total shape from the stencil under each total from the Expenses section. Subtract the Expense total from the Income total and record the balance amount for each month. Saving Towards A GoalUnder the balance total, choose an amount you'd like to set aside in savings, and record that amount inside a stenciled piggy. This could be a random amount or an amount you want to save towards a specific goal that you identify by creating a Savings Planner Spread on a subsequent page in your journal. Here's an example of a Savings Planner Spread we created using the same MoxieDori Budget Finance Stencil. Simply divide a large financial goal by the number of months within which you wish to reach it. 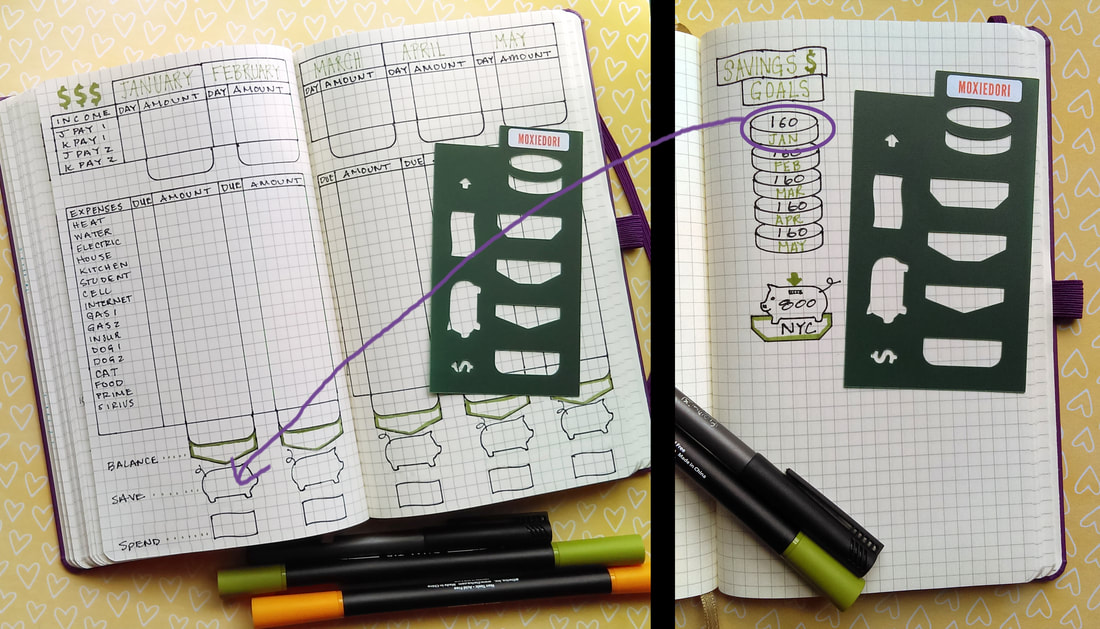 Tracking What You SpendSubtract the amount you want to save from the balance total on your Budget spread, and record the remaining amount in a stenciled dollar to represent how much money remains available for general spending each month. You can use this figure as your limit at the top of a Monthly Spending Tracker you can also create using the the MoxieDori Budget Finance Stencil! 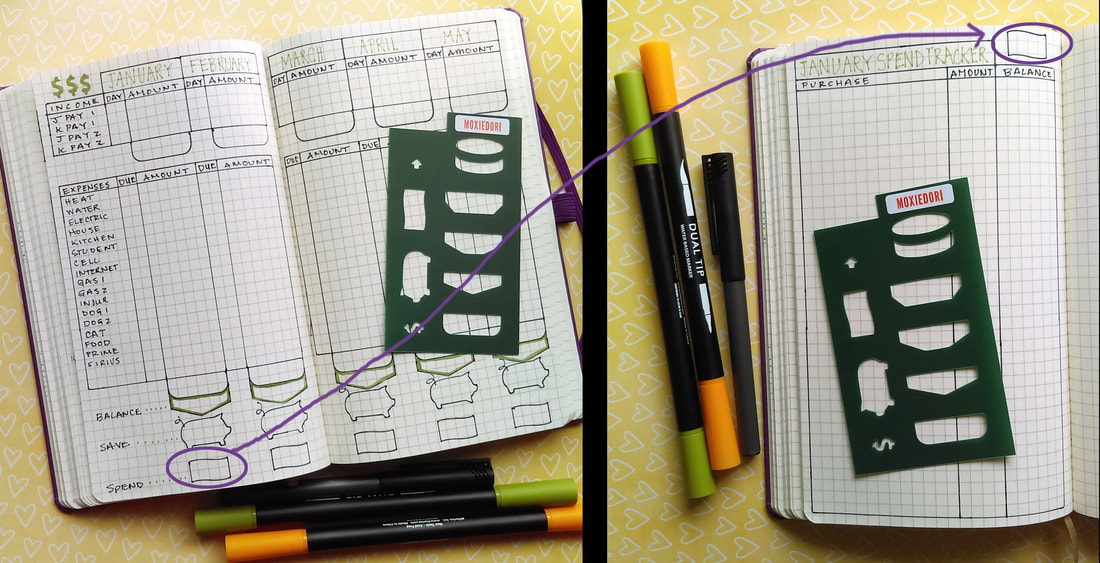 Wishing you all a prosperous, healthy, happy 2018! ~ Love, MoxieDori 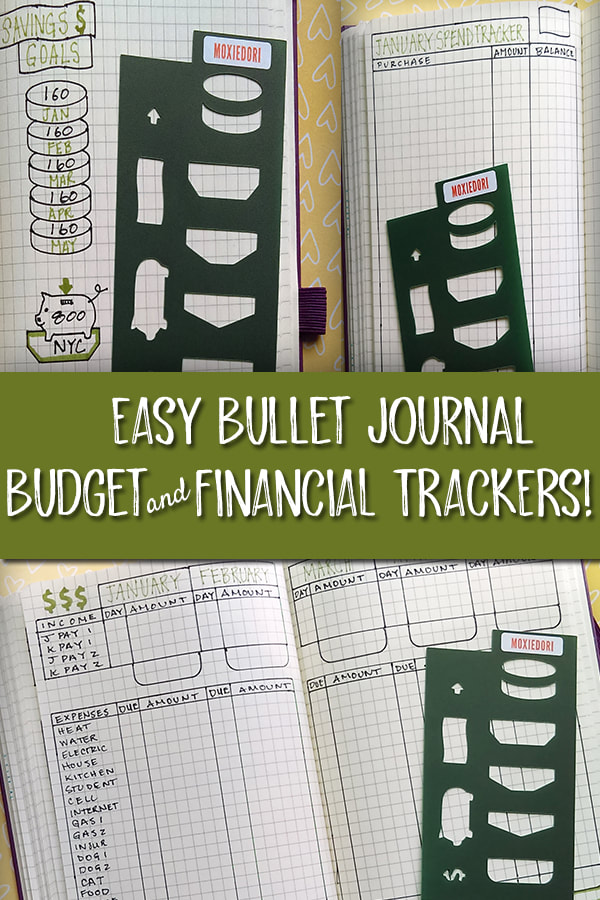 Many of our customers have started creating recipe journals with our stencils. Some have recently expressed worry about spilling and splattering on their lovely finished recipe layouts and wondered if there was any way to protect them. This is the sort of challenge I love. So, my goal was to come up with a solution that used common, inexpensive, items many would already have in their homes that would do the trick AND store simply in the back of the journal until needed. Even better, this little ditty takes 3 minutes tops, requires only a permanent marker, a single sheet protector (the kind used in a 3-ring binder), scissors or an X-Acto knife, and maybe a ruler. The end result is a handy little drop-in protector that keeps your pretty recipe layouts from getting sauced. It's easily stored in the back of your journal and won't distort your pages. Ready to make one of your own? Check out the slide show below! You're smart and creative - your journal can be too! Find decorative and technical stencils, tabs, inserts and more designed specifically for journalers like you at www.moxiedori.etsy.com! Have you ever had a section of pages that you want to keep in your journal, but don't want to have to flip through in order to get to the pages you're actively using? You don't want to permanently get rid of them, and solutions like paper clips, binder or bully clips, washi tape page edges, tabs, multiple ribbon bookmarks, etc. are all possible solutions - but sometimes they add such bulk or take so long to implement that they're not ideal for everyone. I came up with a very simple solution that takes 3 minutes tops, requires only a single sheet of paper, scissors or an X-Acto knife, maybe a ruler, and some tape. The end result is a handy little sleeve that groups archive-ready sections of your journal, providing a visual placeholder when your journal is closed without adding bulk or sticking out beyond your cover. It's easily removable, quick and easy to create and install, and won't damage your pages. Ready to give one a try? Check out the slide show below! You're smart and creative - your journal can be too! Find decorative and technical stencils, tabs, inserts and more designed specifically for journalers like you at www.moxiedori.etsy.com!Nearly three years ago, when Amy first introduced me to the traveler's notebook / planner / bullet journal world, I thought, "Huh?" Yet today, thanks to my journal, I'm able to aptly manage three (yes, three!) small businesses, two children, three pets, a .husband, and a house. However, like many others, I seriously struggled with HOW to incorporate this awesomeness into my life. It took well over a year and a lot of experimentation with different systems, books, sizes and styles to finally find my fit: but now I've found it, and it's marvelous. So, I thought I'd share with you the EXACT RIGHT WAY TO BULLET JOURNAL. Ha, ha, ha. No. Really, I've come to believe there's no one right way to journal, except for the way that ends up working for you. But what I will share is what worked (and what didn't) for me and why, and maybe it will help some of you along too. SuppliesYou don't need to go out and drop $20 on a bound book, or a fancy Traveler's Notebook cover and inserts, or a binder/planner at your local craft store. Eventually, once you've found your groove, you can treat yourself to something nice if you want. But in the beginning, all you really need is a basic composition notebook, and a pen. A ruler can help too, but isn't essential. We're not going for perfection here. Who cares if every line isn't straight? Consider this your practice journal. Use it daily, Use it in different ways, experiment with how you most naturally and productively record information, Journal, in fact, like nobody's watching. Because nobody is. Your journal is yours. Sharing pics online is not a prerequisite. If you start in something forgiving, you'll avoid the intimidation of "ruining" something you spent a chunk of money on and instead enjoy the process learning how to journal. Where do I start?Work with the end goal in mind. The point of journaling is to have all things recorded in one place. All. The. Things. So your planner/calendar, thought journal, sketchbook, receipts, lists of movies/books/podcasts, meeting/class notes, contacts, every post-it on your desk, gift ideas, etc. all portable; all organized; with you at all times. My advice is start with your calendar because the more you habitually go to your journal to find out where you're supposed to be or whether you're available when scheduling something new, the more you'll make sure to take it everywhere and start recording the other types of information in it too. Planner layouts or spreads [A layout takes up one side of a page. A spread takes up two pages that face one another.]There are lots of examples of yearly, monthly, weekly, and daily layouts online. Try making and using a variety to see what fits your lifestyle needs. You don't have to use them all - for example some simply start with a yearly for reference and then make 52 weekly spreads and that's all they need to record their appointments and tasks. Others commit to a yearly followed by 365 daily layouts so that, in addition to appointments and tasks, they have room for decorating or journaling their thoughts or feelings. Some throw in a monthly spread every so often so they can see the most important information at a glance and plan accordingly. Really, you just have to try them all and see what works for you. Keys & IndexesThe traditional approach to Bullet Journaling, presented by Ryder Carroll, proposes that we all use the same system of symbols [called a Key] to visually differentiate a task from an event from an idea, etc. Have a look at it and try it out. If you find that it takes a whole lot of effort to remember which symbol means what, requires that you write them down somewhere in your journal, and then flip back and fourth to look at it, it's okay to use a modified, much simpler version instead. Really. The traditional Bullet Journal method also suggests the use of an index; a table of contents if you will, that notes where in your book something occurs. Every page then needs to be numbered, of course, so that you can reference the page number when you add a new item to your index. It's okay to use tabs, pieces of folded over washi tape, markered page edges, separate inserts if you're using a Traveler's Notebook system, etc. to create sections for different types of information within your journal. You don't have to use an index. Trackers, Lists, Collections, etc.After your calendar/planner is in place, the rest of your notebook can contain other things like those mentioned above; collections, trackers, creative brainstorms, notes, lists, etc. There are also lots and lots of examples of these types of spreads as well. Google something like, 'journal house cleaning tracker' and you'll see there's no reason to reinvent the wheel. Fabulously creative people have already explored a variety of ways to plan out the space on a page and do what you're aiming to do. All you have to do is copy it and try using it. If it fails to work well for you, try a different variation and see if that works better. Not everyone's brain works the same, so it makes sense that different people need to organize information in different ways. Bullet Journaling & Planner AccessoriesOnce you find your groove, are using your journal daily, and are amazed at how much more productive you are for it, you can add on another level of enjoyment with accessories. Things like washi tape, stencils, stamps, bookmarks, pockets, dashboards, colored pens, and more can help you create the layouts you like faster, add decoration and a creative touch to your spreads, help you organize specific information even more efficiently, or make your setup more visually appealing so that you enjoy this fabulous tool even more. Using your journal for a little bit of creative expression can be a great way to relieve stress check in with yourself about how you spend your time, set goals, celebrate accomplishments, etc. There are many, many artists and small businesses on etsy who research and develop product just for the journaling community. Overall, enjoy the journey. Check Out the MoxieDori MoxieBox Beginner Journaling KitWe Wrote a Quick & Easy Guide Just For Those New To Bullet Journaling & Put It In a Box With All Sorts of Starter Goodies!  Sometimes we find solutions that are so simple and cover so many bases. For me, this project falls into that category. Basically, I needed to solve a few things regarding my TN journal planner setup:
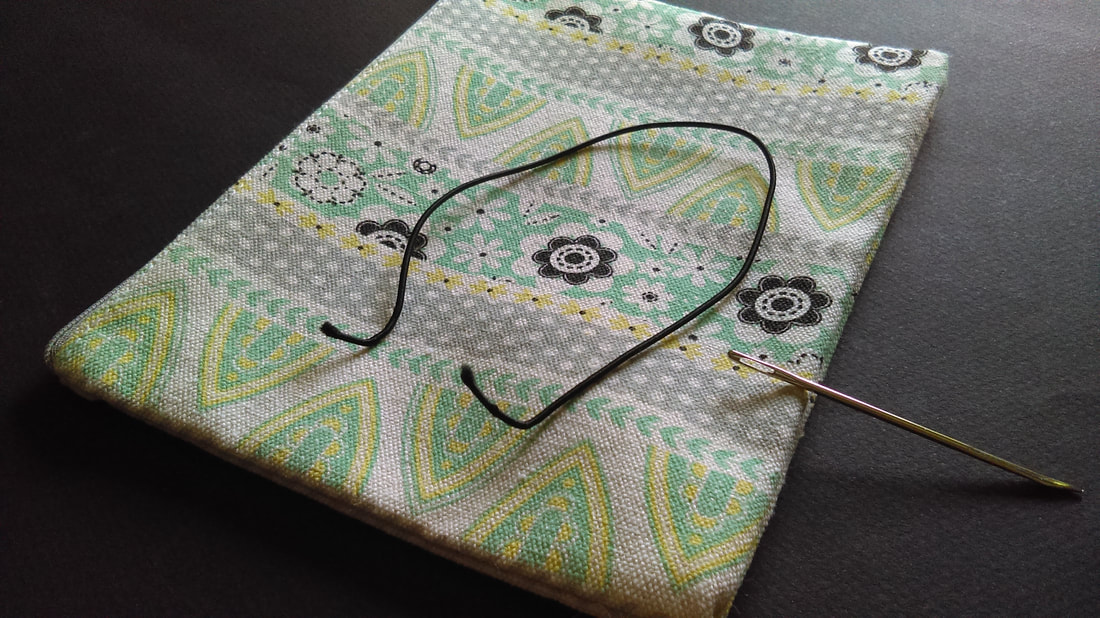
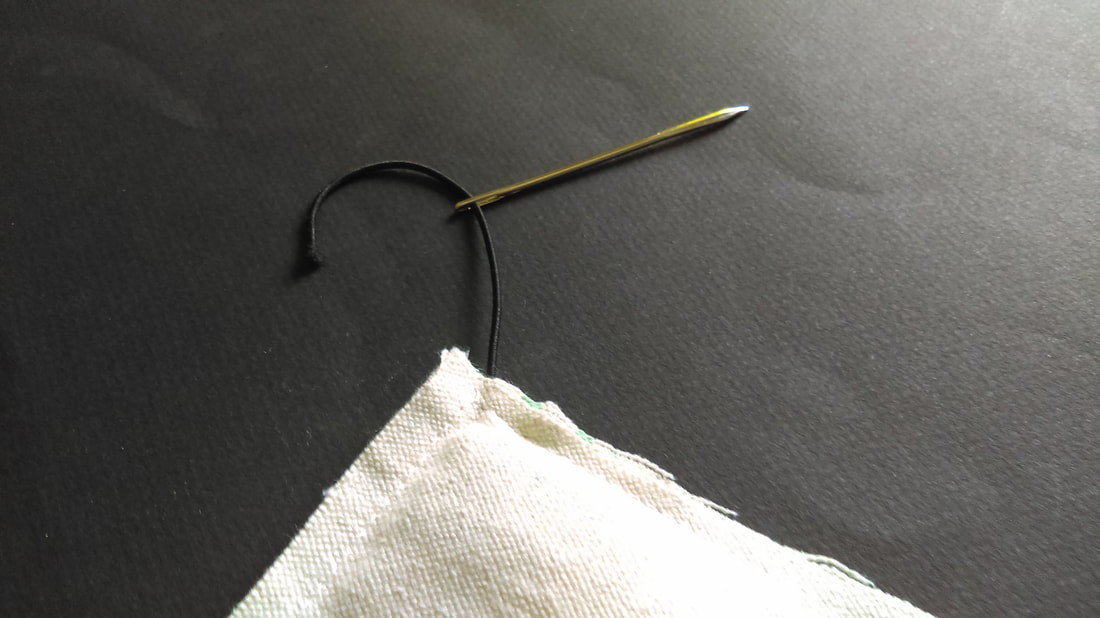
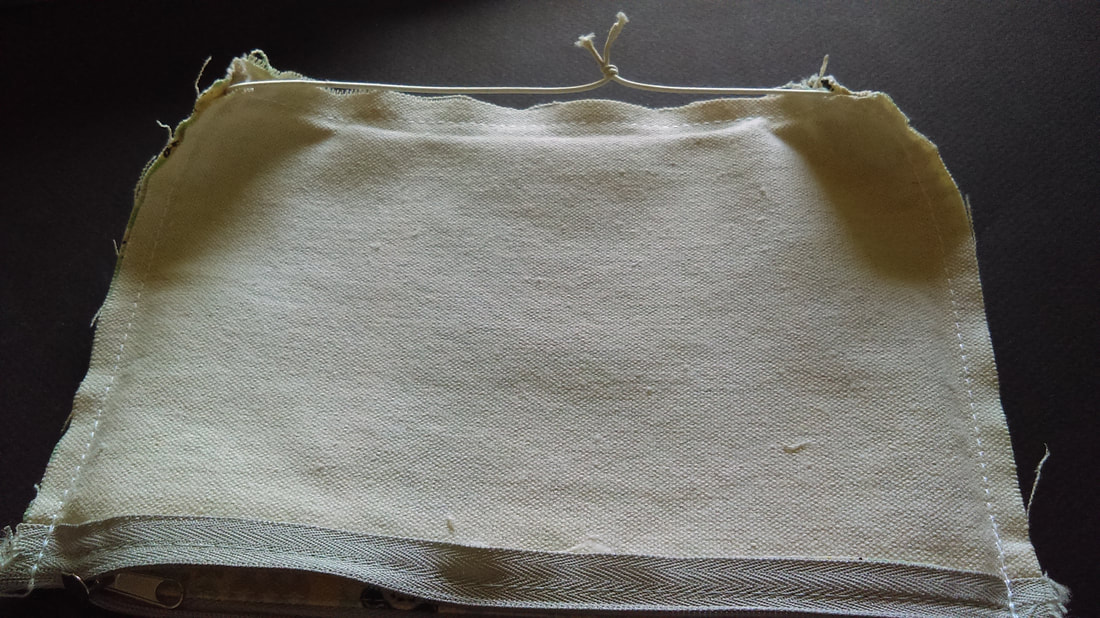
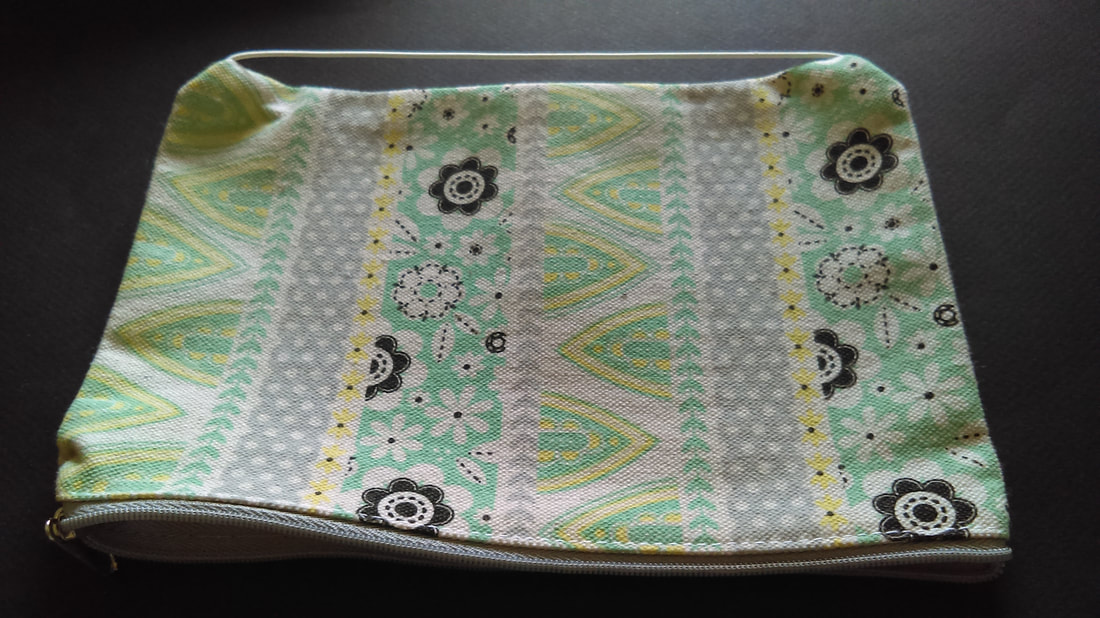
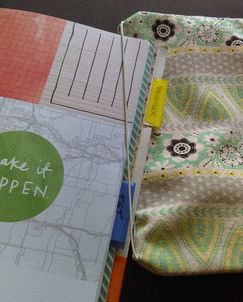
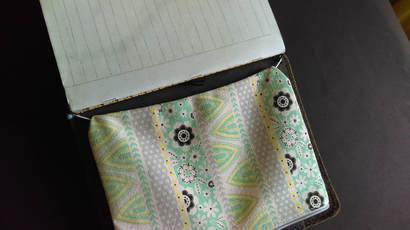
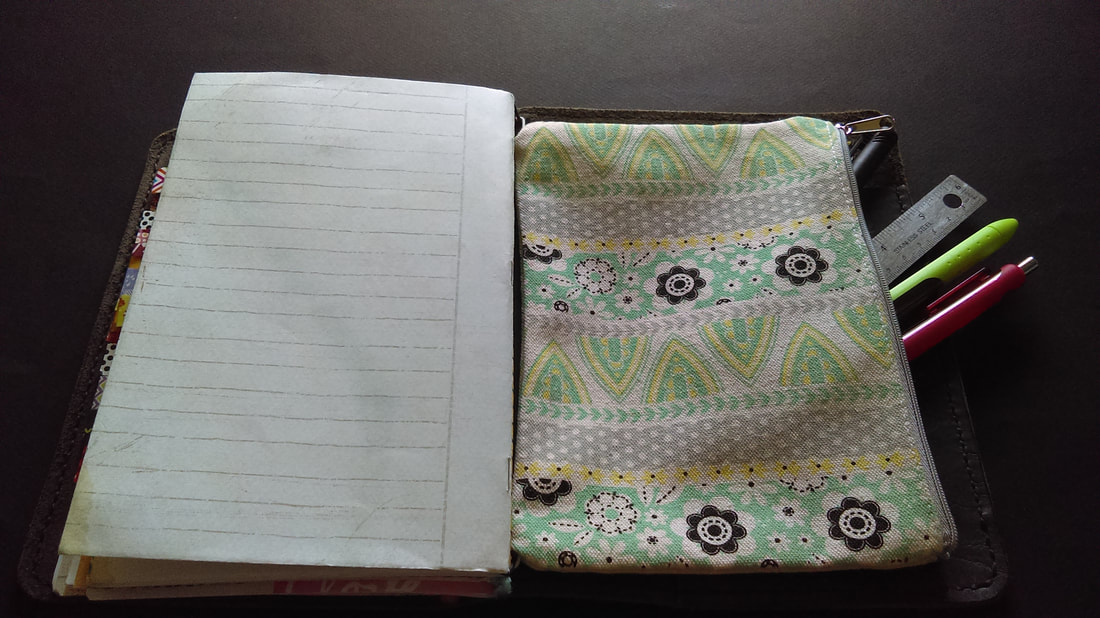
A recent trip to the local dollar store landed me this cute cotton canvas zippered pouch that looked like it might be just the right size to fit inside my Half-Letter TN. Converting it into an insert was super simple and it turned out perfect. Here are the steps I used so that you can track one down and make your own. 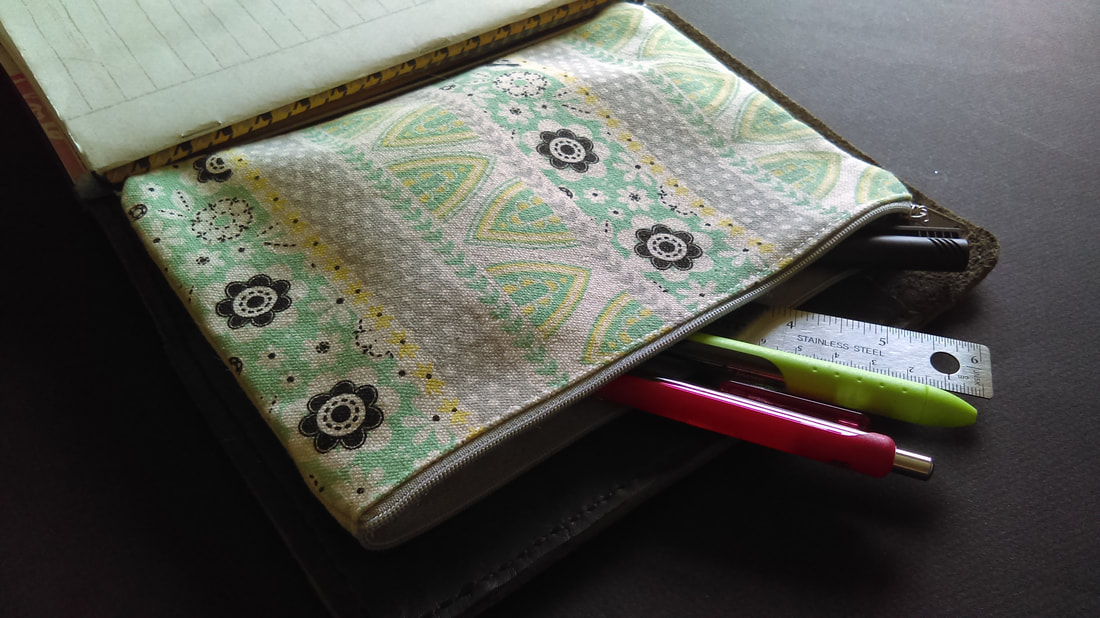
* P.S. One could totally stash their MoxieDori stencils in there too!
  Hi, I'm Kris and I'm approximately half of MoxieDori. This little adventure got off to such a rapid start that we haven't even shared how it all began. I finally have a little time, so… it's time!
MoxieDori is actually the brainchild of my business partner and friend, Amy. She lives a few blocks away from me and she's been a fellow etsian and mother of small children alongside me for the last seven or eight years. Amy is a marketeer-turned educator-turned artisan-work-from-home-mom and is as genuinely nice as folks come. I'm a graphic designer-turned educator-turned artisan-work-from-home-mom as well, so we've always had a nice bit in common. November of 2015, Amy came to me with an idea she wanted to make a reality. Having spent time in Japan and being fond of all things orderly and lovely, she had been exploring the bullet journaling phenomenon which uses planners and notebooks such as Midori Traveler's Notebooks, Field Notes, Filofax and Moleskine . She noticed a need for reusable, functional and decorative stencils specifically designed with the needs and interests of journaling enthusiasts in mind. So, was there a way to make what she envisioned? Well, we're both fortunate she asked me after a few glasses of wine. Initially, I came on board as a designer but bringing a product to market is much more complex than just deciding what it should look like. If you're curious about starting your own product-driven business and want to get an idea of what's involved, I made a little doodle about just that. Eventually, after many logistic, operations, marketing, production and fulfillment hours, Amy and I went into business together, forming MoxieDori, and released over forty different stencils within our first four months. We love the enthusiasm, creativity and support we've found within the journaling community. In addition, we've both heavily incorporated journaling into our own lives - I cannot imagine managing my small businesses without mine! Thank you for cheering us on, providing great feedback and sharing all the wonderful ways our minds come to life via pen and paper. Kris Williams MoxieDori |
FollowIndex
September 2023
|


 RSS Feed